Recently I started playing around with Terraform and I got very excited with how easy and fast it is to provision new resources, especially when someone wants to try out things. Using a file that contains a few lines of code and a few simple commands, new resources can be created; then, when the resources are not needed anymore, they can be easily deleted.
So, let’s get started with the basics.
What is Infrastructure as Code (IaC)?
Infrastructure as Code (IaC) is the managing and provisioning of infrastructure through code instead of manual processes. This approach offers a lot of benefits, as new infrastructure can be provisioned faster and with better consistency, since those files are the single source of truth. Furthermore, there is full traceability of the changes each code file imposes.
There are several tools to use in order to implement infrastructure as code for Azure solutions, such as Azure Resource Manager (ARM) templates or Bicep. However, Terraform has started appealing to me more and more, given that it provides the same way of working for multiple environments and it is really easy to get started with.
So, what is Terraform?
Terraform is an open-source infrastructure as code software tool that allows you to build, change and version infrastructure safely and efficiently.
It generates an execution plan, describing what it will do and asks for approval before making any infrastructure changes. This allows the review of changes before Terraform creates, updates or destroys infrastructure. Another important benefit of using Terraform is that it supports multi-cloud scenarios, so a developer can use the same tool to manage resources of different cloud providers.
To start working with Terraform, I strongly suggest you have a look at the Get Started guide, available on their website, which provides a quick overview of the basics regarding installation, main commands and state to keep track of metadata.
Let’s get started with an example
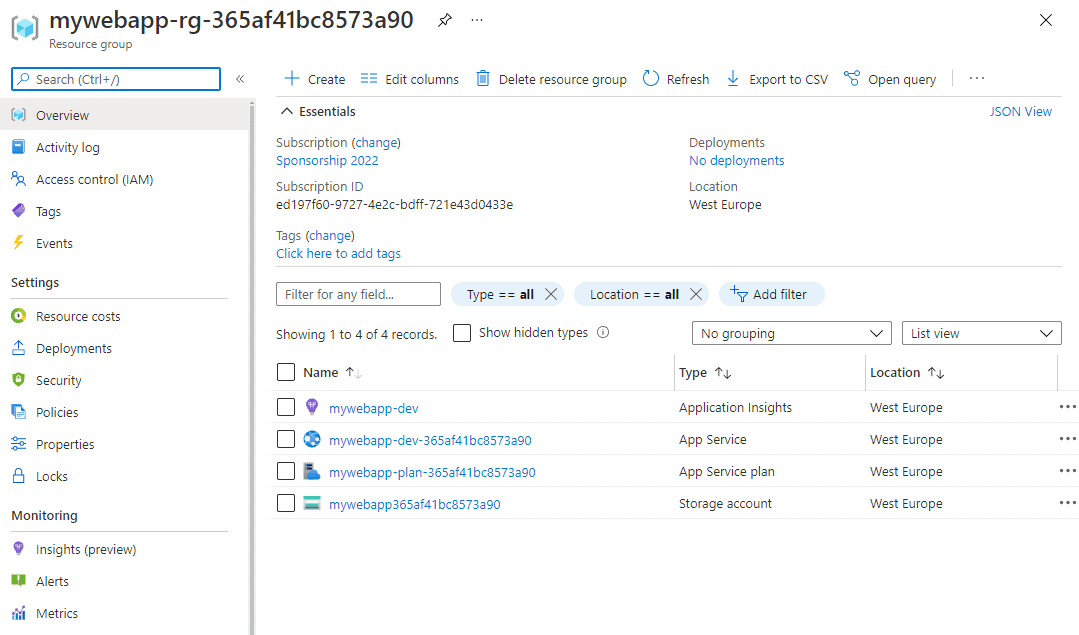
Using the configuration file below, the following resources can be provisioned on Azure:
- an Azure app service plan;
- a storage account and a blob container;
- Application Insights; and
- an Azure app service that is using .NET framework 5.0, a startup command, a few settings, and that is connected with the Application Insights and the storage account created above.
How to run the file to provision the resources
In order to provision the resources described in the .tf file please follow these steps:
Step 1. Download the file
Download the file and store it in a folder. Let’s assume that the folder is under this path: D:\Workspace\IaC\.
Step 2. Login to Azure and select the subscription to use
In case you are not logged into an Azure account, please use the Azure CLI and terminal to login and set the desired subscription as default, using the following commands:
# follow instructions to login to portal
$ az login

# list all available subscriptions
$ az account list -o table

# change default subscription
$ az account set --subscription "<subscription>"
Step 3. Initialize and run the script
While you are at the directory where the .tf file is stored, the init command terraform init needs to be run first to initialize the working directory containing the Terraform configuration files:
D:\Workspace\IaC>terraform init

Initializing the backend...

Initializing provider plugins...
- Finding latest version of hashicorp/random...
- Finding hashicorp/azurerm versions matching "2.46.0"...
- Installing hashicorp/azurerm v2.46.0...
- Installed hashicorp/azurerm v2.46.0 (signed by HashiCorp)
- Installing hashicorp/random v3.1.0...
- Installed hashicorp/random v3.1.0 (signed by HashiCorp)

Terraform has created a lock file .terraform.lock.hcl to record the provider
selections it made above. Include this file in your version control repository
so that Terraform can guarantee to make the same selections by default when
you run "terraform init" in the future.

Terraform has been successfully initialized!

You may now begin working with Terraform. Try running "terraform plan" to see
any changes that are required for your infrastructure. All Terraform commands
should now work.

If you ever set or change modules or backend configuration for Terraform,
rerun this command to reinitialize your working directory. If you forget, other
commands will detect it and remind you to do so if necessary.

D:\Workspace\IaC>
Then, the plan command terraform plan to create an execution plan:
D:\Workspace\IaC>terraform plan

Terraform used the selected providers to generate the following execution plan. Resource actions are indicated with
the following symbols:
  + create

Terraform will perform the following actions:

  # azurerm_app_service.webapp will be created
...

Plan: 7 to add, 0 to change, 0 to destroy.
And, finally, the apply command terraform apply to execute the actions proposed in the Terraform plan:
D:\Workspace\IaC>terraform apply

# or if you want to use custom values
D:\Workspace\IaC>terraform apply -var="name=<your_name>" -var="region=northeurope"
After a few seconds, you will be asked if you want to continue executing the plan described in the previous step.
Once you answer yes to the prompt command, all the resources will start being created in the Azure account you have previously logged in.
Step 4. Clean Up
To delete all the resources that have been created and go back to previous state, just run the destroy command terraform destroy and, in a few minutes, all previous changes will be cleared. After that you can start all over again.
D:\Workspace\IaC>terraform destroy