HTTP/2 is a major revision of the HTTP network protocol used by the World Wide Web and comes with a promise to make our applications faster, simpler, and more robust by allowing us to undo many of the HTTP/1.1 workarounds previously done within our applications and address these concerns within the transport layer itself.
In this post, we will showcase how simple it is to enable HTTP/2 protocol support for our applications running on Azure App Service or Azure Function, but first let’s start with some basics.
What is HTTP/2?
HTTP/2 is an overdue upgrade to Hypertext Transfer Protocol, the basic protocol that handles connections between a web server and your browser. It is extending, not replacing, the previous HTTP standards and no changes were made to the offered functionality or core concepts such as HTTP methods, status codes, URIs, and header fields.
HTTP/2 modifies how the data is formatted (framed) and transported between client and server, in order to focus on security, reduced latency and better performance.
For more info you can read the following articles:
Why HTTP/2?
HTTP/2 has some benefits over HTTP/1.x, such as:
- It is binary, instead of textual
Binary protocols are more efficient to parse, more compact “on the wire” and, most importantly, they are much less error-prone, compared to textual protocols like HTTP/1.x. - It is fully multiplexed
HTTP/2 can send multiple requests for data in parallel over a single TCP connection. Every TCP connection requires a round trip to set up. Because a single connection is multiplexed between many requests, the request can usually be sent immediately without waiting for other requests to finish. - It uses header compression HPACK to reduce overhead.
- It allows servers to “push” responses proactively into client caches instead of waiting for a new request for each resource.
- It uses the new ALPN extension which allows for faster encrypted connections since the application protocol is determined during the initial connection.
- It reduces additional round trip times (RTT), making your website load faster without any optimization.
- Domain sharding and asset concatenation are no longer needed with HTTP/2.
Other great sources for more info:
- The HTTP/2 Protocol: Its Pros & Cons and How to Start Using It
- HPACK: Header Compression for HTTP/2
- HTTP/2: the Pros, the Cons, and What You Need to Know
How to enable HTTP/2 in Azure App Service?
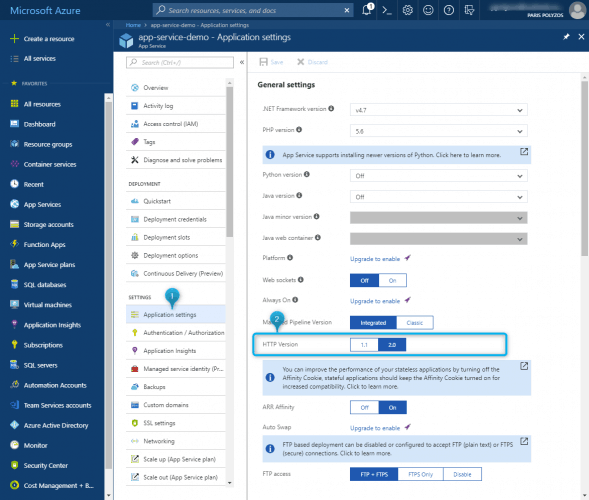
There are several ways to enable HTTP/2 for an application running on Azure App Service, and the easiest one is through Application Settings.
Head over to the App Service where you want HTTP/2 to be enabled and, from the left sidebar, click on Application Settings, and in the section HTTP Version, select 2.0 and click Save.
Now, when you reload your web app, you can see that the protocol has changed to HTTP/2 for your requests in developer tools:
Enabling HTTP/2 for Azure Functions
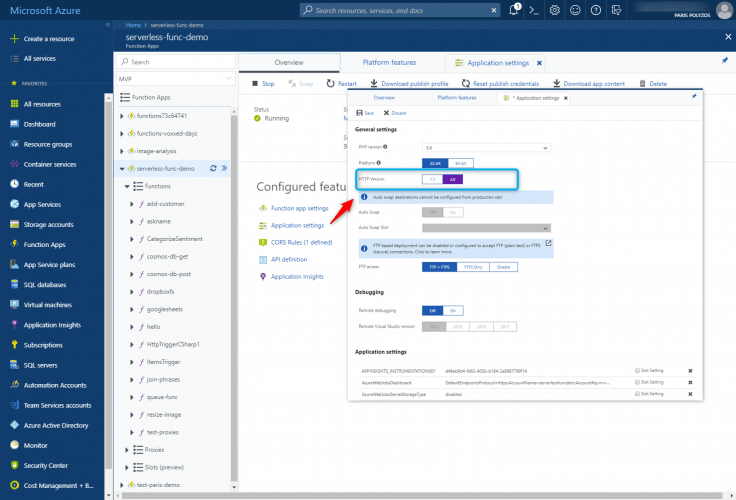
As for your Azure Functions, to enable HTTP/2 is still pretty similar. Head over to your Azure Function, in the Overview tab, click on Application Settings and in the Application Settings tab change the HTTP Version from 1.1 to 2.0.
Other ways to enable HTTP/2 support
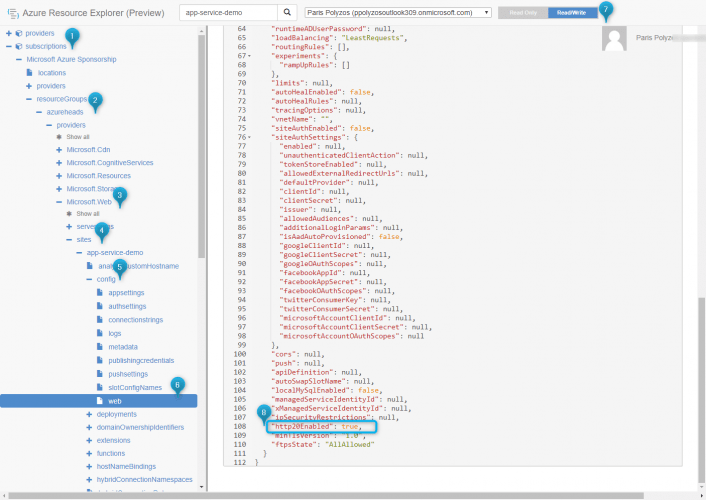
Another way to enable HTTP/2 support is through Azure Resource Explorer.
From Azure Portal, on the left sidebar, under the Development tools section, select Resource Explorer and click Go.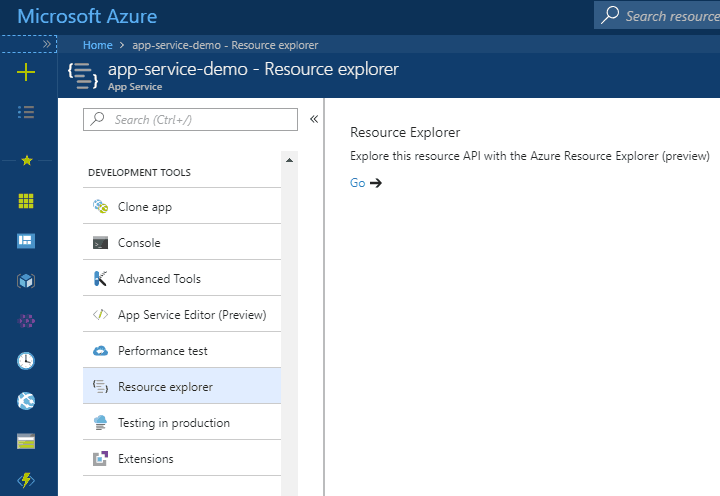
or simply browse directly to Resource Explorer (https://resources.azure.com/) and then:
- find the config section for your app service, usually under the following path `Subscription > Resource Group > your_site_name > Providers > Microsoft.Web > sites > your_site_name > config > web`
- on the top of the page make sure you are in Read/Write mode
- click on Edit button
- change the parameter http20Enabled from false to true
- and then on the top, click on PUT.
Enable HTTP/2 using Powershell
There is also another option for enabling HTTP/2 in Azure App Service and this is through powershell. To do so, you need to perform the following steps:
Step 1. Install the right modules
PS> Install-Module -Name AzureRM.Profile.Netcore
PS> Install-Module -Name AzureRM.Resources.Netcore
Step 2. Login to Azure
PS> Connect-AzureRMAccount
WARNING: To sign in, use a web browser to open the page https://microsoft.com/devicelogin and
enter the code XXX to authenticate.
Step 3. Enable HTTP/2
PS> $properties = @{ http20Enabled = $true; }
PS> Set-AzureRmResource -PropertyObject $properties
    -ResourceGroupName "YourResourceGroupName"
    -ResourceType Microsoft.Web/sites/config
    -ResourceName "YourAppName/web"
    -ApiVersion 2016-08-01
    -Force
After you execute the above command you can see, in the result, whether or not HTTP/2 has been enabled.
