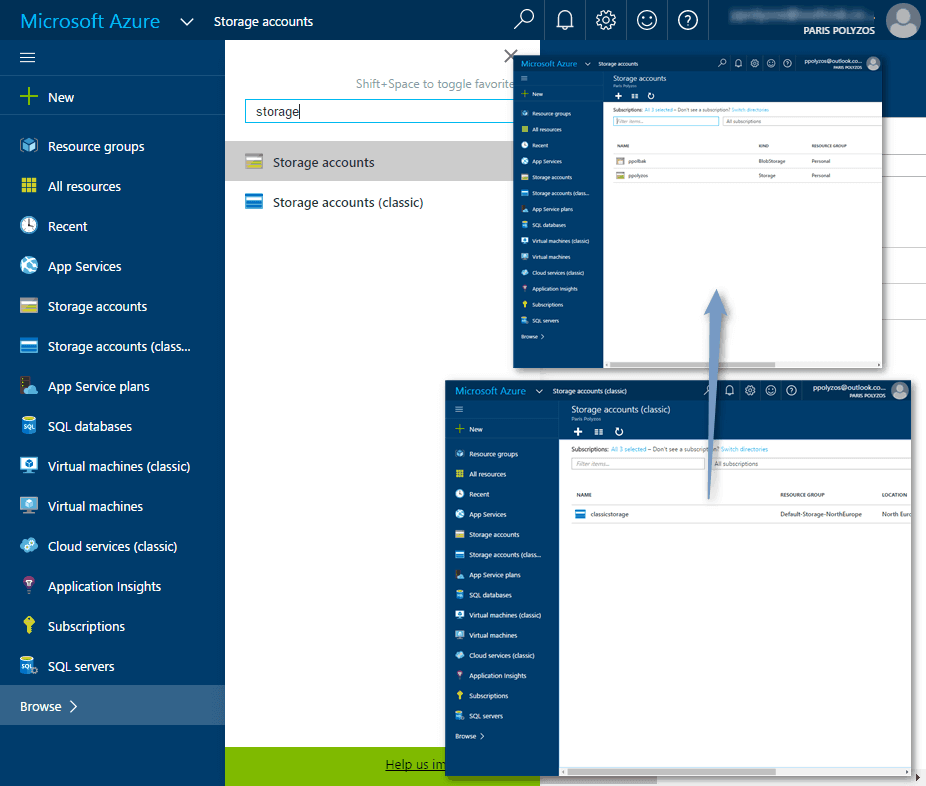
In the new Microsoft Azure Portal, you might have noticed that, next to some of your resources, appears the text “(Classic)”, for example Storage Accounts and Storage Accounts (classic). This happens in order to separate resources that have been deployed with the Classic deployment model from the ones that have been deployed with the Azure Resource Manager.
Some Background
Azure originally provided only the Classic deployment model, where each resource existed independently and there was no way to group related resources.
In 2014, Azure introduced the Resource Manager (ARM), which added the concept of a resource group, a container for resources that share a common life-cycle. The Resource Manager deployment model is significantly different from the Classic deployment model, and the two models are not completely compatible with each other. To simplify the deployment and management of resources, Microsoft recommends that you use Resource Manager for new resources, and, if possible, re-deploy existing resources through Resource Manager.
Why choose ARM to Classic
The Resource Manager deployment model provides several benefits:
- deploy, manage, and monitor all of the services for your solution as a group, rather than handle these services individually;
- use templates to deploy complex applications;
- deploy repeatedly your solution throughout its life-cycle,being sure that your resources are deployed in a consistent state;
- apply access control to all the resources in your resource group, and those policies are automatically applied when new resources are added to the resource group;
- apply tags to resources to logically organize all of the resources in your subscription;
- use JSON to define the infrastructure for your solution;
- define the dependencies between resources so that they are deployed in the correct order.
Should I migrate my resources to ARM?
Since both modes are viable options at this point, it is necessary to pay attention to the features that each one has to offer, and your specific requirements. ARM cannot simply be assumed to be the best fit, as it simply may not meet all of your or your customer’s needs.
Start by reading through the list of unsupported configurations or features and in case you have resources with unsupported configurations or features wait for their support to be announced.
If you have automated scripts, it is always a good idea to create a similar test setup or a sample environment before you begin the migration process.
Migration Experience
The migration workflow is as follows:
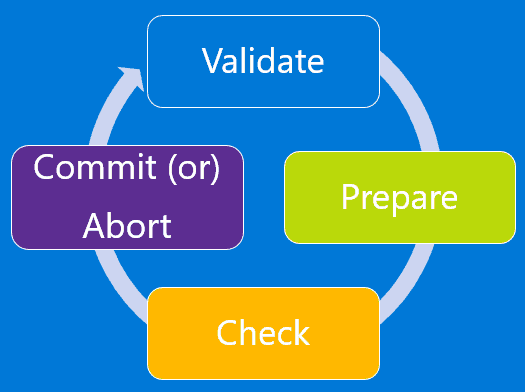
Validate
This step aims at analyzing data in the background for the resources under migration, returning success/failure if the resources are capable of migration. If the resource is not capable of migration, the platform will list all the reasons why it is not supported for migration.
Prepare
This step aims at simulating the transformation of the IaaS resources from Classic to Resource Manager resources, presenting this side by side for you to visualize. If the resource is not capable of migration, the platform will list the stop the migration process and list the reasons why the prepare operation failed.
Check
During this step you can ascertain that the migration looks correct. You can test your monitoring/automation and operational scripts to check if the VMs are working as expected and if your updated scripts work correctly.
Commit (or) Abort
In the final step you can either abort your changes to the Classic deployment model and stop the migration or commit the migration. Resources will not appear anymore in Classic and will be available only in the Resource Manager deployment mode.
Migrate Storage Account from Classic to ARM
Let’s assume you have a Classic storage account, created in the old Azure portal under the name “classicstorage” and you want to migrate it from Classic to ARM deployment model using Powershell.
[box type=”info” width=”100%” ]Before we begin we need to install the latest version of Azure Powershell either from PowerShell Gallery and Web Platform Installer (WebPI). For more information, see How to install and configure Azure PowerShell.[/box]For migration scenarios, you need to set up your environment both for Classic and for Resource Manager.
Enviroment Setup for the Resource Manager Model
Step 1. Sign in to your account for the Resource Manager model
Login-AzureRmAccount
Step 2. Get the available subscriptions
Get-AzureRMSubscription | Sort SubscriptionName | Select SubscriptionName
Step 3. Set your Azure subscription for the current session
$subscr="<subscription name>"
Get-AzureRmSubscription –SubscriptionName $subscr | Select-AzureRmSubscription
Step 4. Register with the migration resource provider
Register-AzureRmResourceProvider -ProviderNamespace Microsoft.ClassicInfrastructureMigrate
After executing the command above, you need to wait for the registration to finish and, before proceeding, you need to make sure that the RegistrationState is `Registered`.
You can check the RegistrationState through the following command:
Get-AzureRmResourceProvider -ProviderNamespace Microsoft.ClassicInfrastructureMigrate

Environment Setup for the Classic Model
Step 1. Sign in to your account for the Classic model
Add-AzureAccount
Step 2. Get the available subscriptions
Get-AzureSubscription | Sort SubscriptionName | Select SubscriptionName
Step 3. Set your Azure subscription for the current session
$subscr="<subscription name>"
Get-AzureSubscription –SubscriptionName $subscr | Select-AzureSubscription
Migrate your storage account
Step 1. Prepare the storage account for migration
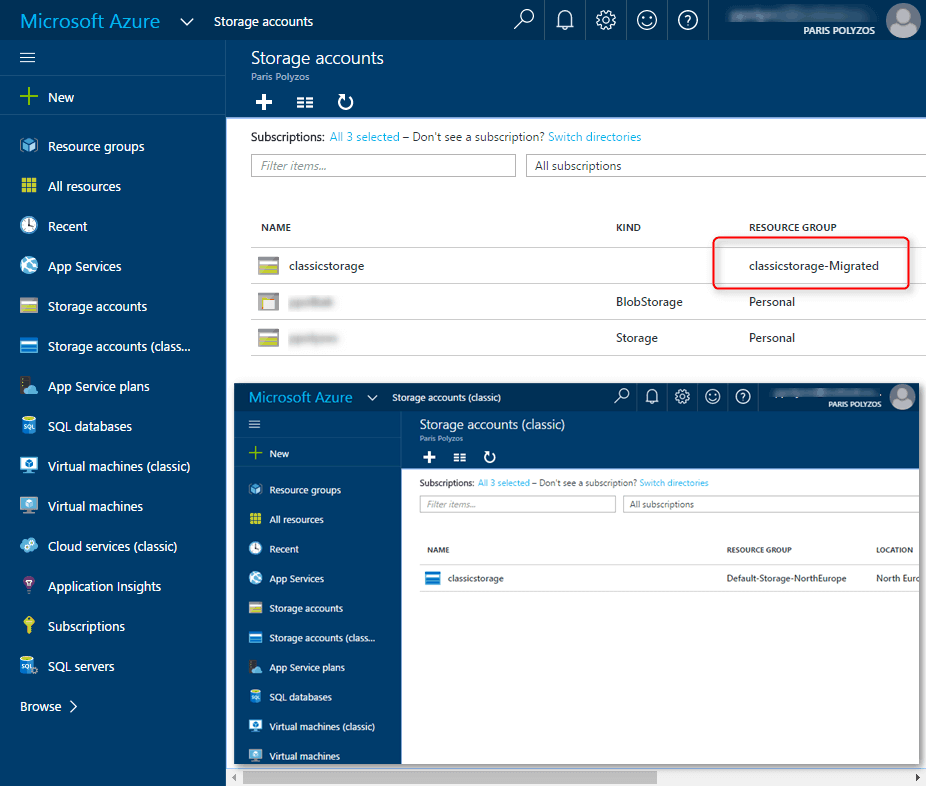
$storageAccountName = "storagename"
Move-AzureStorageAccount -Prepare -StorageAccountName $storageAccountName
After executing the command above you may see that classicstorage is displayed in both Storage Accounts and Storage Accounts (classic) section:
Step 2. Check the configuration for the prepared storage
At this step you may confirm that the migration looks correct and then you may proceed to the final step where you may commit or abort the migration.
Step 3. Commit or Abort
If you are not ready for migration and you want to go back to the old state:
Move-AzureStorageAccount -Abort -StorageAccountName $storageAccountName
If the prepared configuration looks good, you can move forward and commit the resources:
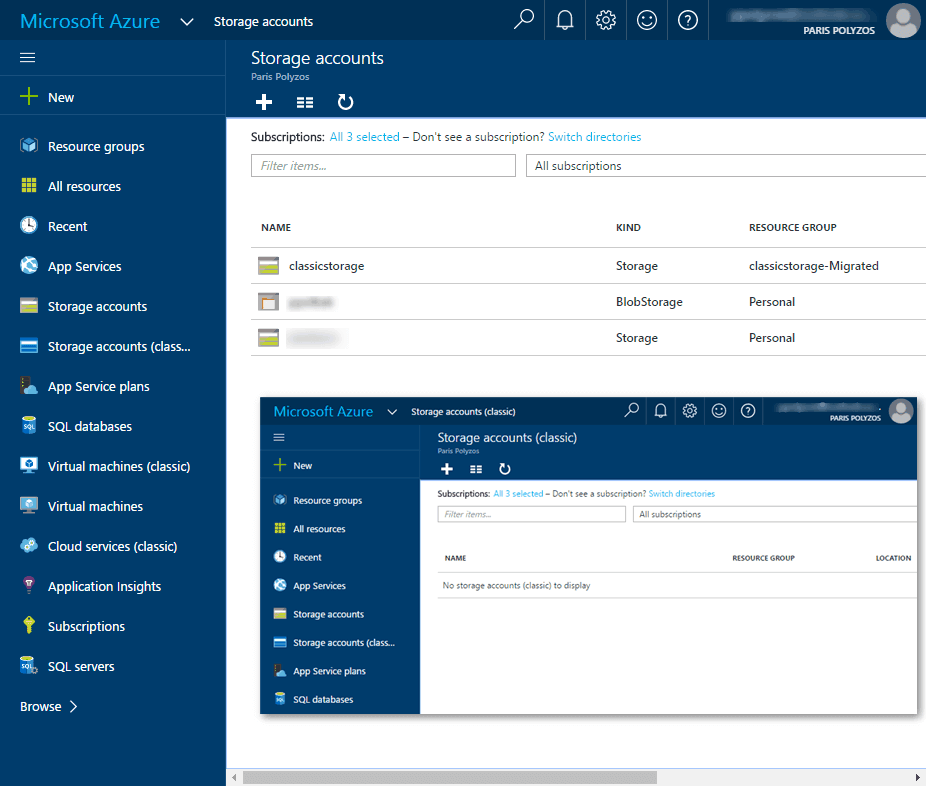
Move-AzureStorageAccount -Commit -StorageAccountName $storageAccountName

After successfully committing your resources you may notice that in Azure Portal the Classic storage account is no longer available and that it has migrated to the ARM deployment model.
Resources
- Platform-supported migration of IaaS resources from classic to Azure Resource Manager
- Migrate IaaS resources from classic to Azure Resource Manager by using Azure PowerShell
- Azure Resource Manager vs. classic deployment: Understand deployment models and the state of your resources
- Azure Compute, Network, and Storage Providers for Windows applications under Azure Resource Manager deployment mode
Any chance you have some C# to do this instead of PowerShell.
At the moment, I am afraid the only way to perform the migration process is using Powershell or Azure CLI.
Thanks, this was very helpful!
FYI – if you get an error Move-AzureStorageAccount cmdlet not found – you need to update to the newest version of Microsoft Azure Powershell.
If your classic storage account is a running production system, is there downtime involved in this migration? Also, I’m assuming no code changes required?
The migration should be smooth and with no down time. I tried it a few times and the VMs that had their volumes in the classic storage didn’t had any issues.