In this post we are going to use Visual Studio Team Services to automate the build and deployment task of an ASP.NET Core Web application to Azure.
What is Visual Studio Team Services?
Visual Studio Team Services (VSTS) provide a fast and easy way to plan, build and ship software across a variety of platforms. Whether you work in the cloud, on-premises, or using a hybrid of the above, you have a comprehensive set of DevOps and Agile tools to support team collaboration throughout the stages of planning, development and testing, and continuous delivery. You can learn more here; keep in mind that small teams, up to 5 members, can start for free.
Create a project in VSTS
A project in VSTS allows you to have unlimited repositories, manage team members, create work items, plan and organize. Creating the project is a necessary step before you start committing your code and start your build and deployment tasks.
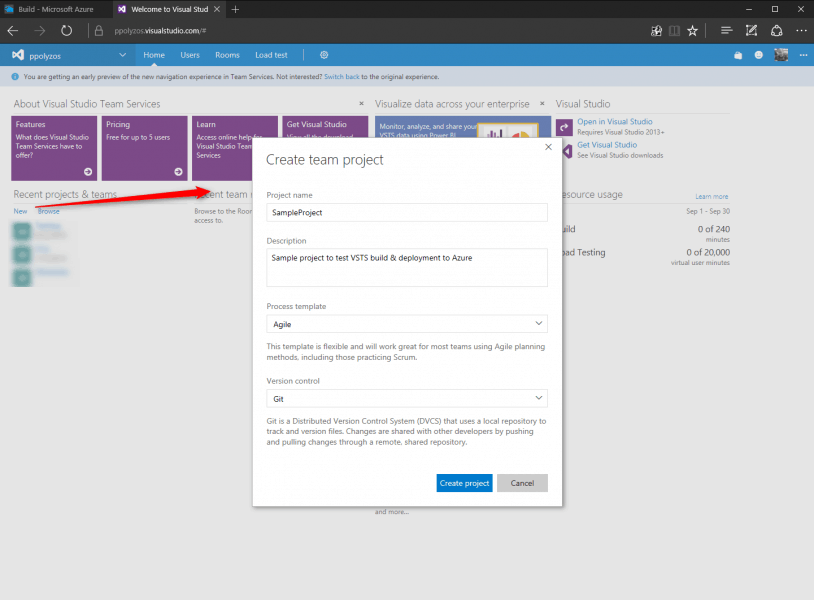
From your Dashboard, click on New, enter a name and description for your Project, select Agile as Process Template, Git as Version Control system and click on Create Project.
After a few seconds your new project will be created and you’ll be prompted to create a new repository to submit your code.

Now that you have a Git repository in your VSTS project, the next step is to start a new ASP.NET Core project and upload files to the repository you just created.
Create an ASP.NET Core Web Application project
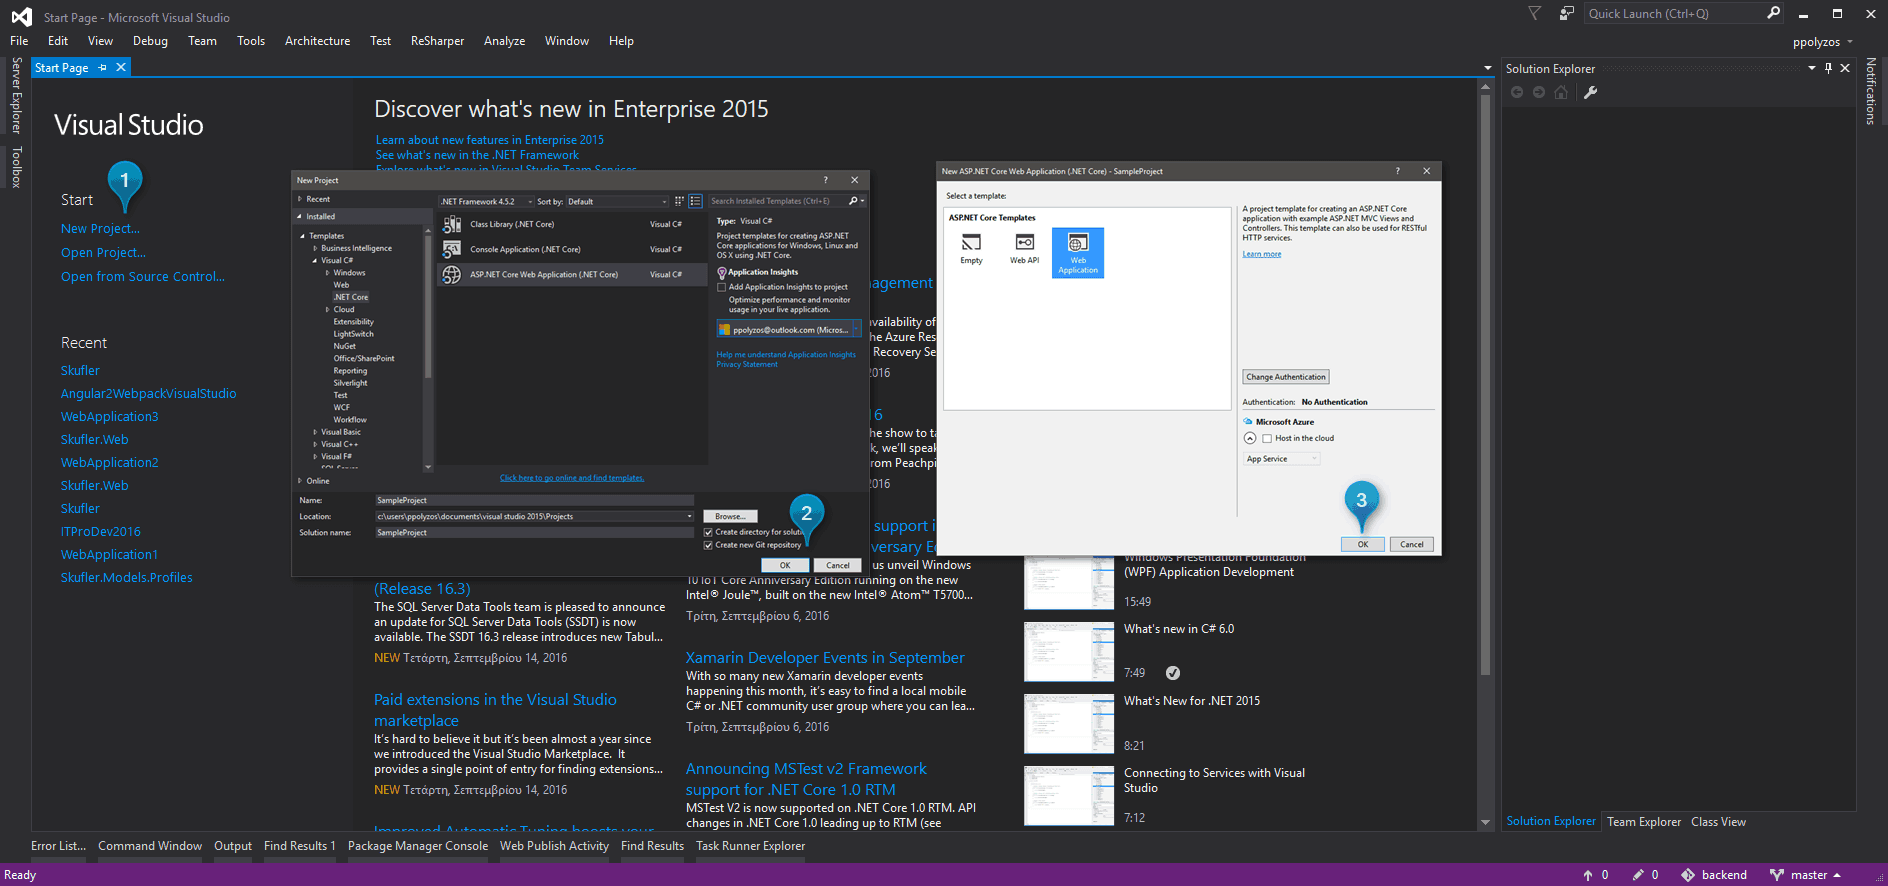
In your Visual Studio select New Project…, and then ASP.NET Core Web Application (.NET Core), enter project name and click OK. In the next popup window select Web Application as a template and click OK.
Then, right-click on your Solution and click on Add Solution to Source Control…
As a next step you need to commit your code to Sample repository you previously created on VSTS.
To do so, you need to follow these steps:
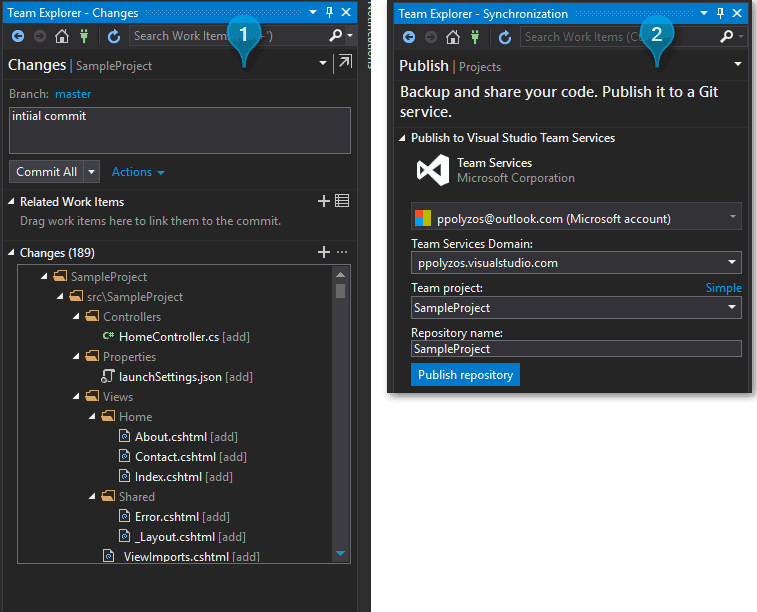
- From Team Explorer, select Changes and perform an initial commit to your code;
- Then click on Sync options and Publish to Visual Studio Team Services, enter your account credentials and specify the project you are going to commit code to.
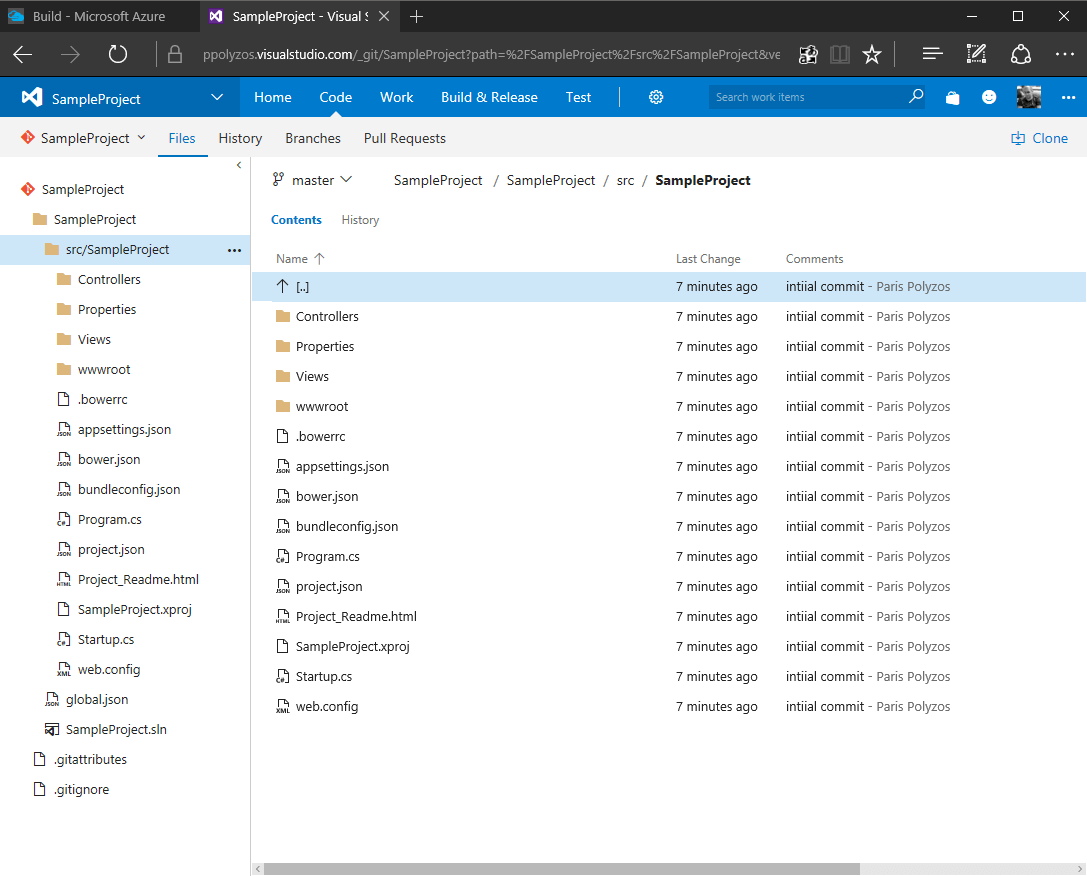
Your code is now uploaded to VSTS repository and, in the next steps, you will see a deployment build which later will allow you to deploy your project to Azure:
Build Deployment Definition
For this definition we are going to use Visual Studio Build step, which gives the option to the user to later extend it by adding UI tests and database projects, all within a single task.
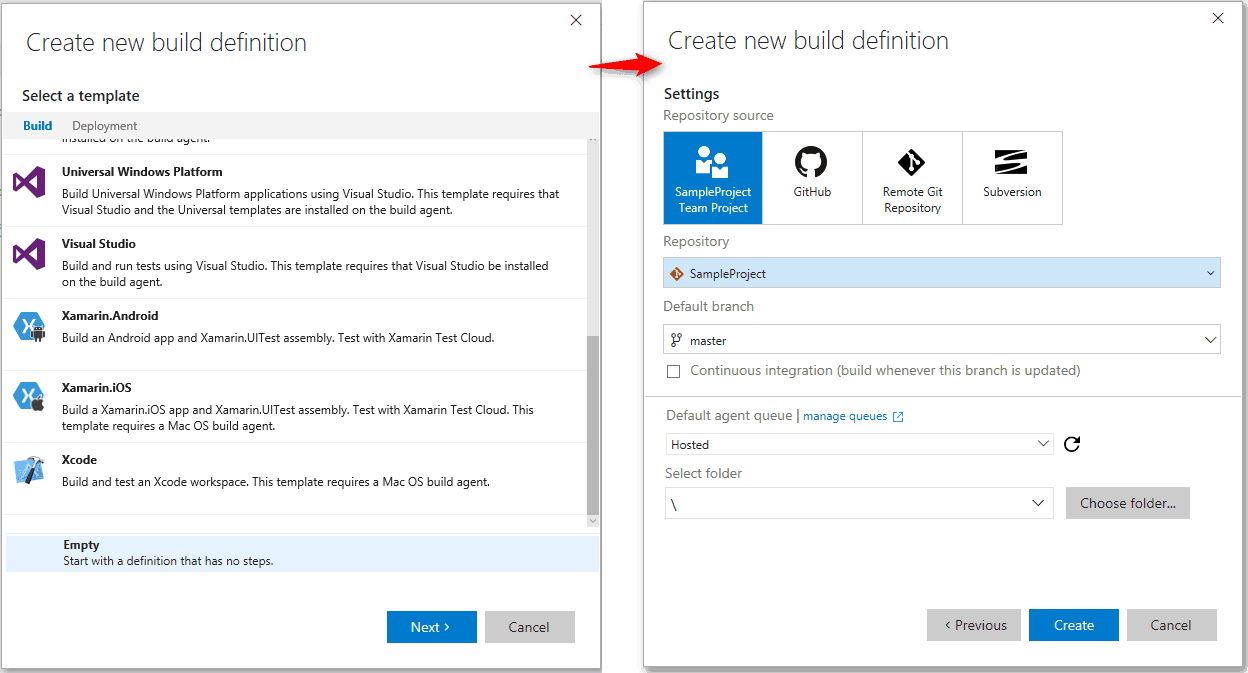
Creating a new build definition
From Build & Release menu select Builds, click on + New Definition button and follow the wizard.
In the first wizard popup window select Empty (definition with no steps) and then select the repository and branch. If you want this build to be executed whenever a new commit happens, check also the Continuous Integration checkbox (you can also edit that later).
Add Build Steps
Step 1. Restore Packages
Set tool to dotnet and arguments to restore, in order to restore packages used in your solution.

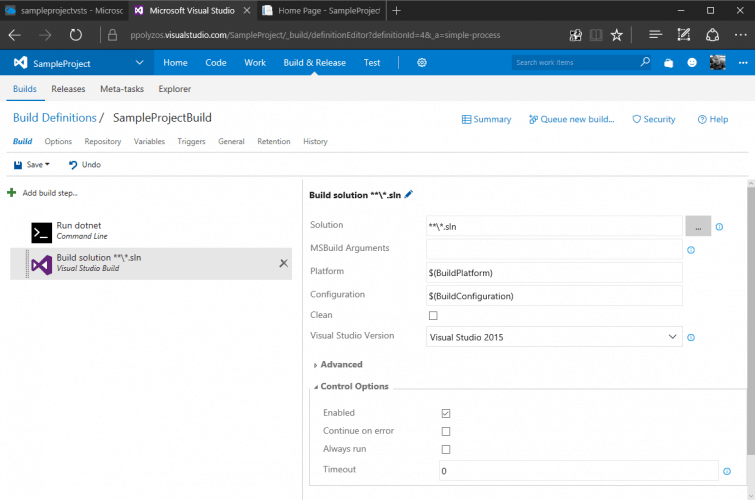
Step 2. Build Solution
Set solution to **\*.sln, platform to $(BuildPlatform) and configuration to $(BuildConfiguration).
BuildPlatform and BuildConfiguration are variables that are going to be set after you save the build definition.
Step 3. Publish Solution
Set Tool to dotnet, Arguments to publish -c $(BuildConfiguration) and in Advanced section, set the working folder as the folder that contains the Web Project. In our case, SampleProject/src/SampleProject.

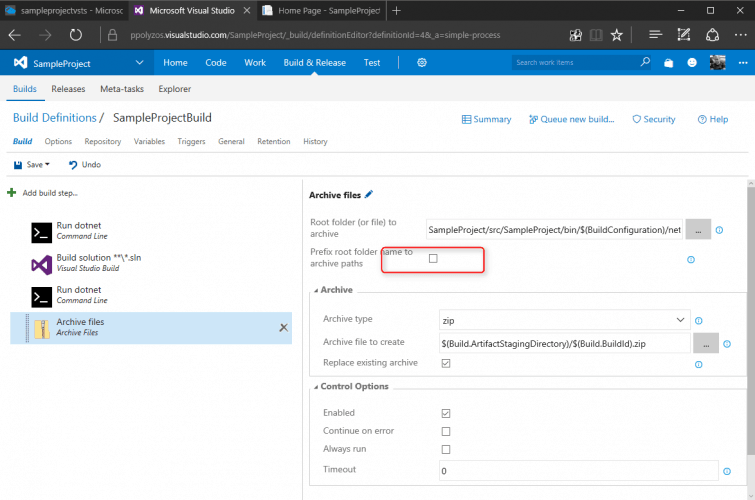
Step 4. Archive Published Files
The previous step publishes all necessary files for the solution to work; the next step is to archive them before publishing build artifacts (the last step).
Set the archive type as zip, “archive file to create” as $(Build.ArtifactStagingDirectory)/$(Build.BuildId).zip.
For the Root folder to archive, there are two options:
- if your app is based on .net core then the folder should be
{solution folder}/src/{project folder}/bin/ $(BuildConfiguration)/netcoreapp1.0/publish,
i.e.: SampleProject$(BuildConfiguration)/netcoreapp1.0/publish - if your app is based on any other version of .net, like for example 4.61, the root folder should be:
SampleProject/src/SampleProject/bin/$(BuildConfiguration)/net452/win7-x64/publish
Note: Prefix root folder should be left unchecked.
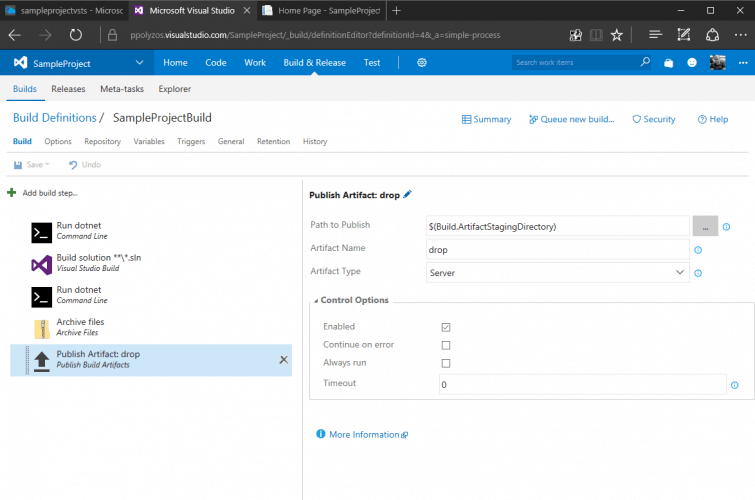
Step 5. Publish Archived File
Then you need to archive all published files in a single zip file:
Set path to publish to $(Build.ArtifactStagingDirectory), artifact name to drop and artifact type to Server
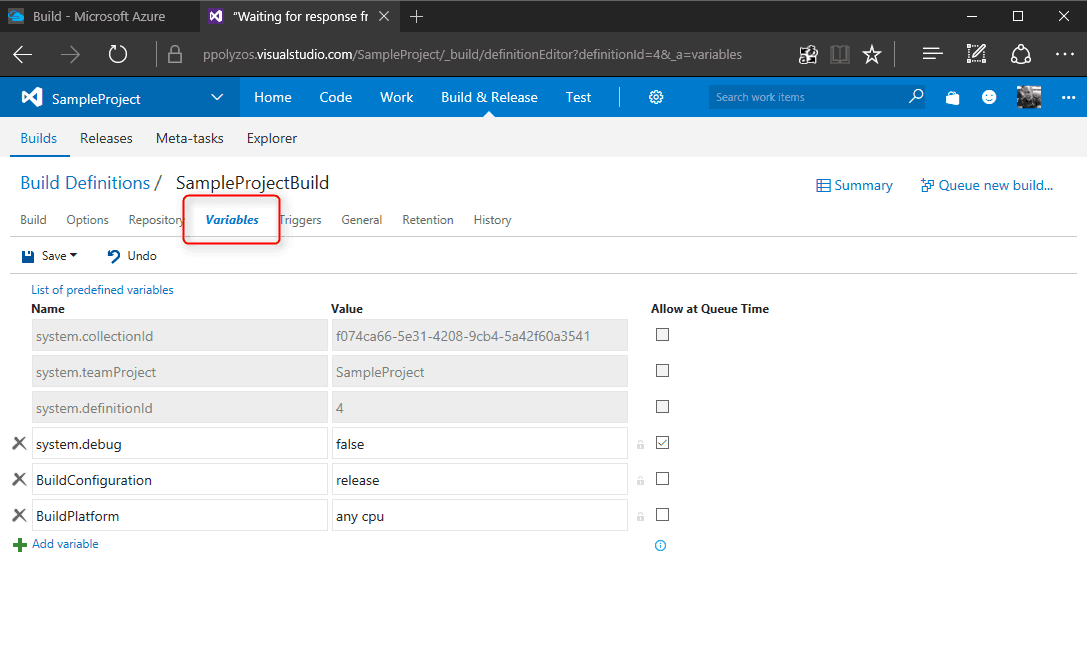
Step 6. Variables
Before queue and test the build, you need to add the variables BuildConfiguration and BuildPlatform. To do so, select Variables tab and add them:
- BuildConfiguration: release
- BuildPlatform: any cpu
In this section you can add as many variables as you want; by checking Allow at Queue Time you have the option to edit them whenever you choose a manual build.
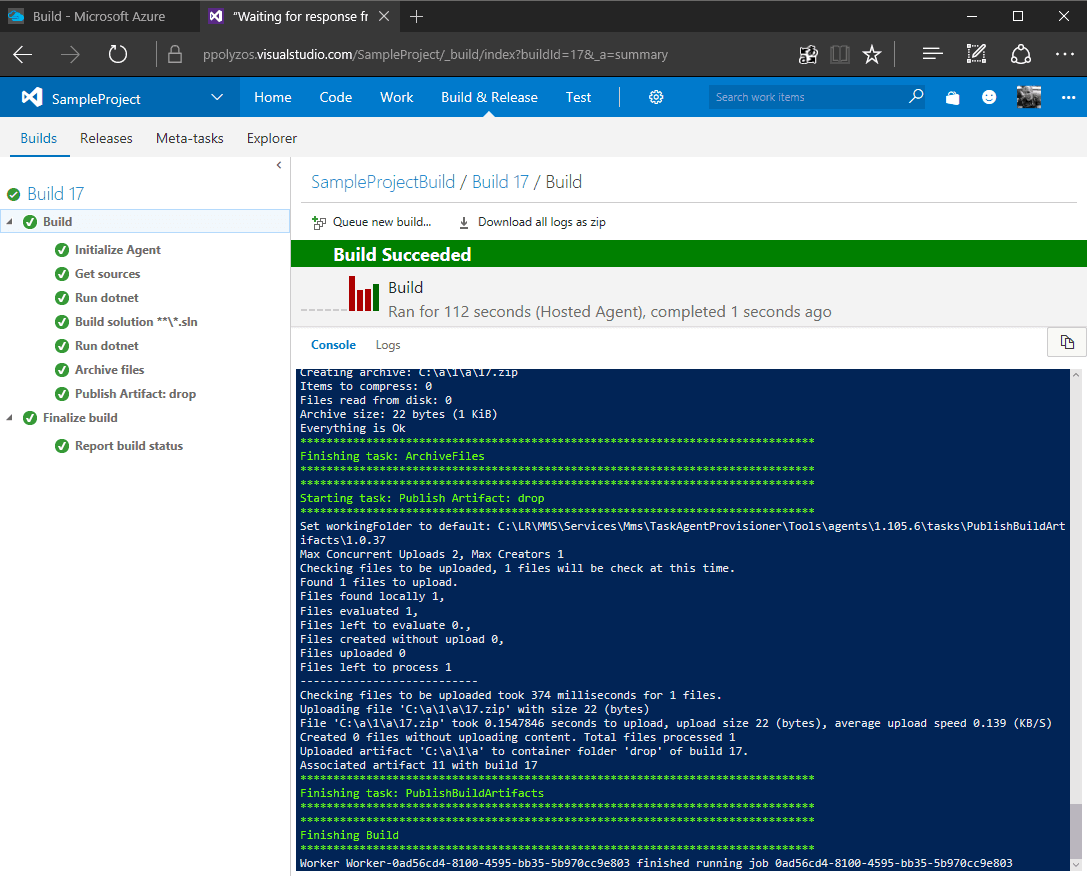
Queue and test the build
Click on the Queue new build… at the upper right corner and you’ll be able to watch the log file on how each step is performing:
Create a Web App on Azure
Before creating a release deployment plan, you may create a web app to host your application. In Azure portal, click on New -> Web + Mobile -> Web App and fill in the app name, subscription, resource group for your new web app.

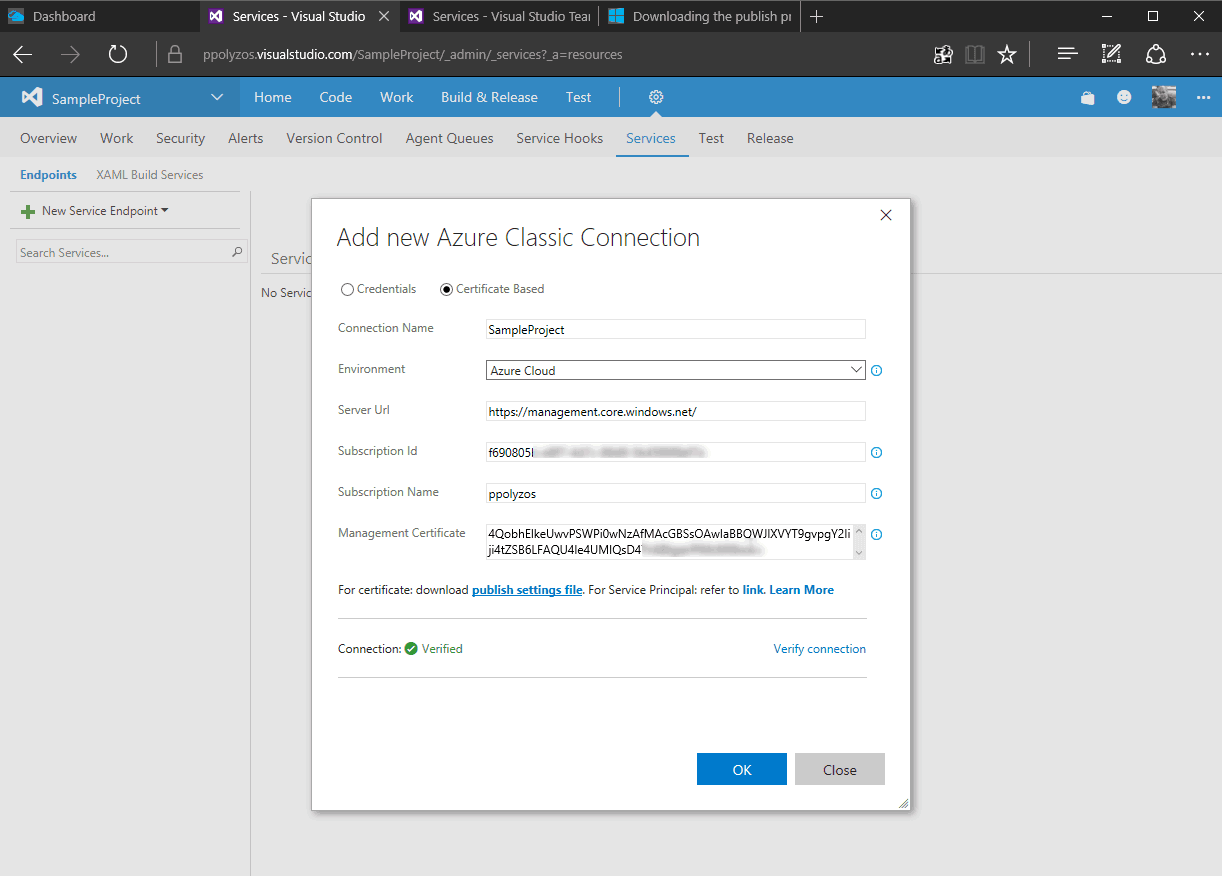
Service Endpoint between Visual Studio Team Services and Azure
In order for VSTS to be able to deploy an app to Azure you need to create an Azure Service Endpoint between VSTS and your Azure account. You can do that using Credentials or by Certificate. In this post we are going to use a certificate-based Azure connection.
Download your account’s publish settings file, which includes details about your Subscription Id, Subscription name and management certificate. It’s a simple xml file that can be opened with any text editor.
On your VSTS Account, click on the cog icon and select Services. Select a New Service Endpoint and choose Add new Azure Classic Connection Certificate-Based. Fill in the form based and verify the connection. If everything works, you have successfully connected your Azure account with Visual Studio Team Services.
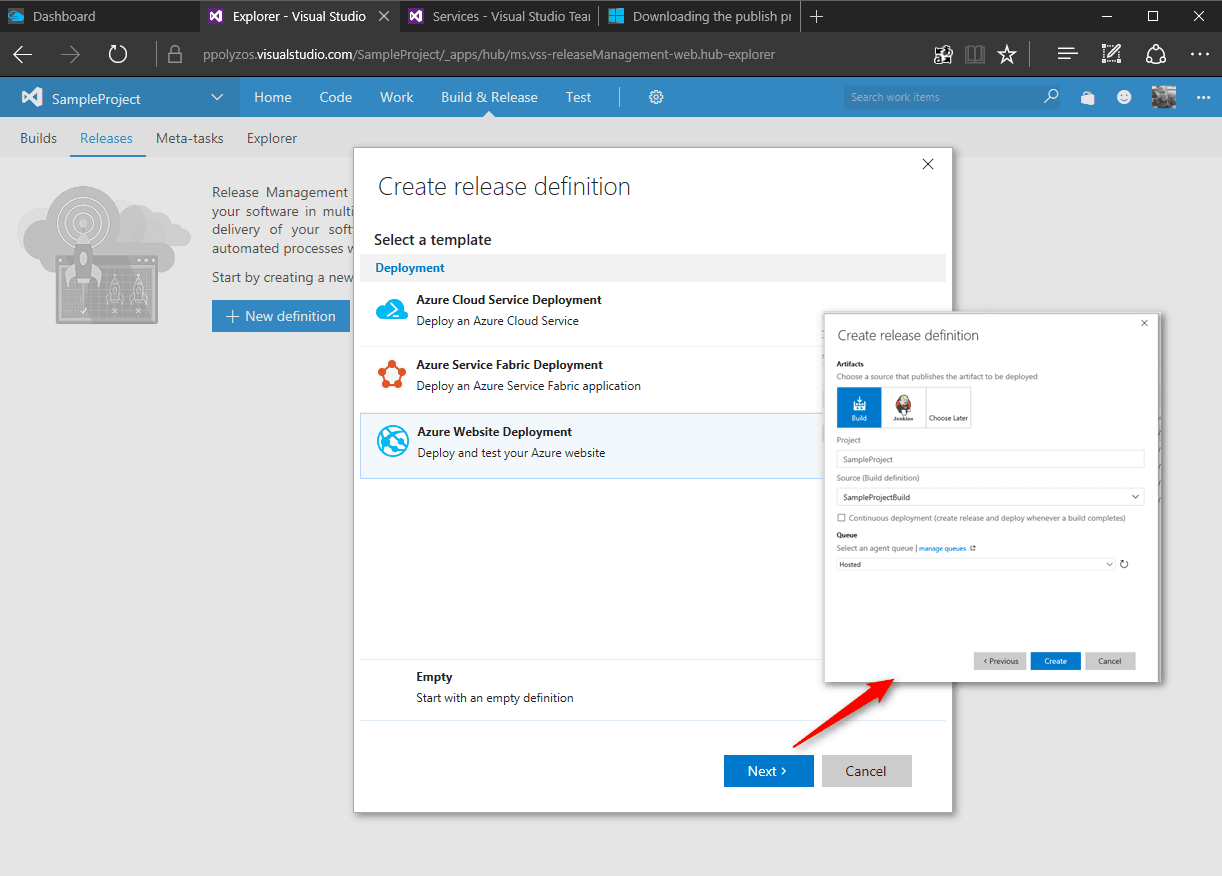
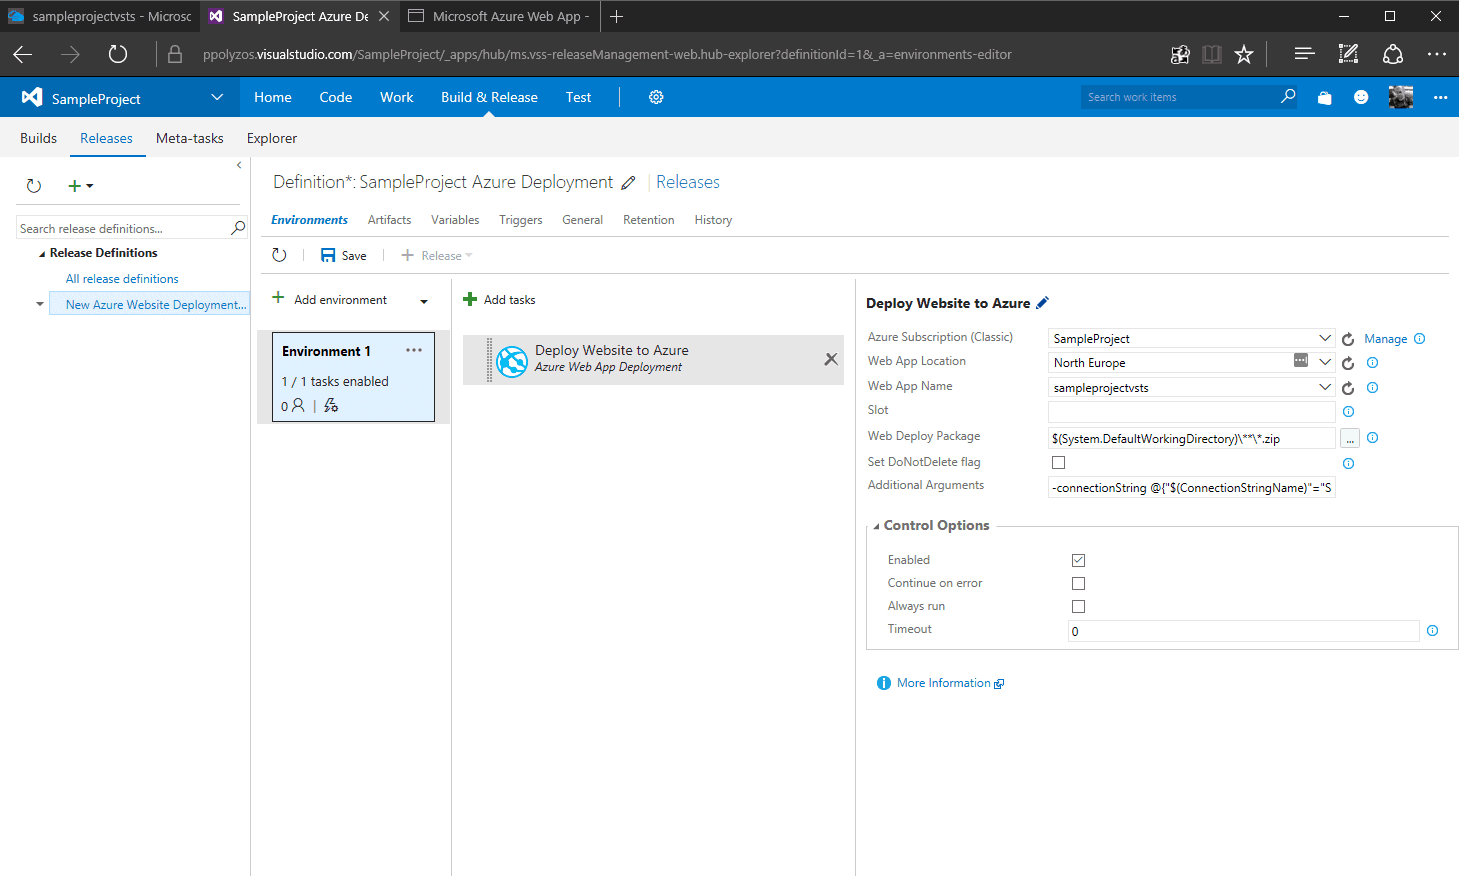
Create a Release definition
From Build & Release menu, select Releases and then click on + New Definition. From the popup window select Azure Website Deployment and click Next. Select Project and Source (Build Definition) and if you want to perform a release after every successful build, check the Continuous deployment option.
Then the only thing you need to fill in is the Deploy Website to Azure task form, by setting:
- the Azure Subscription name as the connection name you have defined in your service endpoint
- Web App’s data center Location
- and web app’s name
Click on save and start the release based on a successful build. If everything goes well, you will see the following
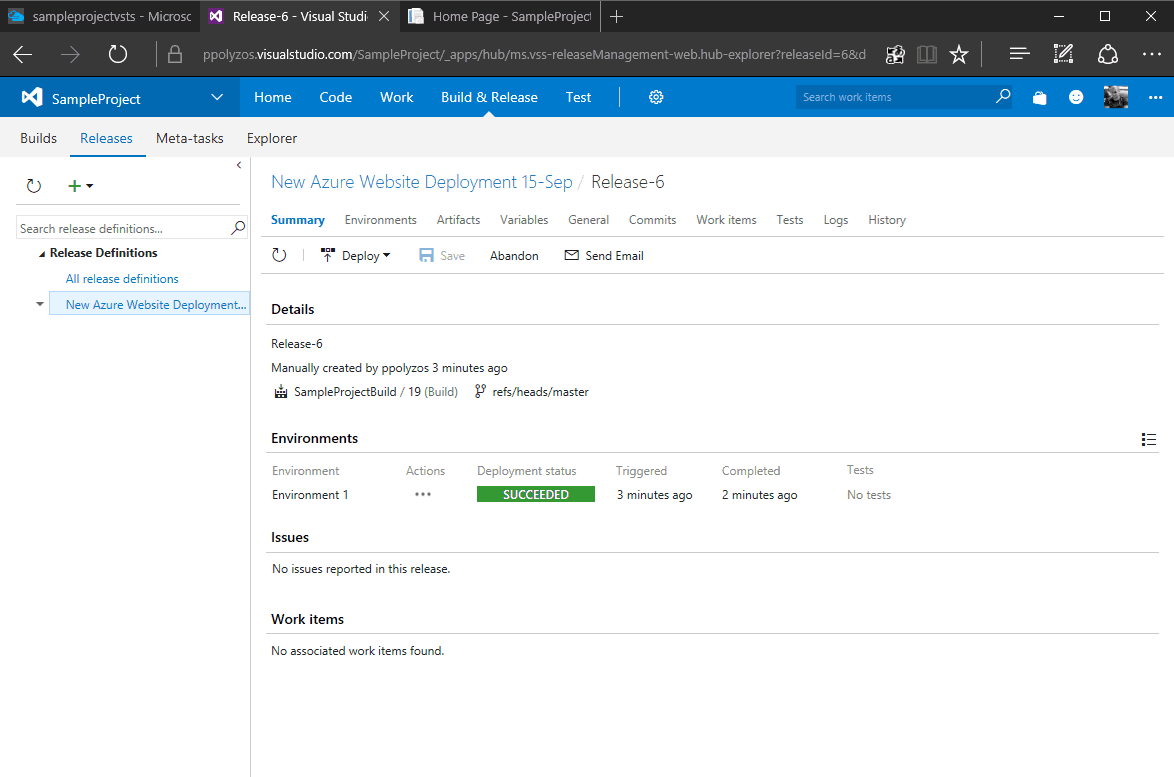
and your web app should be updated and available on {webapp}.azurewebsites.net.
Visual Studio Team Services is a great tool that let’s you automate trivial tasks. Based on your needs, you have the option to trigger a Build every time you commit a change in your repository and after a successful build, through the release definition, you will be able to see your changes being available effortlessly in your production, staging or development environment. In addition, you can extend the build and deployment with as many tasks as you want, like checking if all Tests succeed before continuing to release or executing a performance test just before your application is delivered to the public.