Wouldn’t it be great if you could have a function which generates resized images from every new image that gets uploaded in your Azure blob storage, without having to create a new app and manage the infrastructure to run it? Welcome to the era of Serverless Computing where, through a few lines of code, you can have this function up and running in a few minutes.
To do so, you need an Azure Blob Storage to store your images, and an Azure Functions app to write the few lines of code needed for this task to run.
Before we proceed, let’s start with the basics.
What is Serverless Computing?
As Martin Fowler states in his article about Serverless architectures:
“Serverless can also mean applications where some amount of server-side logic is still written by the application developer but unlike traditional architectures is run in stateless compute containers that are event-triggered, ephemeral (may only last for one invocation), and fully managed by a 3rd party”.
Serverless Computing benefits can be summarized as follows:
- Reduced operational & development costs
- Fast and easy scaling
- Reduced packaging & deployment complexity
- Easy scheduling & event processing
- Reduced time to market / experimentation
For more info, I strongly encourage you to read the following posts:
What is Azure Functions?
Azure Functions is Microsoft Azure’s solution for running easily small pieces of code, or “functions,” in the cloud. You can write just the code you need for the problem at hand, without having to manage the infrastructure to run it. Key points are:
- You can choose between a variety of languages such as C#, F#, Node.js, Python, PHP, batch, bash, or any executable one.
- You pay only for the time spent running your code.
- They support NuGet and NPM for external libraries, and provide a very easy way to leverage Azure services through triggers, which are ways to start execution of your code, and bindings, which are ways to simplify coding for input and output data.
- Functions scale up or down based on demand.
You can read more here for an Azure Functions Overview.
Setup your Azure Storage Account
First of all, you will be needing a place to store your image files and, to this end, you may use Azure Blob Storage service, which is a service that stores unstructured data in the cloud as objects/blobs. Blob storage can store any type of text or binary data, such as documents, media files, or application installers. Blob storage is also referred to as object storage.
Create your Azure Blob Storage Account
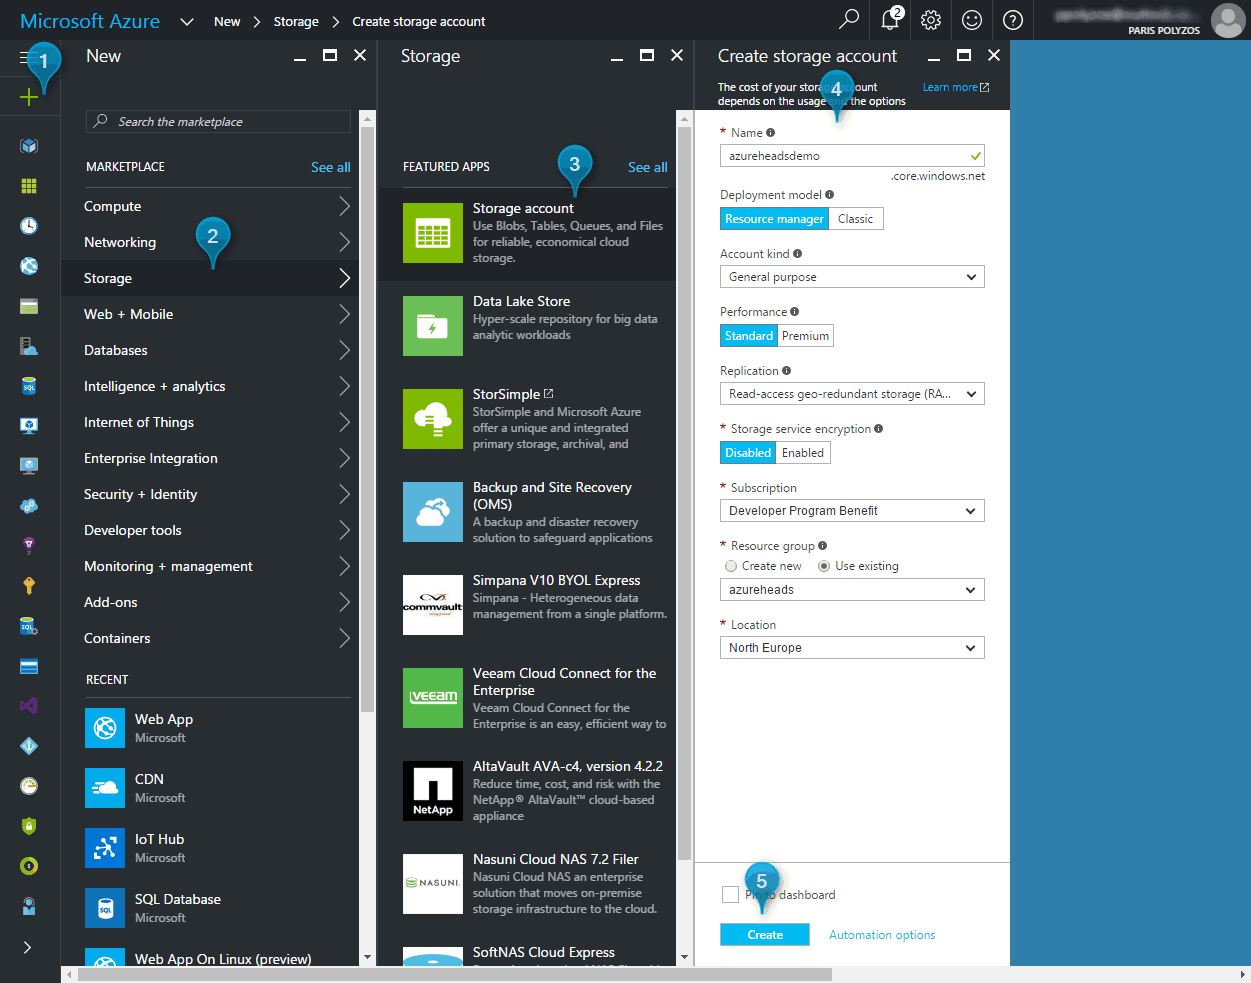
To create an Azure Storage account through the portal click on New – Storage – Storage Account, fill in the form details and click on Create.
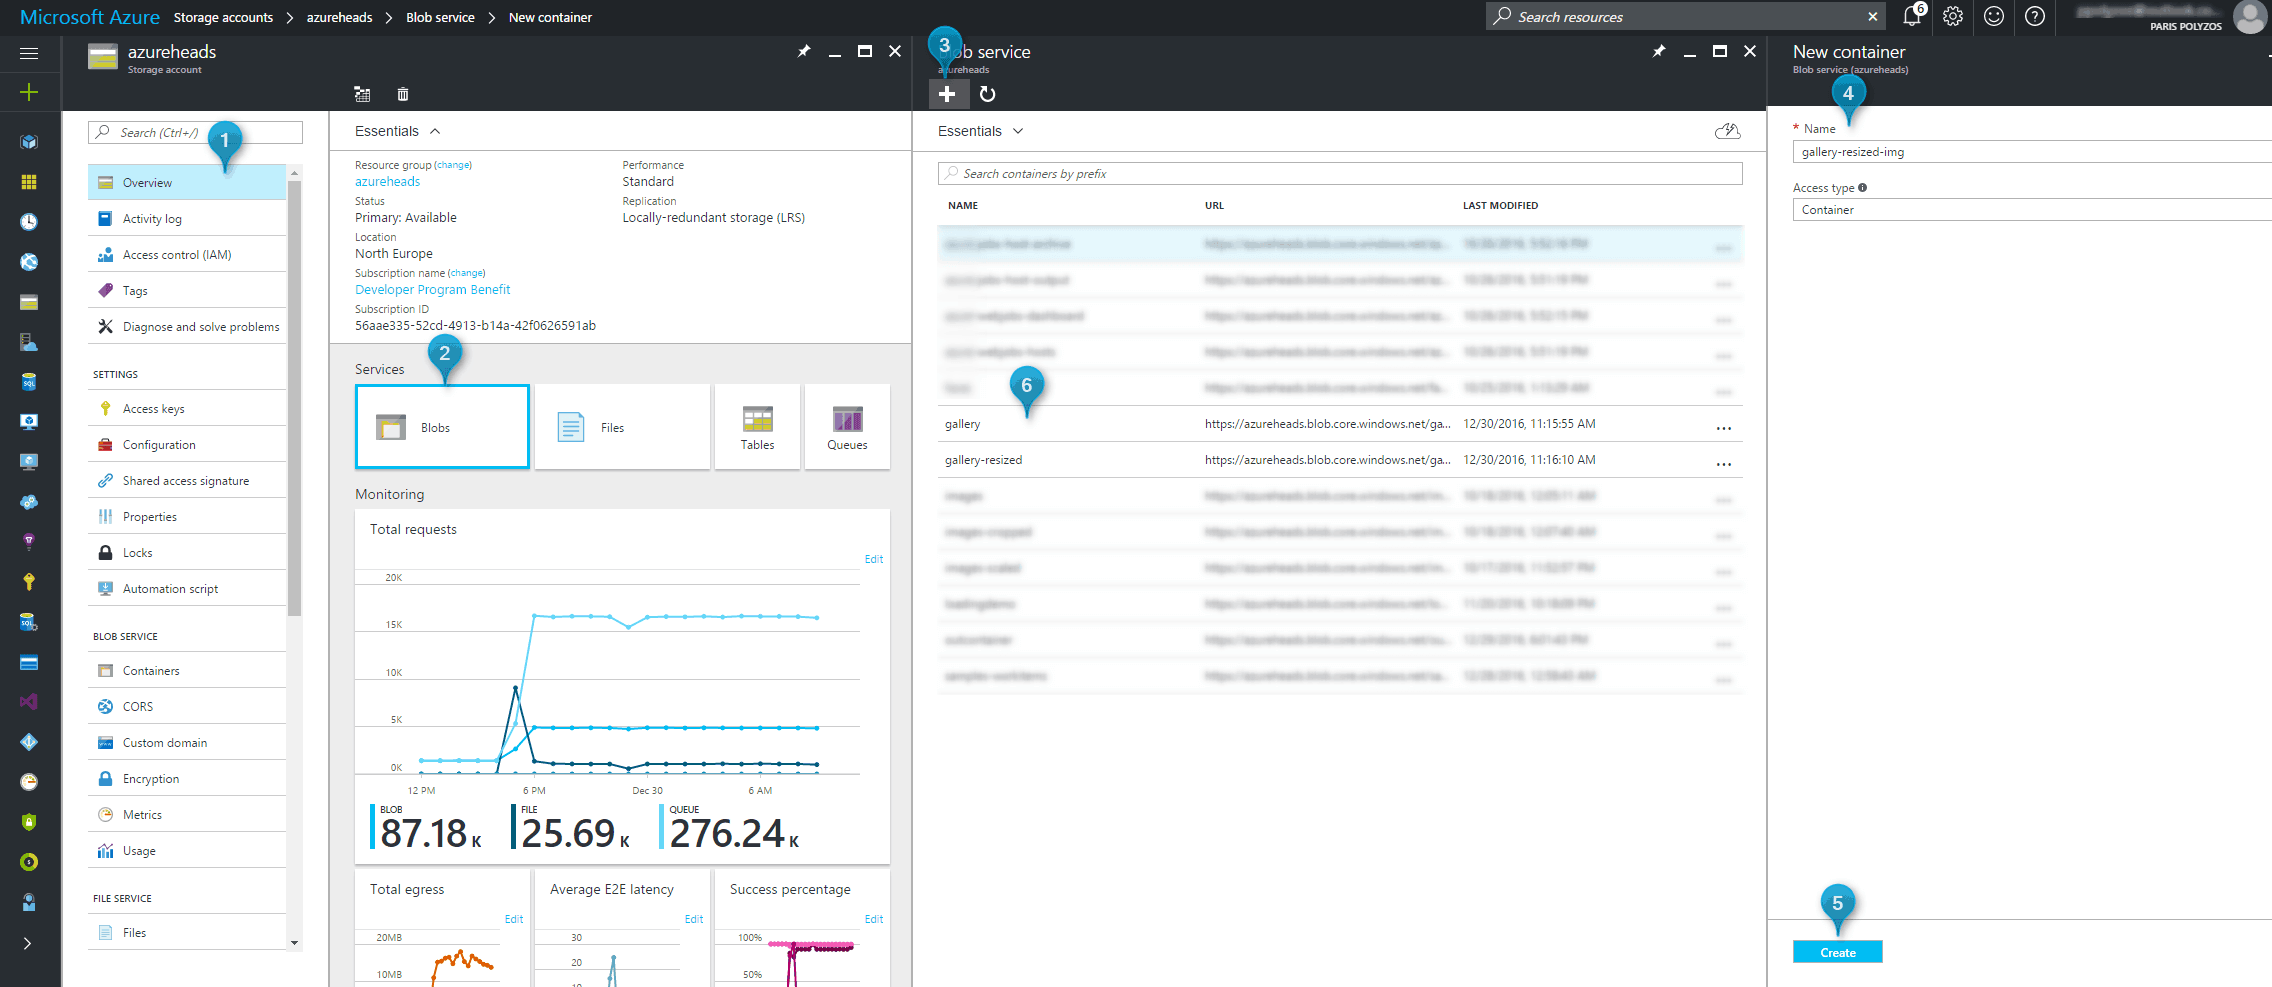
After your Storage Account is created, you can create two containers, gallery to upload your images and `gallery-resized` where the resized images will be written after the function processes each file:
The containers are now ready and you can manage them through Azure portal or Azure Storage Explorer, a standalone app from Microsoft that allows you to easily work with Azure Storage data on Windows, macOS and Linux.
Setup Azure Functions
Now that the Azure Blob Storage account service is in place, you need to create a new Azure Function that will be triggered when a new image is uploaded to the `gallery` container, and that will generate a resized image to the `gallery-resized` container.
Create Azure Functions App
Creating an Azure Functions app is very simple. Go to Azure portal, click on New and then from Compute category select Function App, and fill in the form details.

Key things to note:
- Hosting plan has two options, Consumption and App Service plan. The Consumption plan lets you pay-per-execution and dynamically allocates resources based on your app’s load. App Service plan lets you use a predefined capacity allocation with predictable costs and scale.
- Selecting a Storage Account allows you to automatically configure Azure Functions to have access to it.
Create Azure Function
To create a new Azure Function you need to go to your Azure Function app and follow these steps:
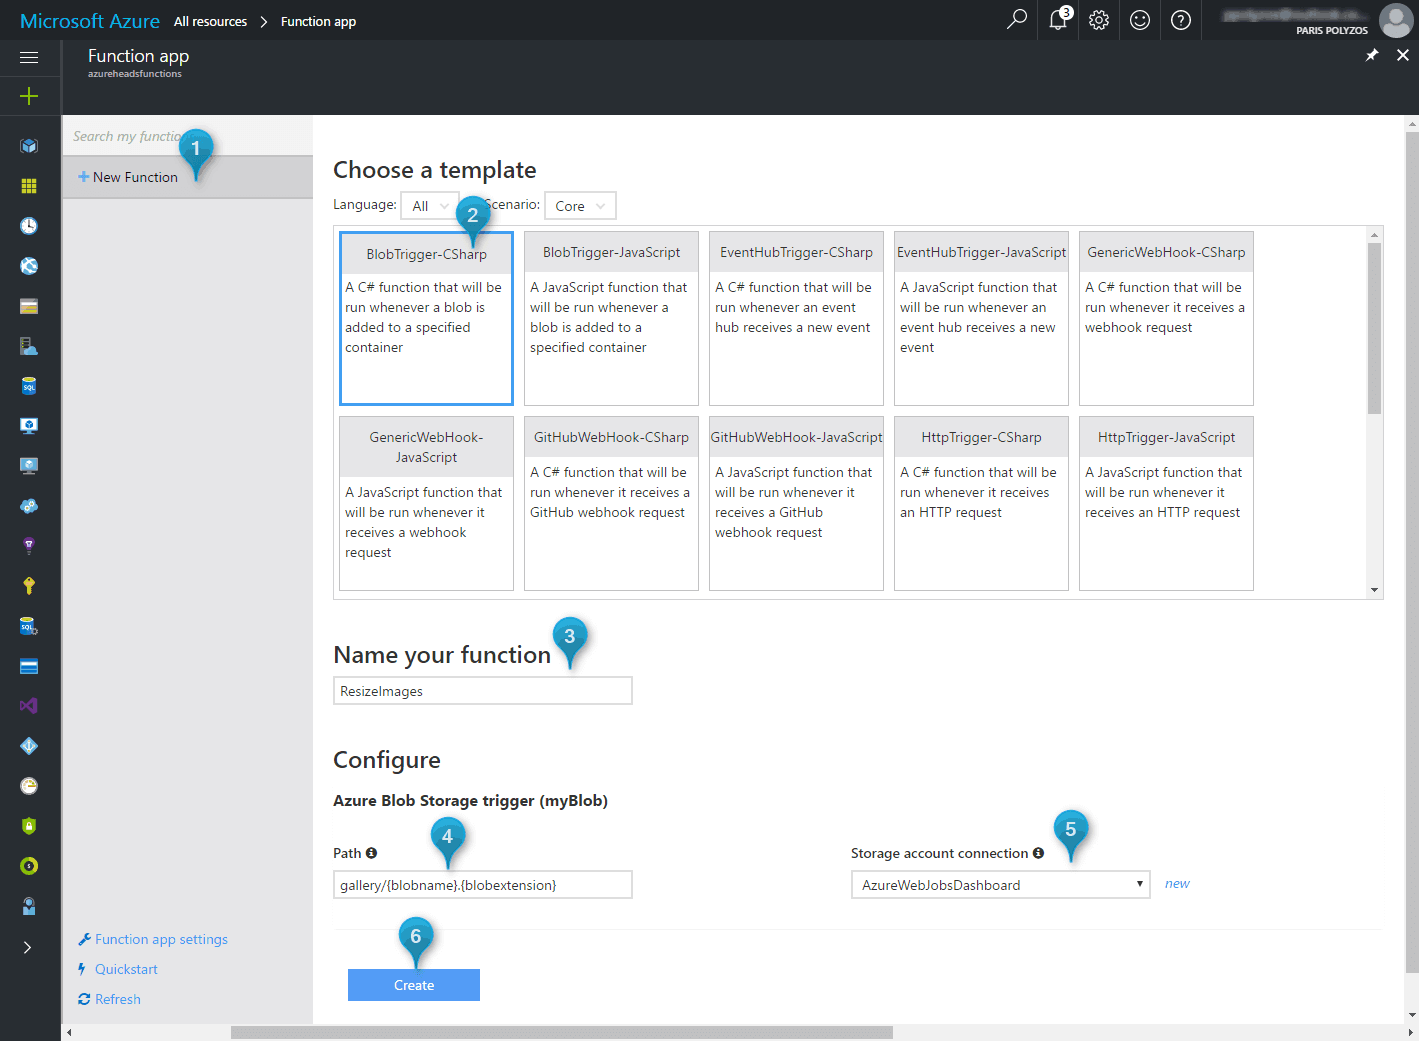
- click on “+ New Function“;
- select BlobTrigger-CSharp from template, as you need this function to be triggered every time a new image is uploaded in Azure Blob Storage container gallery;
- name your function (ResizeImages);
- set the trigger path to gallery/{blobname}.{blobextension}. This path would find a blob uploaded to gallery container and the value of the `blobname` and `blobextension` variables in function code would be imagename and jpg or png (more info on bindings can be found here);
- set the storage account connection string and click Create.
Azure Functions Editor Overview
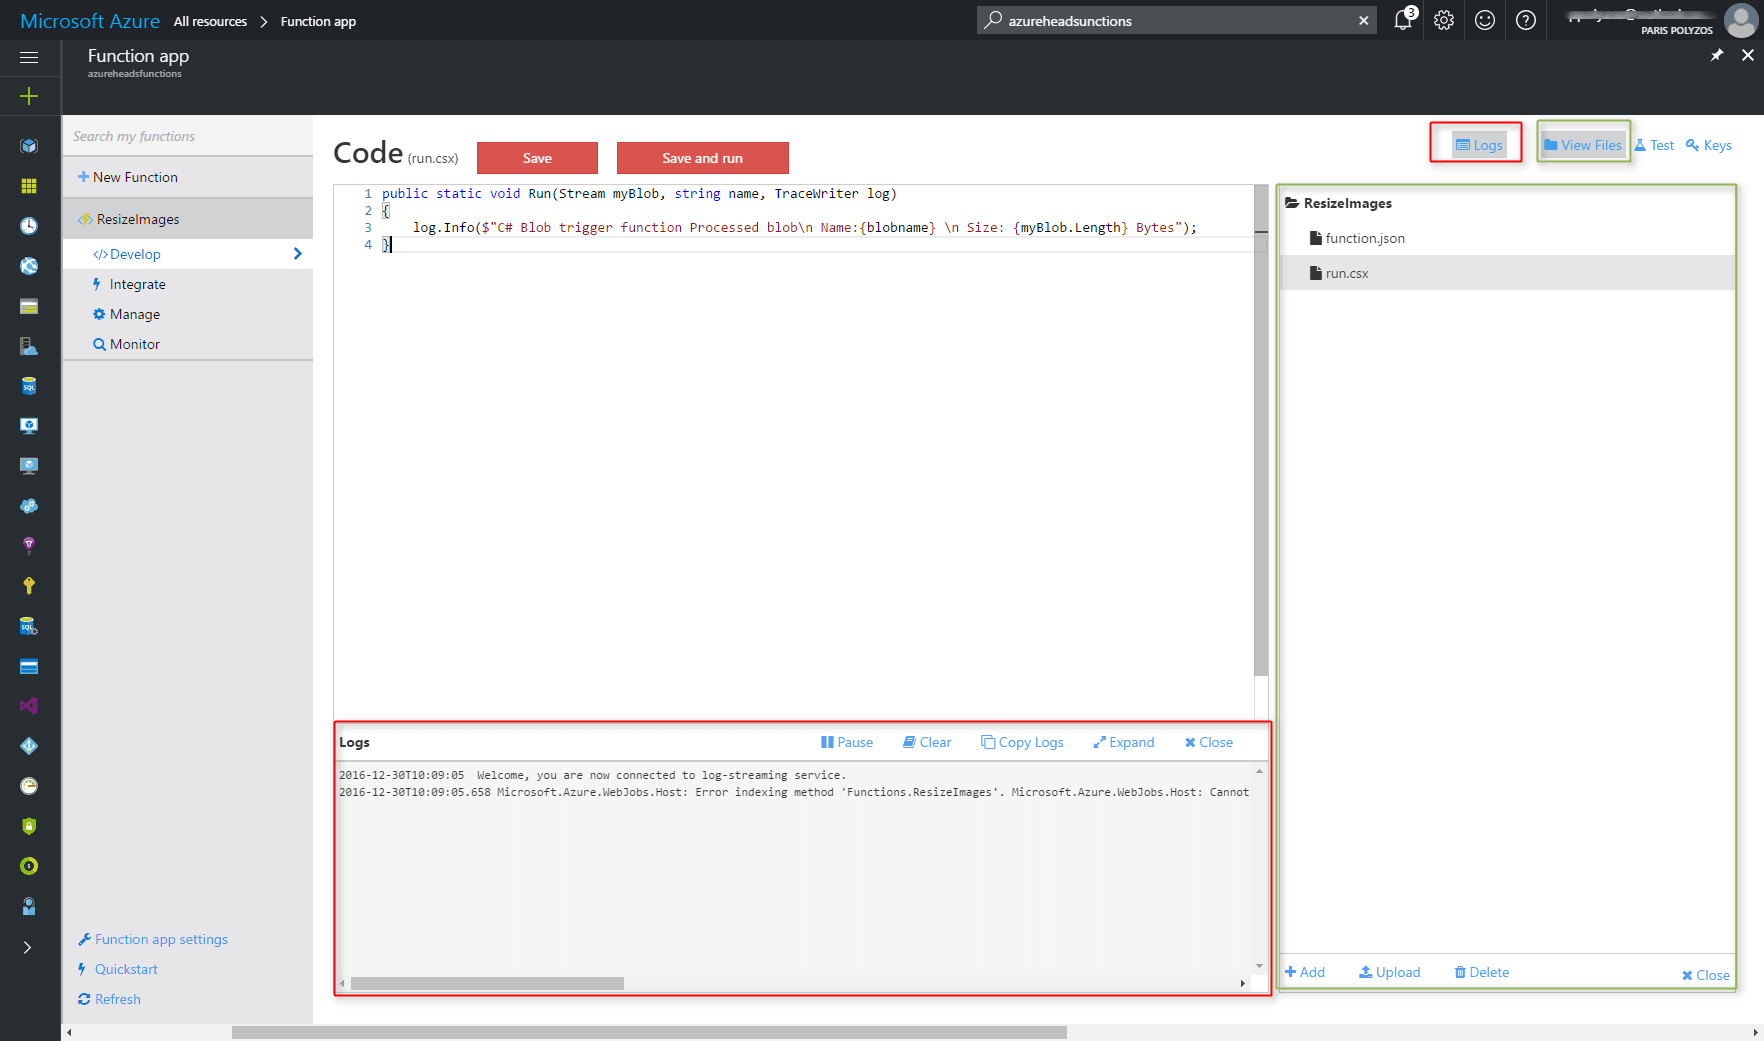
A new function is created and the default workspace is set.
- Develop allows you to review the Code window.
- Integrate allows you to set up triggers, inputs and outputs.
- Manage allows you to enable, disable or delete your function and setup keys.
- Monitor allows you to real-time monitor the execution of your function.
- Logs display all the necessary info when you save your code.
- Files allows you to upload and manage files.
- Test allows you to setup a request body and check the output.
Code your function
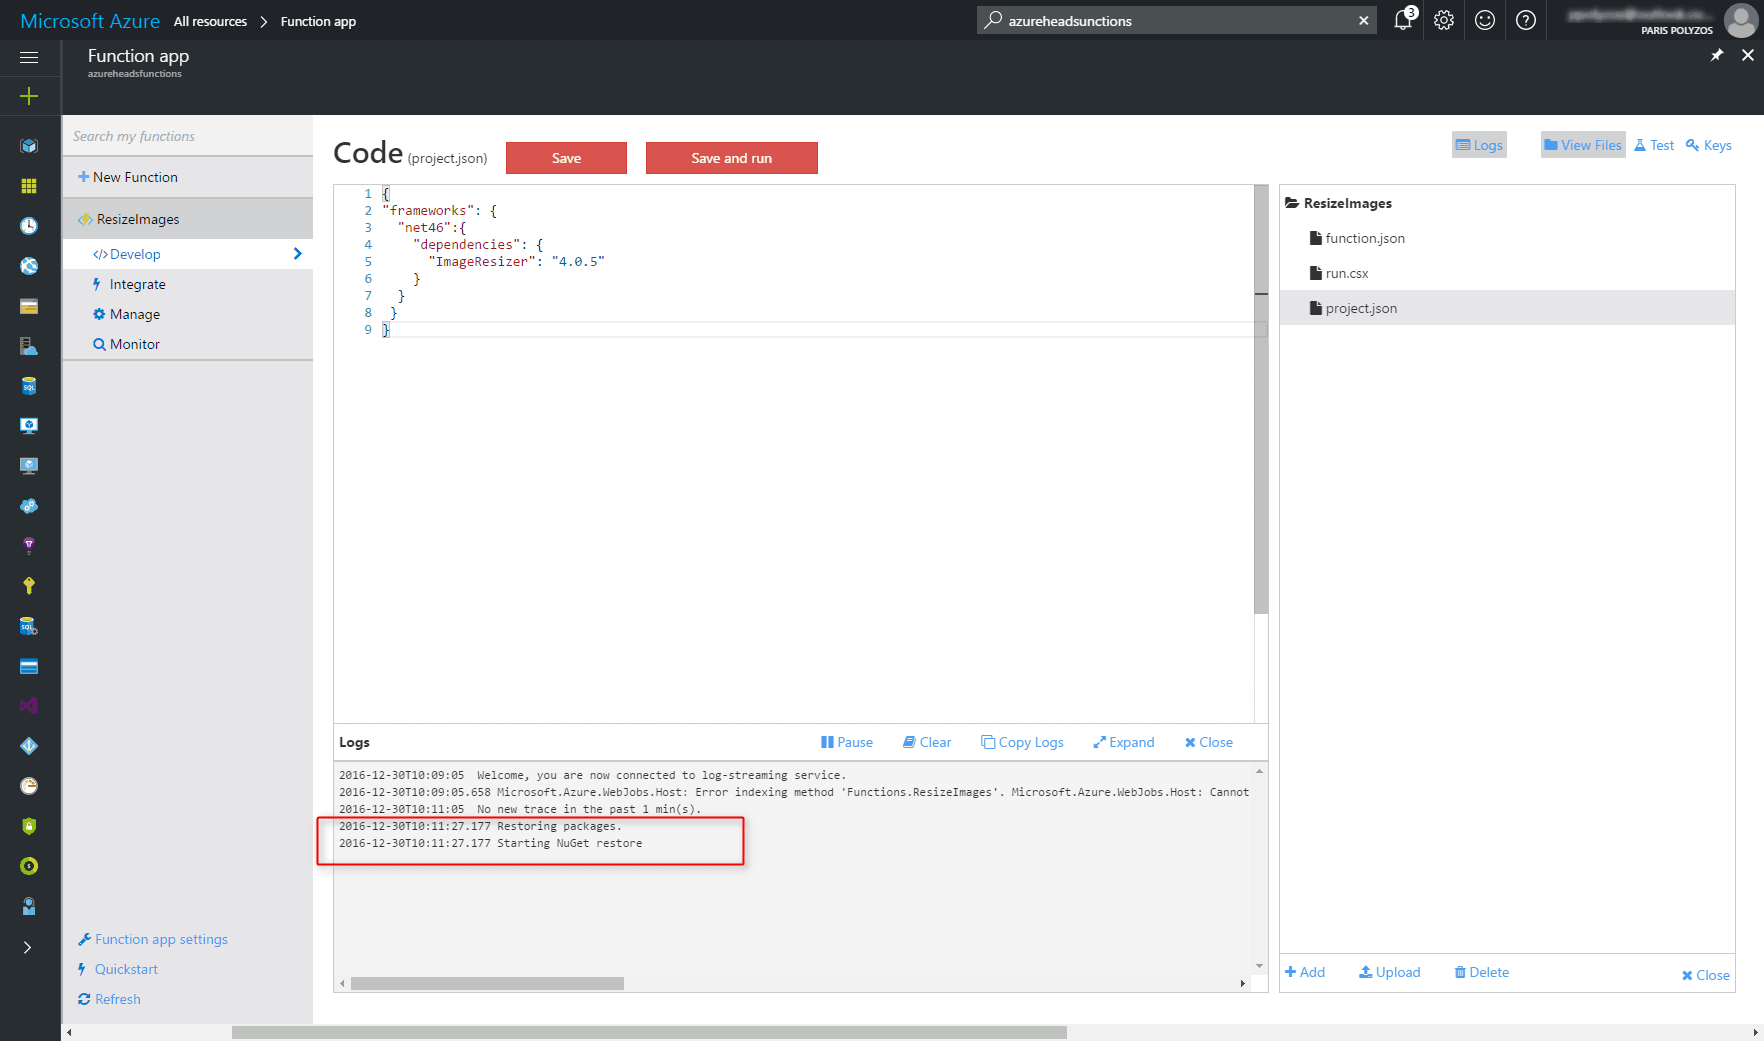
In order to resize every image that is uploaded in the gallery container you may use the ImageResizer NuGet package. To have this NuGet package installed you need to add a `project.json` file, where you will declare the use of this package, using the following code:
{
"frameworks": {
  "net46":{
    "dependencies": {
      "ImageResizer": "4.0.5"
    }
  }
 }
}
When you click on Save, notice on the logs pane the Restoring packages and Starting NuGet restore traces.
Configure Outputs
Click on the Integrate tab, and in the Outputs section, click on +New Output, select Azure Blob Storage and set the output parameters:
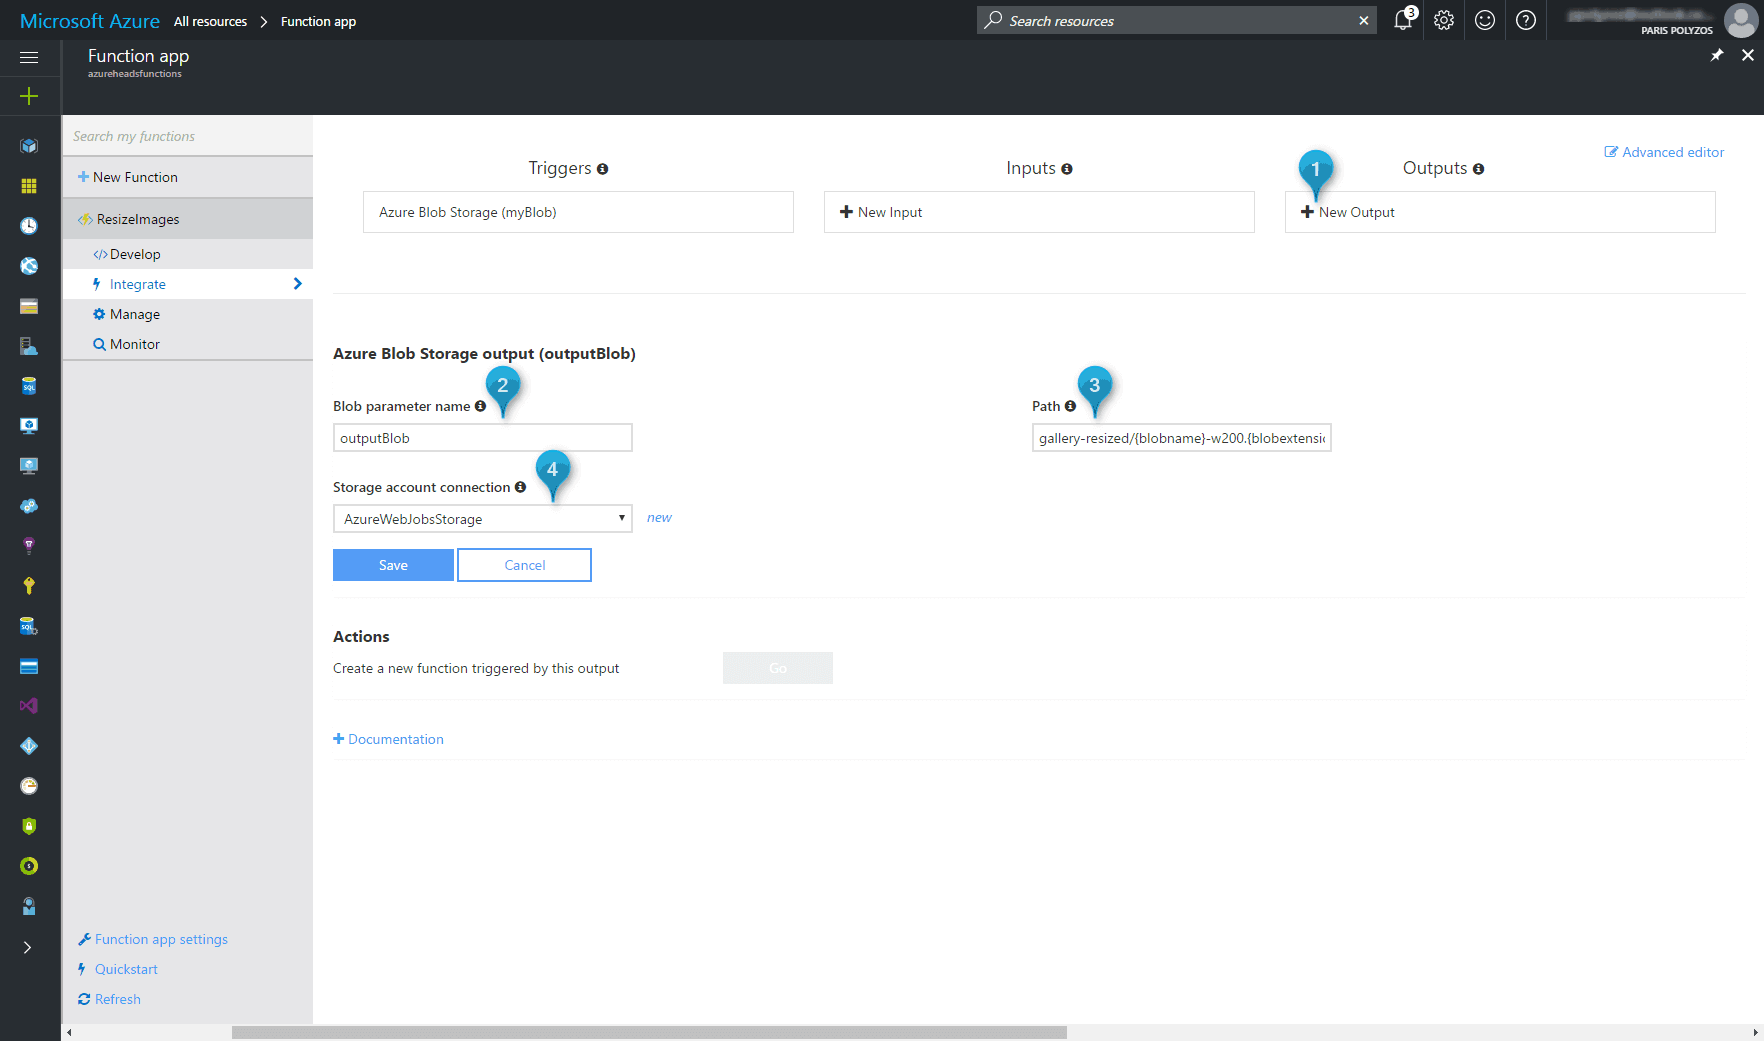
- outputBlob is the name of the parameter in the code for output binding to bind to.
- path is the path within your storage account to which the blob will be written, `gallery-resized` is the container where your resized images will be written using the same name and extension as the original blob, plus
w200which is the 200px width.
Code
The actual code of the function is the following:
using ImageResizer;
using ImageResizer.ExtensionMethods;

public static void Run(Stream myBlob, string blobname, string blobextension, Stream outputBlob, TraceWriter log)
{
    log.Info($"C# Blob trigger function Processed blob\n Name:{blobname} \n Size: {myBlob.Length} Bytes");

    var instructions = new Instructions
    {
        Width = 200,
        Mode = FitMode.Carve,
        Scale = ScaleMode.Both
    };
    ImageBuilder.Current.Build(new ImageJob(myBlob, outputBlob, instructions));
}
- the first two using statements are used to import the necessary namespaces from ImageResizer library;
- Run is the method that is going to be executed every time a new image is uploaded;
- myBlob, blobName and blobExtensions refer to the blob that is uploaded inthe gallery container and are defined in the Triggers section;
- outputBlob refers to the image that will be resized and written to the gallery-resized container;
- TraceWriter log is used to log output to your streaming logs.
Test
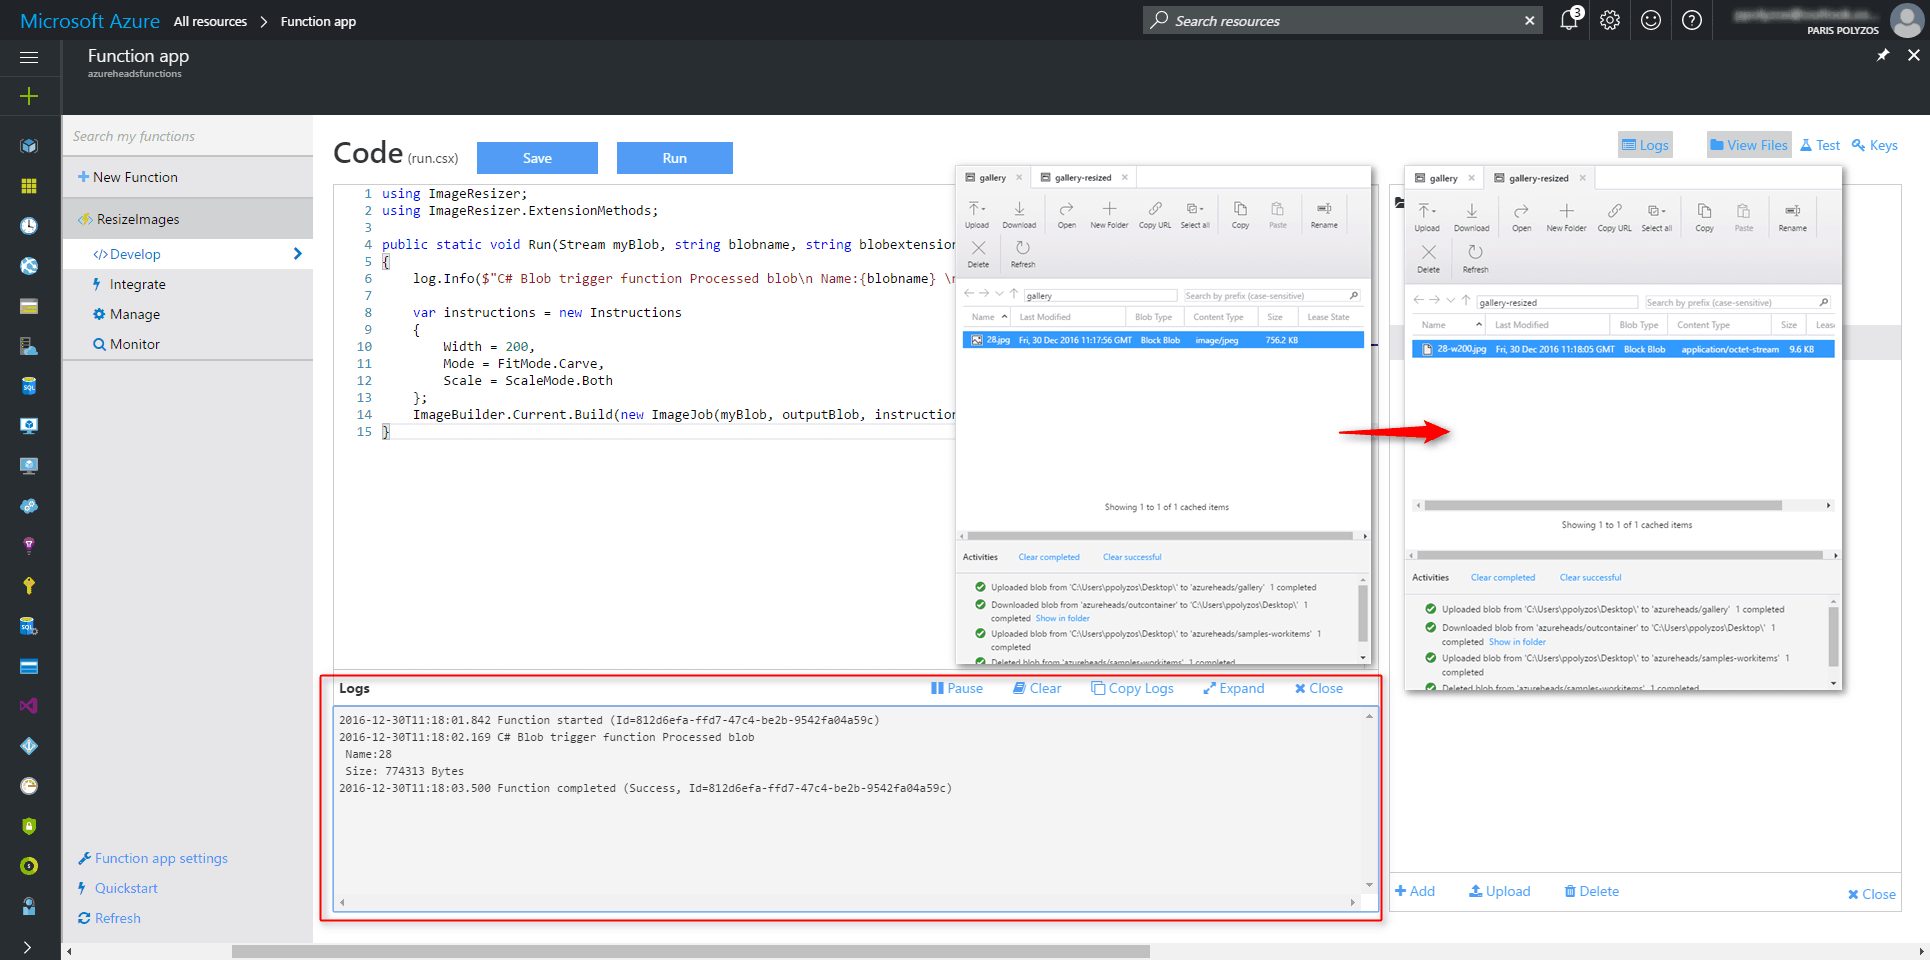
Now that you are all setup, you can test and monitor your function. You may upload an image to the gallery container, and then watch your function triggered in the logs pane and the output result to be written in gallery-resized container:
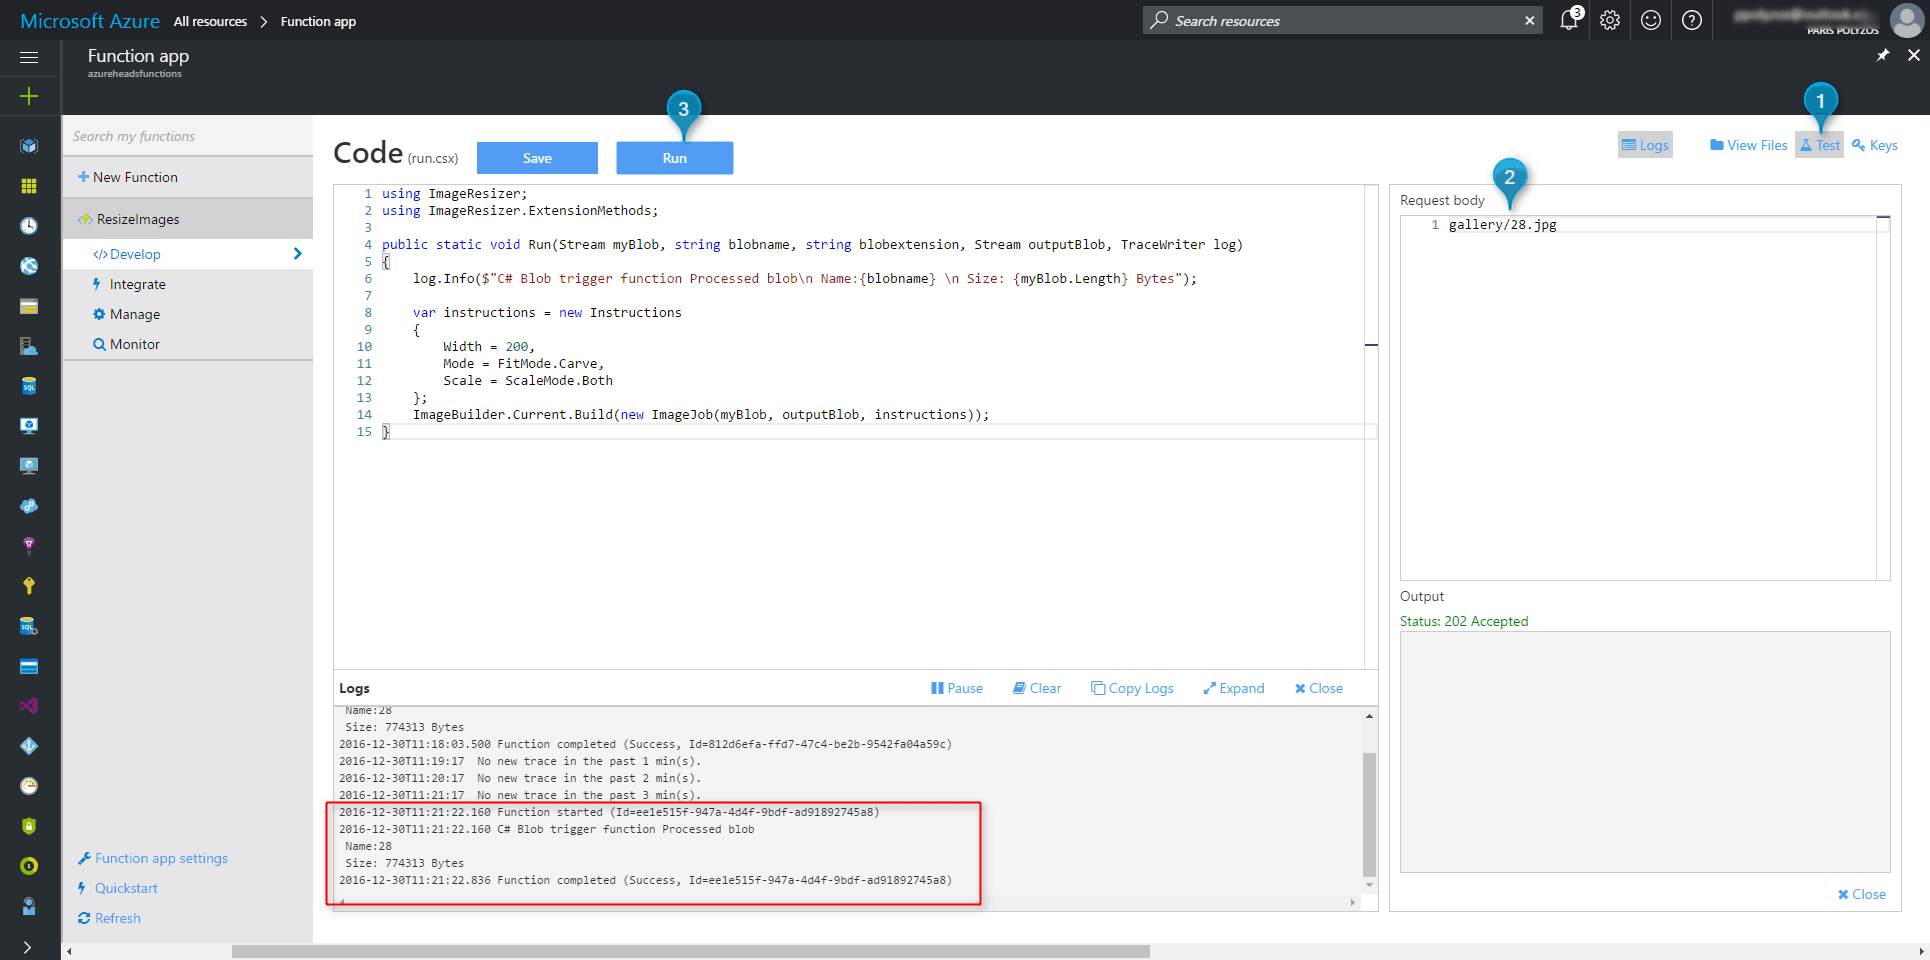
You can also test your function using the Test option, where you set the path for the file in the Request Body, watch your functions triggered and the Output result set to Status: 202 Accepted
Monitor
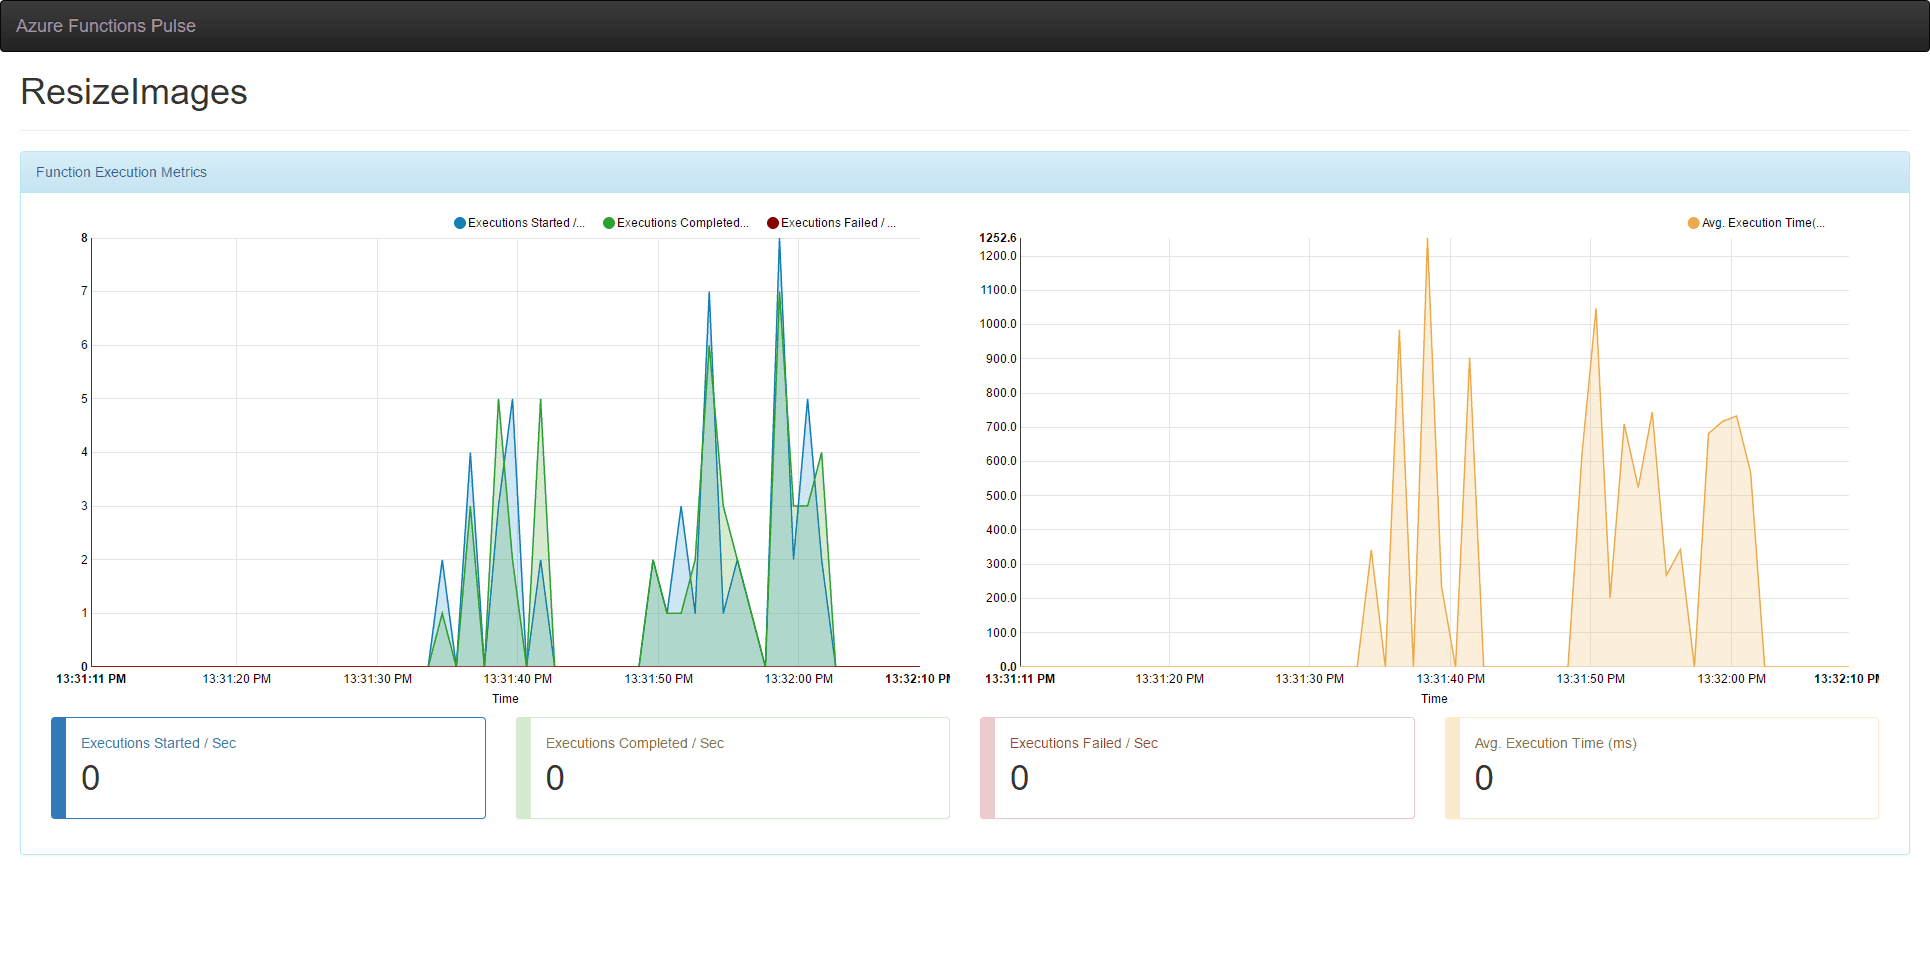
By clicking on the Monitor tab you gain access to a dashboard display info about every function’s execution, if it was successful or failed, when it ran and how long it took:

Another option is Live Event Stream, which can be accessed through the highlighted link in the red square. That link gives you access to real time event stream analytics, including details like:
- Executions Started / Sec
- Executions Completed / Sec
- Executions Failed / Sec
- Avg Execution Time (ms)
Turns out as application/octet-stream. How do i set the contenttype to image?
This is a bit tricky as by default the output Stream is set to `application/octet-stream` and `CloudBlockBlob` can’t be used for output binding. However, you can declare `CloudBlockBlob` as “inout” in `function.json` file and it will work properly.
function.json
{
  "bindings": [
    {
      "name": "myBlob",
      "type": "blobTrigger",
      "direction": "in",
      "path": "samples-workitems/{blobname}.{blobextension}",
      "connection": "AzureWebJobsStorage"
    },
    {
      "type": "blob",
      "name": "outputBlob",
      "path": "outcontainer/{blobname}-w200.{blobextension}",
      "connection": "AzureWebJobsDashboard",
      "direction": "inout"
    }
  ],
  "disabled": false
}
And the function code to achieve custom ContentType is the following:
#r "Microsoft.WindowsAzure.Storage" using ImageResizer; using ImageResizer.ExtensionMethods; using Microsoft.WindowsAzure.Storage.Blob; public static void Run(Stream myBlob, string blobname, string blobextension, CloudBlockBlob outputBlob, TraceWriter log) { log.Info($"C# Blob trigger function Processed blob\n Name:{blobname} \n Size: {myBlob.Length} Bytes"); var instructions = new Instructions { Width = 200, Mode = FitMode.Carve, Scale = ScaleMode.Both }; Stream stream = new MemoryStream(); ImageBuilder.Current.Build(new ImageJob(myBlob, stream, instructions)); stream.Seek(0, SeekOrigin.Begin); outputBlob.Properties.ContentType = "image/jpg"; outputBlob.UploadFromStream(stream); }2017-06-02T13:45:21 Welcome, you are now connected to log-streaming service.
2017-06-02T13:45:23.809 Function compilation error
2017-06-02T13:45:23.809 (1,7): error CS0246: The type or namespace name ‘ImageResizer’ could not be found (are you missing a using directive or an assembly reference?)
2017-06-02T13:45:23.809 (2,7): error CS0246: The type or namespace name ‘ImageResizer’ could not be found (are you missing a using directive or an assembly reference?)
2017-06-02T13:45:23.809 (8,28): error CS0246: The type or namespace name ‘Instructions’ could not be found (are you missing a using directive or an assembly reference?)
2017-06-02T13:45:23.809 (11,16): error CS0103: The name ‘FitMode’ does not exist in the current context
2017-06-02T13:45:23.809 (12,17): error CS0103: The name ‘ScaleMode’ does not exist in the current context
2017-06-02T13:45:23.809 (14,5): error CS0103: The name ‘ImageBuilder’ does not exist in the current context
2017-06-02T13:45:23.809 (14,36): error CS0246: The type or namespace name ‘ImageJob’ could not be found (are you missing a using directive or an assembly reference?)
2017-06-02T13:45:31.387 Script for function ‘ImageResizer’ changed. Reloading.
2017-06-02T13:45:31.718 (2,7): error CS0246: The type or namespace name ‘ImageResizer’ could not be found (are you missing a using directive or an assembly reference?)
2017-06-02T13:45:31.718 (3,7): error CS0246: The type or namespace name ‘ImageResizer’ could not be found (are you missing a using directive or an assembly reference?)
2017-06-02T13:45:31.718 (9,28): error CS0246: The type or namespace name ‘Instructions’ could not be found (are you missing a using directive or an assembly reference?)
2017-06-02T13:45:31.718 (12,16): error CS0103: The name ‘FitMode’ does not exist in the current context
2017-06-02T13:45:31.718 (13,17): error CS0103: The name ‘ScaleMode’ does not exist in the current context
2017-06-02T13:45:31.718 (15,5): error CS0103: The name ‘ImageBuilder’ does not exist in the current context
2017-06-02T13:45:31.718 (15,36): error CS0246: The type or namespace name ‘ImageJob’ could not be found (are you missing a using directive or an assembly reference?)
2017-06-02T13:45:31.718 warning AF004: Missing binding argument named ‘inputBlob’. Mismatched binding argument names may lead to function indexing errors.
2017-06-02T13:45:31.718 Compilation failed.
I am always getting this error I tried everything
You need to add ImageResizer library to `project.json` as described in the “Code your Function” section.
@ppolyzos I have added project.json still I am getting same error mentioned by @Tushar.
2018-02-04T19:25:54.180 Function compilation error
2018-02-04T19:25:54.180 run.csx(2,7): error CS0246: The type or namespace name ‘ImageResizer’ could not be found (are you missing a using directive or an assembly reference?)
2018-02-04T19:25:54.180 run.csx(3,7): error CS0246: The type or namespace name ‘ImageResizer’ could not be found (are you missing a using directive or an assembly reference?)
2018-02-04T19:25:54.180 run.csx(24,32): error CS0246: The type or namespace name ‘Instructions’ could not be found (are you missing a using directive or an assembly reference?)
2018-02-04T19:25:54.180 run.csx(27,20): error CS0103: The name ‘FitMode’ does not exist in the current context
2018-02-04T19:25:54.180 run.csx(28,21): error CS0103: The name ‘ScaleMode’ does not exist in the current context
2018-02-04T19:25:54.180 run.csx(30,9): error CS0103: The name ‘ImageBuilder’ does not exist in the current context
2018-02-04T19:25:54.180 run.csx(30,40): error CS0246: The type or namespace name ‘ImageJob’ could not be found (are you missing a using directive or an assembly reference?)
my project.json is as below
{
"frameworks": {
  "net46":{
    "dependencies": {
      "ImageResizer": "4.0.5",
      "WindowsAzure.Storage": "4.3.0"
    }
  }
 }
}
I dont see ImageResizer dll in project.lock.json. Am I missing something?
You can try the following:
– project.json
{
  "frameworks": {
    "net46":{
      "dependencies": {
        "ImageResizer": "4.1.10"
      }
    }
   }
}
– function.json
{
  "bindings": [
    {
      "name": "myBlob",
      "type": "blobTrigger",
      "direction": "in",
      "path": "input-images/{name}.{blobextension}",
      "connection": "AzureWebJobsStorage"
    },
    {
      "type": "blob",
      "name": "outputBlob",
      "path": "output-images/{name}-w200.{blobextension}",
      "connection": "AzureWebJobsDashboard",
      "direction": "out"
    }
  ],
  "disabled": false
}
– run.csx
using ImageResizer; // additional using ImageResizer.ExtensionMethods; // libraries public static void Run(Stream myBlob, // trigger string name, // input binding Stream outputBlob, // output TraceWriter log) // inject services { log.Info($"C# Blob trigger function Processed blob :{name}"); log.Info($"Size: {myBlob.Length} Bytes"); var instructions = new Instructions { Width = 200, Mode = FitMode.Carve, Scale = ScaleMode.Both }; Stream stream = new MemoryStream(); ImageBuilder.Current.Build(new ImageJob(myBlob, outputBlob, instructions)); }Hi,
Thank you for your article. I was wondering if there is a way to resize the images stored in every container of a storage and not a specific one. In our storage we create a new container for every bill we handle and then add pictures to that container related to the bill. How could I create thumbnails to those containers using Azure functions?
I don’t think this is possible at the moment. Usually you need to pass the container to monitor in the path parameter.
However you could follow another approach where you have one container for input and one container for output, and then create a folder inside each container based on your customer id or name, or use your customer’s id before input/output blob name.
Even in Azure WebJobs this feature is not yet possible. There is an open issue here, so you could vote for it.
Thank you for your reply. I was looking around and found that maybe using Azure Event Grid could be a good approach although it is still a preview version.
Indeed Azure Event Grid is a very good approach. You can have a look at this tutorial.
hello ppolyzos,
Great artical by the way, saved almost day work 🙂
is there any way to create thumbnail out of Uploaded video using azure function?
hey – found your code – is it possible to use the resizer in flow.microsoft.com as a file content parameter?
(i want do resize an image on sharepoint, scale down to get below the 4MB limit’s for cognitive services)
Although, you can not directly integrate Azure Functions in Microsoft Flow, not available yet as connector, you can do it using Custom APIs. Every Azure Function has an API definition that you can use to add a function in your flow.
You can have a look at the following example on how to call an Azure Function from Microsoft flow. Also, how to call custom APIs will help you too.