In this post, we are going to explore the necessary steps to build a cluster on Azure Container Service and then setup RabbitMQ using Kubernetes as orchestrator and helm as package manager.
First things first, let’s briefly introduce the services we are going to use.
What is Azure Container Service?
Azure Container Service (ACS) allows you to create, configure and manage a cluster of virtual machines that are pre-configured to run containerized applications. It uses an optimized configuration of popular open-source scheduling and orchestration tools. Azure Container Service leverages the Docker container format to ensure that your application containers are fully portable. It provides a container hosting environment and exposes API endpoints for popular orchestrators, like DC/OS, Docker Swarm or Kubernetes.
For more info, see here.
What is Kubernetes?
Google started the Kubernetes project in 2014, and is built upon a decade and a half of experience that Google has with running production workloads at scale, combined with best-of-breed ideas and practices from the community. Kubernetes is an open-source system for automating deployment, scaling, and management of containerized applications. It groups containers that make up an application into logical units for easy management and discovery.
A very popular project, with some of its key features being automatic binpacking, namely the ability to automatically place containers based on their resource requirements and constraints, horizontal scaling, with which you can scale your app up and down automatically based on rules, self-healing, service discover, load balancing, automatic rollouts and rollbacks, etc.
More info can be found here.
What is Helm?
Helm is a tool for managing Kubernetes charts. Charts are packages of pre-configured Kubernetes resources. They help you:
- Find and use popular software packaged in the form of Kubernetes charts
- Share your own applications in the form of Kubernetes charts
- Create reproducible builds of your Kubernetes applications
- Intelligently manage your Kubernetes manifest files
What is RabbitMQ?
RabbitMQ is the most widely deployed open-source message broker that implements the Advanced Message Queuing Protocol (AMQP). RabbitMQ server is written in the Erlang programming language and is built on the Open Telecom Platform framework for clustering and failover.
Helm provides us with a chart which bootstraps a RabbitMQ deployment on a Kubernetes cluster.
Let’s begin!
Step 1. Install Azure CLI 2.0
In order to build and setup a cluster on Azure Container Service, you will need Azure CLI 2.0., Azure’s new command-line experience for managing Azure resources.
Azure CLI 2.0 is optimized for managing and administering Azure resources from the command line, and for building automation scripts that work against the Azure Resource Manager.
In order to install it, please follow this guide.
Step 2. Login into Azure
When being on a Windows machine, you may use bash on Ubuntu on Windows and run the following commands in order to login into Azure:
$ az login
$ az account set--subscription "<subscription_id>"
$ az account show
Step 3. Create the ACS Kubernetes Cluster
To create the ACS Kubernetes cluster, you will need some variables to store:
- the name of the resource group that will be used
- the location where the Kubernetes cluster will be deployed
- the DNS name prefix for the cluster
- the cluster name
Step 3.1 Create the resource group
$ RESOURCE_GROUP=acs-group
$ LOCATION=northeurope
$ az group create --name=$RESOURCE_GROUP --location=$LOCATION
Step 3.2 Create the Kubernetes Cluster
$ DNS_PREFIX=<unique_value>
$ CLUSTER_NAME=<any_acs_cluster_name>
$ az acs create --orchestrator-type=kubernetes --resource-group $RESOURCE_GROUP --name=$CLUSTER_NAME --dns-prefix=$DNS_PREFIX --generate-ssh-keys
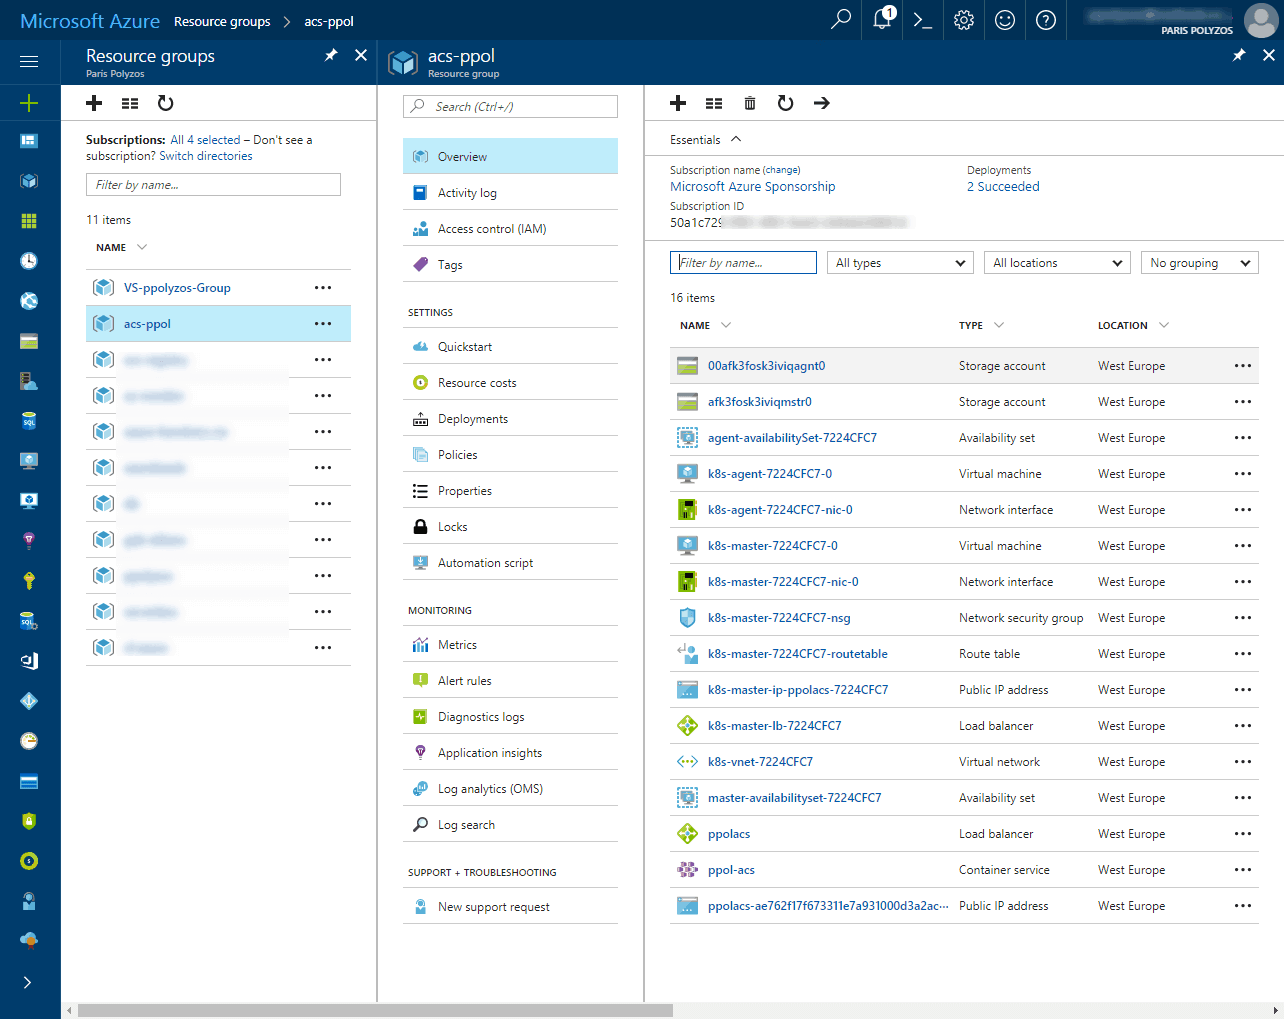
When this process is completed, which takes some time (around 15 minutes), you can check at the Azure portal the resources that have been created with the command above.
Step 4. Kubernetes CLI to manage the cluster
To manage your cluster, you can install the Kubernetes CLI, a command line interface for running commands against Kubernetes clusters.
Step 4.1 Install Kubernetes CLI
$ sudo az acs kubernetes install-cli
Step 4.2 Grab the Kubernetes Cluster config locally
$ az acs kubernetes get-credentials --resource-group=$RESOURCE_GROUP --name=$CLUSTER_NAME
After executing the command above, you will be asked to enter a password for private key.
After that, you will be able to view the available nodes and master in your cluster
kubectl get nodes
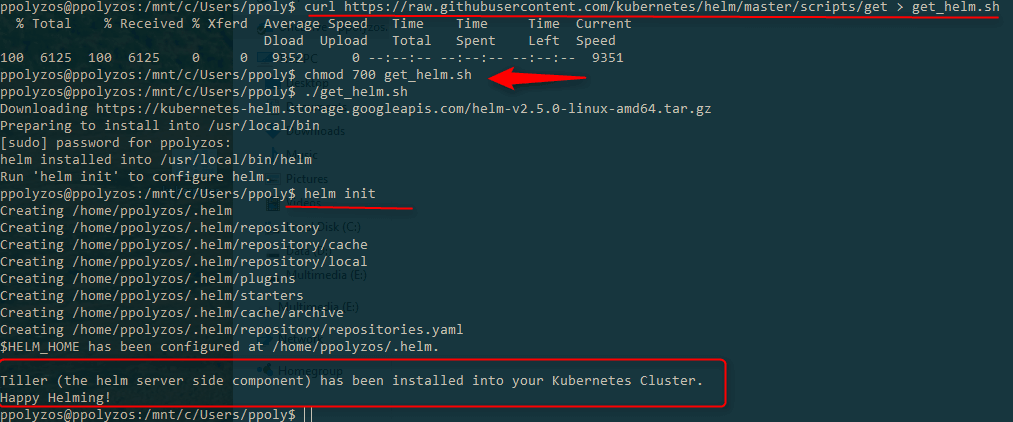
Step 5. Installing Helm in the Kubernetes Cluster
To install it in your cluster , you need to execute the following commands:
$ curl https://raw.githubusercontent.com/kubernetes/helm/master/scripts/get > get_helm.sh
$ chmod 700 get_help.sh
$ ./get_helm.sh
$ helm init
After that, the Helm Tiller
Step 6. Install RabbitMQ
To install RabbitMQ using Helm, execute the following command:
$ helm install stable/rabbitmq
Once it is installed, you get info on how to get the user credentials to access RabbitMQ’s management service. Username is `user`, while for password you need the following command:
$(kubectl get secret --namespace default truculent-whale-rabbitmq -o jsonpath="{.data.rabbitmq-password}" | base64 --decode)
and for the Erlang cookie:
$(kubectl get secret --namespace default truculent-whale-rabbitmq -o jsonpath="{.data.rabbitmq-erlang-cookie}" | base64 --decode)
Accessing RabbitMQ’s management service
$ export POD_NAME=$(kubectl get pods --namespace default -l "app=truculent-whale-rabbitmq" -o jsonpath="{.items[0].metadata.name}")
$ echo URL : http://127.0.0.1:15672
$ kubectl port-forward $POD_NAME 15672:15672
and you can access RabbitMQ’s management service on http://127.0.0.1:15672.
Bonus Step. Browse the Kubernetes UI
You can access the Kubernetes web UI for your cluster, right from your machine using `kubectl` in proxy mode. The command:
$ kubectl proxy
runs an authenticated proxy on localhost to view the Kubernetes web UI on http://localhost:8001/ui