If you have an ASP.NET Core web application that already has JWT authorization, this guide will help you add JWT (JSON Web Token) support to the Swagger UI.
What is Swagger UI?
Swagger UI is a collection of HTML, Javascript and CSS assets that dynamically generates beautiful documentation from a Swagger-compliant API. You can learn more in https://swagger.io/ and in the project’s GitHub repository.
Setup Swagger UI in ASP.NET Core
In order to use Swagger UI in your ASP.NET Core project you need a NuGet package called Swashbuckle.
dotnet add package swashbuckle.aspnetcore
or using the NuGet package manager in Visual Studio:
Then you need to add Swagger support toConfigureServices(IServiceCollection services) and toConfigure(IApplicationBuilder app, IHostingEnvironment env) in your application’s Startup.cs file. To do so, you need to create a SwaggerServiceExtensions class and add the necessary code to support Swagger in your app.
using Microsoft.AspNetCore.Builder;
using Microsoft.Extensions.DependencyInjection;
using Swashbuckle.AspNetCore.Swagger;

namespace JwtSwaggerDemo.Infrastructure
{
    public static class SwaggerServiceExtensions
    {
        public static IServiceCollection AddSwaggerDocumentation(this IServiceCollection services)
        {
            services.AddSwaggerGen(c =>
            {
                c.SwaggerDoc("v1.0", new Info { Title = "Main API v1.0", Version = "v1.0" });

                c.AddSecurityDefinition("Bearer", new ApiKeyScheme
                {
                    Description = "JWT Authorization header using the Bearer scheme. Example: \"Authorization: Bearer {token}\"",
                    Name = "Authorization",
                    In = "header",
                    Type = "apiKey"
                });
            });

            return services;
        }

        public static IApplicationBuilder UseSwaggerDocumentation(this IApplicationBuilder app)
        {
            app.UseSwagger();
            app.UseSwaggerUI(c =>
            {
                c.SwaggerEndpoint("/swagger/v1.0/swagger.json", "Versioned API v1.0");

                c.DocExpansion("none");
            });

            return app;
        }
    }
}
Changes in Startup.cs file
Using the above class, the only thing you need to do in your Startup.cs file is the following:
namespace JwtSwaggerDemo
{
    public class Startup
    {
        // This method gets called by the runtime. Use this method to add services to the container.
        public IServiceProvider ConfigureServices(IServiceCollection services)
        {
            //... rest of services configuration
            services.AddSwaggerDocumentation();

            //...
        }

        // This method gets called by the runtime. Use this method to configure the HTTP request pipeline.
        public void Configure(IApplicationBuilder app, IHostingEnvironment env)
        {
            if (env.IsDevelopment())
            {
                //.... rest of app configuration
                app.UseSwaggerDocumentation();
            }
            //.... rest of app configuration
        }
    }
}
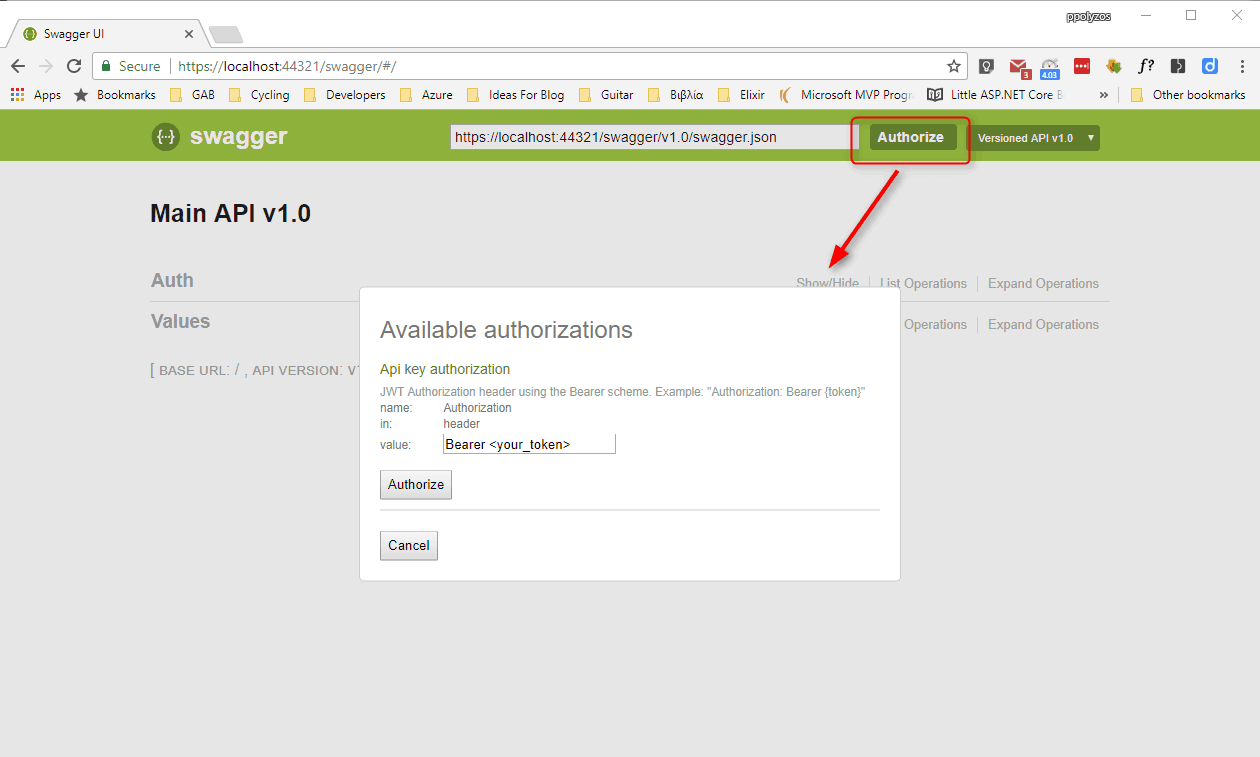
Authorize requests in Swagger UI
Now, when you load the Swagger’s UI address (e.g: https://localhost:44321/swagger/#/), you will see an Authorize button at the top. Clicking on it leads to a modal window, which allows you to authorize your app with a JWT token, by adding `Bearer <your_token>` in the value input field.
It is like logging in with a user and, therefore, all your next API calls will be using this token to authorize requests.
How it works
In the following video, you may see how to request a JWT token for a user and then use it to access authorized requests.
For swagger 2.x
To support JWT authentication in Swagger 2.x you need to update your code with the following snippet:
using Microsoft.AspNetCore.Builder;
using Microsoft.Extensions.DependencyInjection;
using Swashbuckle.AspNetCore.Swagger;

namespace JwtSwaggerDemo.Infrastructure
{
    public static class SwaggerServiceExtensions
    {
        public static IServiceCollection AddSwaggerDocumentation(this IServiceCollection services)
        {
            services.AddSwaggerGen(c =>
            {
                c.SwaggerDoc("v1.0", new Info { Title = "Main API v1.0", Version = "v1.0" });

                // Swagger 2.+ support
                var security = new Dictionary<string, IEnumerable<string>>
                {
                    {"Bearer", new string[] { }},
                };

                c.AddSecurityDefinition("Bearer", new ApiKeyScheme
                {
                    Description = "JWT Authorization header using the Bearer scheme. Example: \"Authorization: Bearer {token}\"",
                    Name = "Authorization",
                    In = "header",
                    Type = "apiKey"
                });
                c.AddSecurityRequirement(security);
            });

            return services;
        }

        public static IApplicationBuilder UseSwaggerDocumentation(this IApplicationBuilder app)
        {
            app.UseSwagger();
            app.UseSwaggerUI(c =>
            {
                c.SwaggerEndpoint("/swagger/v1.0/swagger.json", "Versioned API v1.0");

                c.DocumentTitle = "Title Documentation";
                c.DocExpansion(DocExpansion.None);
            });

            return app;
        }
    }
}
Awesome!
Thanks!
Great!
Very helpful! Thanks.
In swagger 2.x you need to accompany your scheme definition with a corresponding requirement to indicate that the scheme is applicable to all operations in your API:
c.AddSecurityRequirement(new Dictionary<string, IEnumerable>
{
{ “Bearer”, new string[] { } }
});
Credits:
https://stackoverflow.com/questions/49379943/authentication-swagger-with-jwt-bearer-token
For swagger 2.x I have used the following code:
This breaks in core 2.0 swagger v2+ but if you follow:
https://github.com/domaindrivendev/Swashbuckle.AspNetCore/issues/603
You’ll find the fixes that work.
Thanks for the input. I have updated the post to include support for swagger 2.x
This is great, but kinda sucks that it doesn’t remember the token when you refresh the page.
Is there anything planned or possible with that?
(right now I’m keeping notepad open with a token to copy each time i recompile)
I wish to have that option too!
Besides doing some tricky things with javascript, I haven’t found any workaround to persist a token across page refreshes.
Here is an issue that you may find useful (https://github.com/DarkaOnLine/L5-Swagger/issues/120).
thanks!
Can you pls also post the code for the Auth/token to generate the bearer token?
I have created a simple asp.net core application that can be used as a startup template.
This commit describes all the necessary steps to add JWT Authentication support in your project.
The link gives 404. Have you removed the repo?
Can you please let me know which link I have missed?
Thanks,
Just what I needed
I have the issue that any random token get the tab said authorized, but actually the swagger client is not authenticated at all
Perfect! Can I filter some endpoints no need token?
You can use the `[AllowAnonymous]` attribute if you want your API endpoint to be public.
Otherwise use `[Authorized(Roles=”Admin”)]` for Role-based Authentication or `[Authorize(Policy = “EmployeeOnly”)]` for claims-based authorization.
You can read more here and here if you want to do filtering based on security policies in Swagger.
Great tutorial, Thanks.
Thank you so much for the article on jwt token.
Huge thanks!!
Why does not work the [Authorized(Roles=”Admin”)] ?
I am using the below code in StartUp.cs.
services.AddSwaggerGen(t =>
{
t.SwaggerDoc(“v1”, new OpenApiInfo() { Title = “RestaurantApp”, Version = “Version1” });
t.AddSecurityDefinition(“Bearer”,
new OpenApiSecurityScheme
{
Description = “Roles required: Admin”,
Name = “Authorization”,
In = ParameterLocation.Header,
Type = SecuritySchemeType.ApiKey,
})
});
Also, in my controller I am using [Authorized(Roles=”Admin”)] . My program is working correctly in Postman.
Thank you.
Have you tried what is specified in this link?
Do you get any error?
Is the problem that this endpoint does not contain the authorization role you have specified or something else?
I have tried the same code with Postman and is running correctly. The code is:
[HttpGet(“get_all_customers”)]
[Authorize(Roles = Role.Admin)]
public async Task GetAllCustomers()
{
var customers = await _customerService.GetAllCustomersAsync();
return Ok(customers);
}.
The problem is that it can not be Authorized with swagger . In postman ,it is working. If I delete the [Authorize(Roles = Role.Admin)] command , it’s running. Also, if I am using [Authorize] is running correctly. Something is going wrong with swagger documentation and [Authorize(Roles = Role.Admin)] command.
Thank you!
You are adding the same key used in Postman as described in the video above and you still get a 401?
The only thing I see in Swagger docs is that OpenID is not supported yet for the Swagger UI https://swagger.io/docs/specification/authentication/openid-connect-discovery/.
However, if you can send me a small video with the problem I might investigate a little bit further.