Azure Blob Storage is part of the Microsoft Azure Storage service, providing a relatively low cost service for storing large amounts of unstructured data, such as text or blobs; “blobs” stands for Binary Large Objects. A blob is a collection of binary data stored as a single entity. It typically comprises images, audio, or any other file.
In this tutorial, we will describe the process of creating a Web API project and uploading a file directly to a container in your Azure Storage account.
Create a storage account in Microsoft Azure
From Preview Portal, select New > Data and Storage > Storage Account
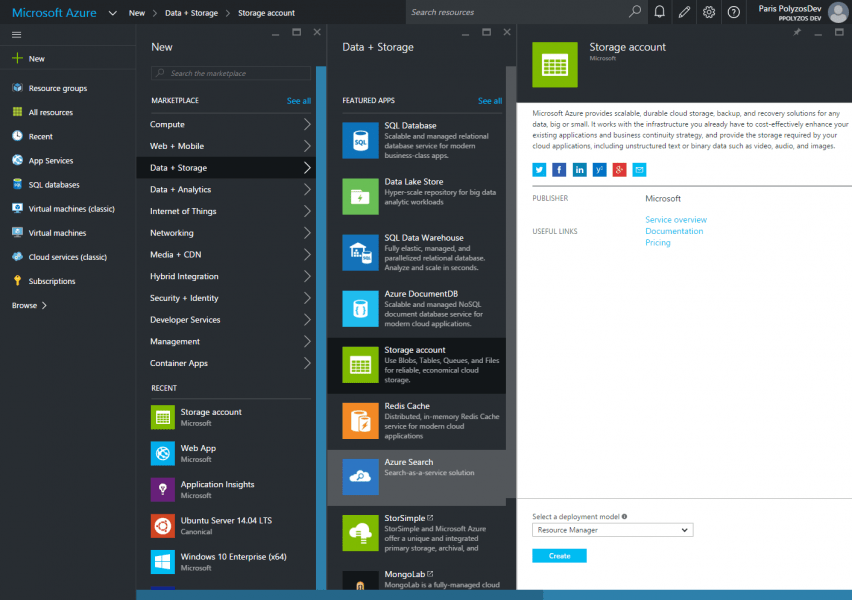
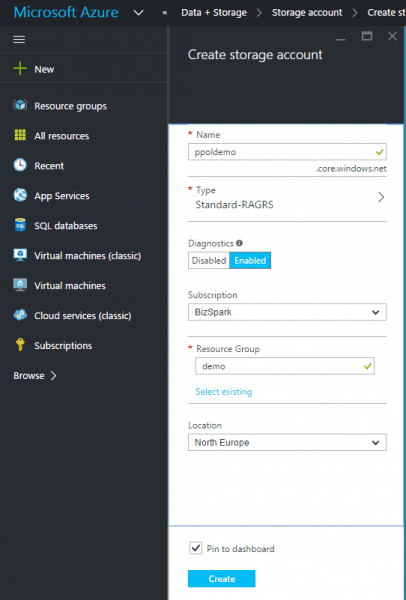
Enter the name, the resource group and the location of your storage account.
After a few minutes your storage account will be ready to use!
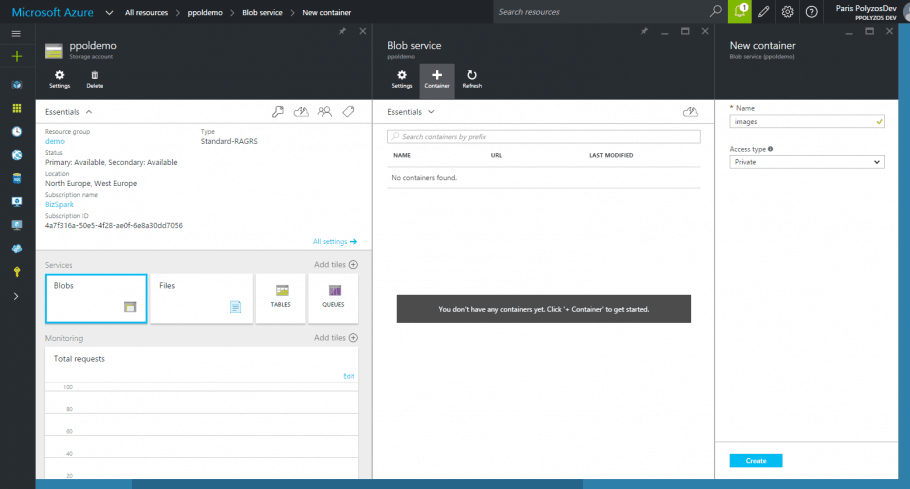
Create a container to store your files
In order to store your files in Azure Blob Storage, you need to have a container, which groups any set of blobs. A container may have two different access types:
- Private, which does not provide anonymous access to the container or the blobs therein.
- Public, in which case all the blobs within the container can be accessed publicly through anonymous access; however, in order to list all blobs in a container, the account credentials are necessary.
Let’s name the container in our example “images” and set its access type to Public.
Storage Account Credentials
In order to have access to the container and upload your files, you are going to need:
- Storage Account Name and Access Key, or
- Connection String
both provided from Settings > Access Keys.

Create a project in Visual Studio
For starters, you need to create a New ASP.NET project in Visual Studio, selecting Web API from ASP.NET 4.6 Templates and leaving Authentication to “No Authentication”.
Install Windows Azure Storage Nuget package
Then, search for “azure storage” in Nuget Gallery
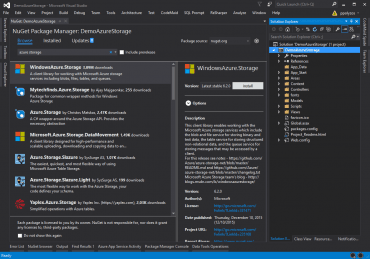
or type the command below from Package Manager Console:
Install-Package WindowsAzure.Storage
Add Azure Storage Credentials
Subsequently, add your storage account credentials in the AppSettings section of your Web.config:
<appSettings>
 <add key="storage:account:name" value="{account_name}"/>
 <add key="storage:account:key" value="{account_key}"/>
</appSettings>
Create a Custom Stream Provider
Afterwards, you need to extend MultipartFormDataStreamProvider class by creating your own AzureStorageMultipartFormDataStreamProvider, which will be responsible for writing streamed data directly to a blob in your container.
public class AzureStorageMultipartFormDataStreamProvider : MultipartFormDataStreamProvider
{
    private readonly CloudBlobContainer _blobContainer;
    private readonly string[] _supportedMimeTypes = { "image/png", "image/jpeg", "image/jpg" };

    public AzureStorageMultipartFormDataStreamProvider(CloudBlobContainer blobContainer) : base("azure")
    {
        _blobContainer = blobContainer;
    }

    public override Stream GetStream(HttpContent parent, HttpContentHeaders headers)
    {
        if (parent == null) throw new ArgumentNullException(nameof(parent));
        if (headers == null) throw new ArgumentNullException(nameof(headers));

        if (!_supportedMimeTypes.Contains(headers.ContentType.ToString().ToLower()))
        {
            throw new NotSupportedException("Only jpeg and png are supported");
        }

        // Generate a new filename for every new blob
        var fileName = Guid.NewGuid().ToString();

        CloudBlockBlob blob = _blobContainer.GetBlockBlobReference(fileName);

        if (headers.ContentType != null)
        {
            // Set appropriate content type for your uploaded file
            blob.Properties.ContentType = headers.ContentType.MediaType;
        }

        this.FileData.Add(new MultipartFileData(headers, blob.Name));

        return blob.OpenWrite();
    }
}
Create an Upload Api Controller
Finally, you need to create an Api Controller, which will provide the API for the file to be uploaded in your storage account.
[RoutePrefix("api/upload")]
public class UploadController : ApiController
{
    private const string Container = "images";

    [HttpPost, Route("")]
    public async Task<IHttpActionResult> UploadFile()
    {
        if (!Request.Content.IsMimeMultipartContent("form-data"))
        {
            throw new HttpResponseException(HttpStatusCode.UnsupportedMediaType);
        }

        var accountName = ConfigurationManager.AppSettings["storage:account:name"];
        var accountKey = ConfigurationManager.AppSettings["storage:account:key"];
        var storageAccount = new CloudStorageAccount(new StorageCredentials(accountName, accountKey), true);
        CloudBlobClient blobClient = storageAccount.CreateCloudBlobClient();

        CloudBlobContainer imagesContainer = blobClient.GetContainerReference(Container);
        var provider = new AzureStorageMultipartFormDataStreamProvider(imagesContainer);

        try
        {
            await Request.Content.ReadAsMultipartAsync(provider);
        }
        catch (Exception ex)
        {
            return BadRequest($"An error has occured. Details: {ex.Message}");
        }

        // Retrieve the filename of the file you have uploaded
        var filename = provider.FileData.FirstOrDefault()?.LocalFileName;
        if (string.IsNullOrEmpty(filename))
        {
            return BadRequest("An error has occured while uploading your file. Please try again.");
        }

        return Ok($"File: {filename} has successfully uploaded");
    }
}
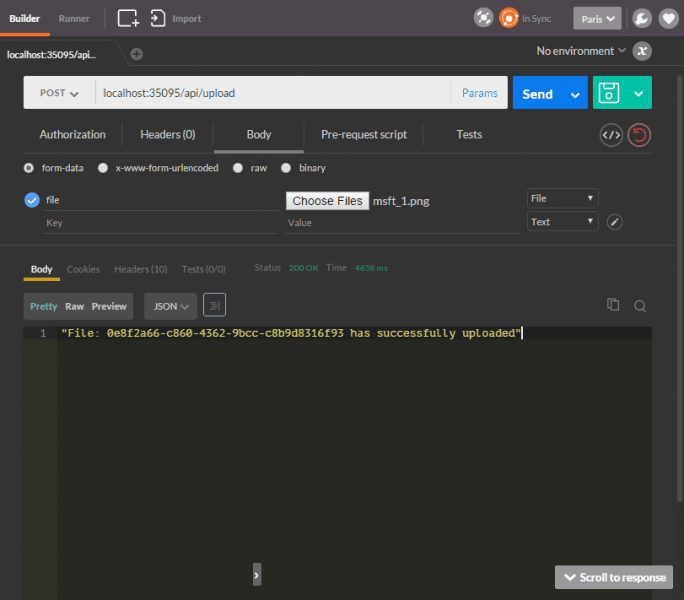
Testing Request with Postman
You can create a simple Post Request through Postman, to test how the above works.
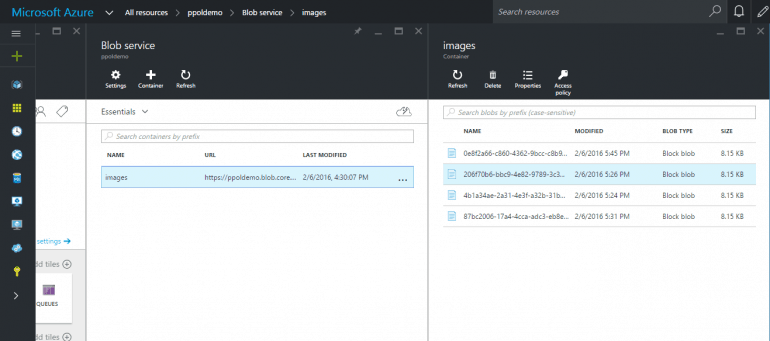
View your files in Azure Blob Storage
All successfully uploaded images will be available in “images” container, in Azure Preview Portal.
You can download the source code from here.
let’s assume that the client sends:
– the file
– md5 hash as a parameter.
What is the best method to check, that saved blob md5 hash is equal with client md5 hash?
Any blob file stored in Azure Storage can have Properties and Metadata.
In blob’s file Properties you can use the ContentMD5, which is the base64-encoded binary MD5 value.
If you want to have a custom value for validation, you can use blob’s Metadata but you need to have in mind that the total size of the metadata, including both the name and value together, may not exceed 8 KB in size.
For additional info you can have a look at the following articles:
https://msdn.microsoft.com/en-us/library/dd179404.aspx
https://www.simple-talk.com/cloud/platform-as-a-service/azure-blob-storage-part-6-blob-properties,-metadata,-etc/
Can you please provide a solution where I could post the formdata & files on the same request.
1. save files to blob
2. read formdata & save it under DB
Thanks,
Mitesh
You can have a look at gab-demo-athens, a demo project created for Global Azure Bootcamp Athens 2016, where user can upload image files and through Azure Cognitive Services, detect faces on them.
In FileUploadController I can upload multiple files and then store them to database.
If you need something more specific, don’t hesitate to ask me.
What’s good practice for security using Storage Blobs? I have a mobile app that with access RESTful web services provided by the Web API, can i just used my Azure storage access keys within my Web API or is it better to use a SAS key even though the mobile clients aren’t talking directly to the Blob (going through the Web API) (or does it even not work like that? Sorry still learning)
Shared access signature (SAS) provides a powerful way to grant limited access to objects in your storage account to other clients, without having to expose your account key.
If you have private blobs that you want to be accessible only, for example, by certain users, I would suggest you to provide a REST API call, in your web api controller, that will generate the Shared Access Signature to access this blob for limited time, or to apply a certain security policy.
Storage account credentials (account name and key) should not be available to your mobile app to access storage account directly, but only through your Web API app. Consider the fact that, in case your access keys are compromised, you need to update all your mobile clients to continue accessing your storage account, while in the other case you simply update the credentials to your app and none of your clients is affected.
I would suggest to have a look at this article
Create and use shared access signatures on how to access your blobs using SAS and Stored Access Policy.
Great article! Thanks for sharing. In my use case, I had a few extract string values being posted in the form body. If you’re passing in multiple, GetStream() is called for each one. In the case of non-file values, I had to return Stream from the base class. Otherwise, you’ll get an exception that “stream cannot be read” since “blob.OpenWrite()” does not expose the ability to read the stream and prevents you from getting at those FormData[] values.
Great article. Thanks for help!
Hi, can you give me the full path of the Postman request URL and also show me how the authorization is structured in Postman? Thank you.
Your server needs to know how to access your storage account container and this info can be provided in `UploadController`:
The full path of the Postman URL is shown in the image above.
As far as securing your API calls, it depends on the approach you have followed. For example, if you have selected to authorize access to your calls using Tokens, then in Postman you need to add a header: `Authorization` with a value `Bearer {AuthToken}`
PS: If I misunderstood your questions don’t hesitate to contact me.
Hi
Thank you for the example works great:)
The web api works fine through Postman , but for some reason I am struggling to post through Xamarin android.
Do you have any experience in this?
Thank you
Hmm, what error do you get?
Are you using System.Net.WebClient.UploadFile Method?
You might also have a look at this video, it may help you:
https://www.youtube.com/watch?v=IVvJX4CoLUY
Hi
Thanks I resolved my problem in the end. Thanks for the linked it helped as well.
The problem after getting everything to work was the MIME types, but i only removed that and it worked perfectly.
Thanks a bunch:)
return unsupported media type
sorry
the error
Error writing MIME multipart body part to output stream.
Can you please check if you have the necessary permissions for your application to write to the folder you are using.
Thank you for the post. I was working on a demo and wanted to move from a local demo to an Azure demo, so wanted to use Azure Strorage. This post was spot on, aside from the mimetypes. The _supportedMimeTypes should start with “image/” not “images/”.
Oooops, you are right :). `_supportedMimeTypes` updated properly.
Thanks again for the feedback.
How can i get the URL of the image ?
The url of a file stored in a Azure Storage container, is in the following format:
`https://{storage_account_name}.blob.core.windows.net/{container}/{filename}`
In this demo:
So the url will be: `https://ppoldemo.blob.core.windows.net/images/0e8f2a66-c860-4362-9bcc-c8b9d8316f93`
In addition, you can view file’s url through Azure Portal. Clicking on a file pops up a sidebar where among other details, gives you file’s URL.
An other way to view file details, stored in an Azure Storage account is using Microsoft Azure Storage Explorer.
thank you for help to understand the Azure
i get it
Hello, when I try to upload using a rest client I am getting error code 415 Unsupported Media Type. When I use the debugger it’s not even getting past this line: if (!Request.Content.IsMimeMultipartContent(“form-data”)).
These are my request headers if this helps at all:
Content-Type: multipart/form-data
Content-Length: 0
Is my rest client configured wrong? Or would there be another factor why I’m getting this error
Hey there! Are you sure that the file is in a format your server supports? What type is the file you are trying to upload? What REST client do you use? Can you try it using Postman as shown in the image above?
I was using advanced rest client but I have just tried it with postman like you suggested. I am still getting error 415 with content-length 0. I have followed your guide for the web api, but how would I allow my server to support the file being uploaded? Should I change something in my web.config?
You can check this project
https://github.com/ppolyzos/gab-demo-athens
And especially this file:
https://github.com/ppolyzos/gab-demo-athens/blob/master/src/GabDemo2016/Controllers/FileUploadController.cs
It’s not updated to latest asp.net core version but I think it might help you.
Ah, I was specifically using your example for the azure blob storage as that is what I’m using to store my files, but I will look into what you linked as well. Thank you!
I tried my code once again and it worked properly. However, If you have your code committed in a public repo, I could give it a look.
Thank you, that worked perfect!
Hi,
When I upload image to Azure, how can I show that picture later on my web app? Can I just load the image url in the page? On my app idea is that the users upload their images. So I need to track which user uploaded which image. I thought to do that with saving the image url in my database with the user’s info. Is that good idea?
When you upload an image or any other file in an Azure Storage Blob container this is publicly available, in case blob’s container policy is set to public. That means that, if you have uploaded your file using i.e. “image/jpg”, then using {storage_account_url}/{container}/{file} anyone can access the file.
If you want to track the uploaded images, you can use a private blob container and generate a SAS (Shared Access signature) whenever an image is requested. You can read more here.
Saving the image filename (i.e. guid) or filepath in a database is a good idea, as you can easily retrieve it from blob container storage using Azure Storage SDK.
I got the upload working fine! Thanks a lot!
I’m trying to do a resize before uploading and really struggling with it. Any advice for how to go about this?
Depends on the front-end stack you are working with. For example:
* for angular: (https://github.com/FBerthelot/angular-images-resizer)
* for react: (https://github.com/bamlab/react-native-image-resizer)
* for plain jQuery, you can have a look at this code (https://stackoverflow.com/questions/23945494/use-html5-to-resize-an-image-before-upload)
Nice article. Minor correction on the mime types: They should have “image/…” rather than “images/…”
Thank you very much! I updated the post.
Good Article!
but, i got some error when using your repo.
Unexpected end of MIME multipart stream. MIME multipart message is not complete.
i think it’s a kind of bugs in asp.net web api module.
Do you know how i can fix.
Are you using any `headers` in your request? Can you give it another try without specifying any headers, please?
OK. I got it.
It seems like a postman problem. I think postman does’t append Line break at the end of mime
everything is OK with fiddler.
Excellent Article! Learned a lot.Now I’ve got a clear view about the uploading blobs.
I’m trying to download a blob with an uploaded URL (which is Retrieved from DB) i.e, https://{storage_account_name}.blob.core.windows.net/{container}/{filename} using Web API calls.
But I’m not having any idea how it can be implemented in Web API also how can I able test those in POSTMAN?
Can you please provide some example for downloading which can easily merge with your code?
I would suggest you to read the following article Get started with Azure Blob storage using .NET and especially the section “Download Blobs”. It will guide you through the process.
Nice blog, thanks
Nice code, run successfully in first run.
Hi there,
First of all, great article, It’s more clearer than anything else I find in the internet on this topic.
Second, I’m trying to follow the steps, and currently up to using postman to test my api, however, no matter what I try, I’m getting a “Api key is invalid” error, I’m not sure where it’s coming from, would you be able to help me?
Thanks,
If I recall correctly Azure Storage API does not respond with “API key is invalid” mesage, even if your call is unauthorized. Are you sure Account name and key are correct? Do you get any error, in UploadFile method, when debugging your request? Can you please share your code to have a look at it, can you upload it in a GitHub repo or a gist snippet?
Good Article!
but, i got some error when using your repo.
Unexpected end of MIME multipart stream. MIME multipart message is not complete.
i think it’s a kind of bugs in asp.net web api module.
Do you know how i can fix. facing the issue with postman and fiddler both
Reply
Can you try removing the headers added by Postman to see if that fixes the issue?
Hi
Thanks for the code example. Is there a way to find out the size of the file before uploading to azure storage?
I want to allow up to 20 MB file. I initially thought using the IFormFile but that won’t scale.
Thanks.
You could use `.Length` property to get the file length in bytes.
Thanks for quick reply. Really appreciate your help.
When I do .length on the file stream i get 0 as length.
Here is the code i am using.
var boundary = GetBoundary(Request.ContentType);
var reader = new MultipartReader(boundary, Request.Body, 80 * 1024);
var valuesByKey = new Dictionary();
MultipartSection section;
while ((section = await reader.ReadNextSectionAsync()) != null)
{
var contentDispo = section.GetContentDispositionHeader();
// reads the file part of the multipart request
if (contentDispo.IsFileDisposition())
{
var fileSection = section.AsFileSection();
var test = fileSection.FileStream.Length; this returns 0 i am expecting it to return file size.
Is also the `Position` set to 0?
Yep position is 0 as well.
Tried everything can’t get the length of the file via file section. I am now using the content length of the entire request as my file size. The only downside is that this request also include other form fields which contribute to the size of the reqeust. not ideal but does the work. If you do find a way to determine file size please do reply.
here is what i am using.
var contentLength = Request.ContentLength;
Can you have a look at this doc as well (https://docs.microsoft.com/en-us/aspnet/core/mvc/models/file-uploads?view=aspnetcore-2.2)?
Great article. Thanks for help!