In this tutorial we are going to map a network drive on our computer to a file storage in the cloud using Azure File Storage. This can be very helpful if you want to share files among multiple computers and, bearing in mind that the storage is in the cloud, you can scale your drive as much as you need.
First of all, let’s start with the basics and learn some things about Azure Storage.
What is Azure Storage?
Azure Storage is the cloud storage solution for modern applications that rely on durability, availability and scalability. You can store as much data as you want and use it in many different ways based on the usage scenario you are interested in. It is accessible from anywhere in the world, from any type of application, whether it’s running on the cloud, on the desktop, on an on-premises server, or on a mobile or tablet device.
Azure Storage provides four services:
- Blob Storage stores unstructured object data. A blob can be any type of text or binary data, such as a document, a media file, or an application installer. Blob storage is also referred to as Object storage.
- Table Storage stores structured datasets. Table storage is a NoSQL key-attribute data store, which allows for rapid development and fast access to large quantities of data.
- Queue Storage provides reliable messaging for workflow processing and for communication between components of cloud services.
- File Storage, which we are going to use in this post, offers shared storage for legacy applications using the standard SMB protocol. Azure virtual machines and cloud services can share file data across application components via mounted shares, and on-premises applications can access file data in a share via the File service REST API.
For more information on Azure Storage you can start from this introductory article.
What is File Storage?
Azure File storage is a service that offers file shares in the cloud using the standard Server Message Block (SMB) Protocol (SMB 2.1 or SMB 3.0). You can mount a File Storage share to access file data, just as you would mount a typical SMB share. There is no limitation to the number of computers or roles that can mount and access the File storage share simultaneously. While in the cloud, you can scale as much as you want based on your needs.
File Storage contains the following components:
- Storage account that provides access to Azure Storage.
- Share which is an SMB file share in Azure. All directories and files must be created in a parent share. An account can contain an unlimited number of shares, and a share can store an unlimited number of files, up to the 5 TB total capacity of the file share.
- Directory which is nothing more than an optional hierarchy of directories.
- File that stands for the actual file and that can be up to 1 TB in size.
For more info on Azure File Storage you can start here.
Create Storage Account
First of all you need to create a storage account that will give you access to the File Storage service that you are going to use. You can do that through the Azure portal:

To create a new Storage Account you need to follow the steps below:
- specify a Name, which shall be unique across all storage account names in Azure,
- select the deployment model; for new applications, Resource Manager is a better choice as it provides more benefits,
- choose between standard and premium performance; in our case standard is better, as data is stored in magnetic drives and it provides lower costs per GB,
- select the replication strategy that matches your durability requirements, in our case Locally-Redundant Storage (LRS) replicates data within the region in which you created your storage account by creating 3 copies on separate nodes,
- create a new or use an existing resource group to group your resources and
- select the location of the datacenter where your storage account should be created on and click create.
Create File Storage
After your Azure Storage Account is created you need to create a File Share. From the storage account you have previously created, select Files and add a new File Service. Name your service and set a Quota in GB, to limit the total size of files on the share.
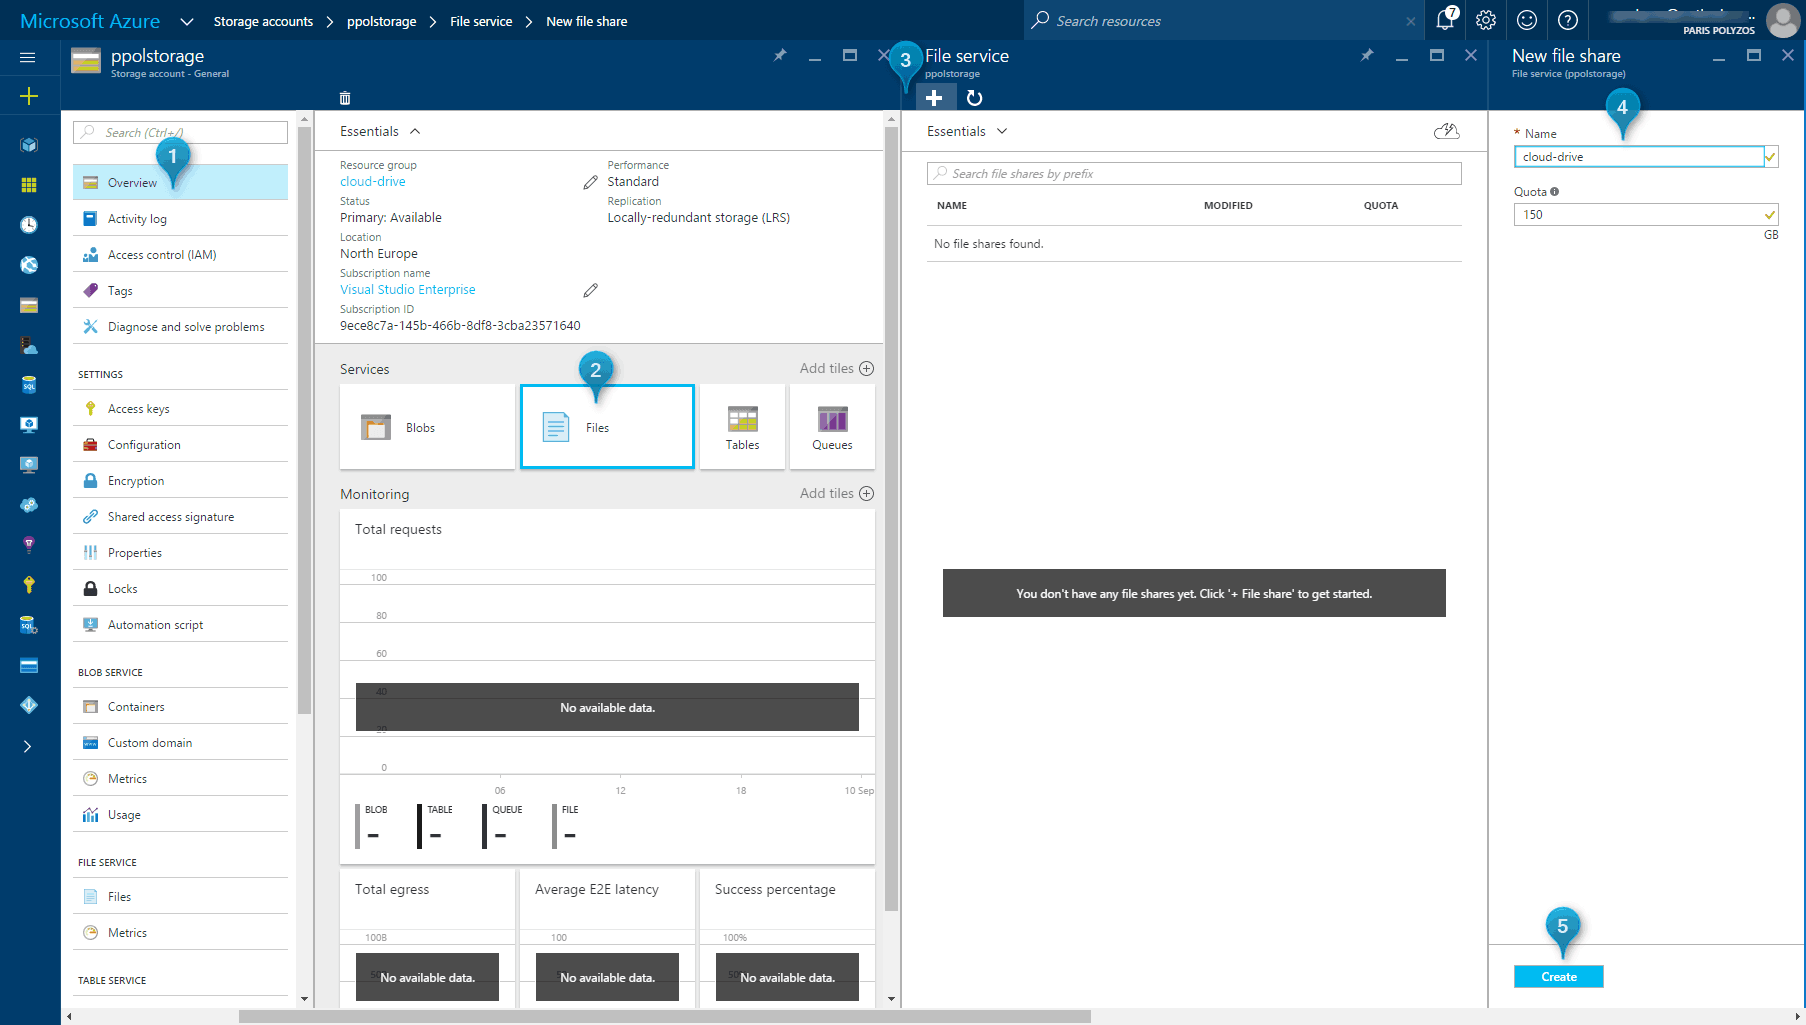
Note that you can change quota whenever you want and scale your drive based on your needs.
Map Network Drive
Now that your file share is created, you can map it as a network drive in your computer. You can achieve that in many ways but for all of them you are going to need three things:
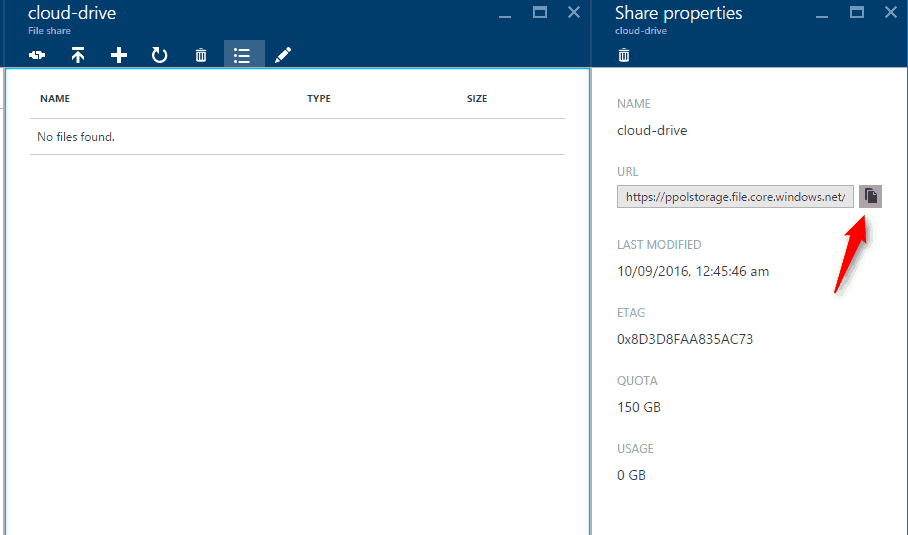
- The url for your share which can be found if you click on the properties button on your file share toolbar:

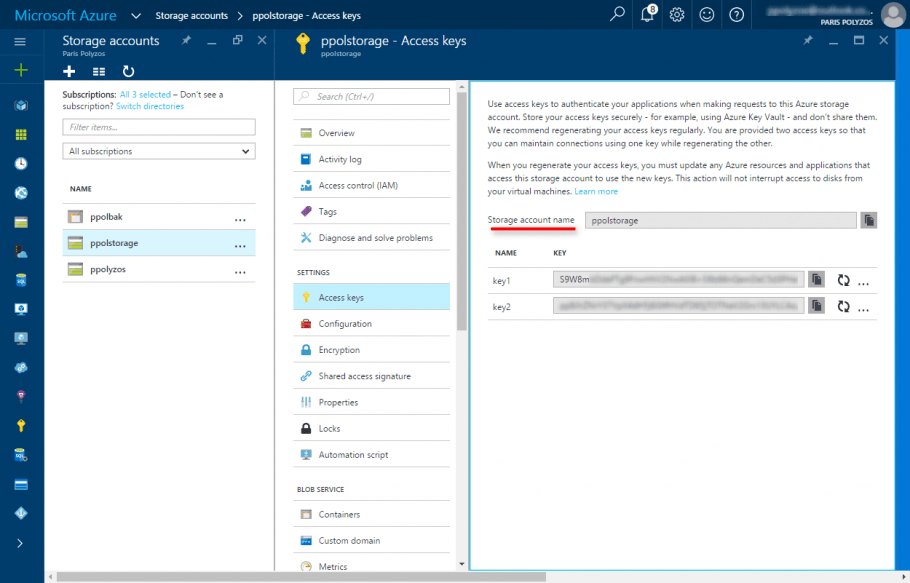
Note that you should changehttps://to\\in order to mount the file share. - The storage account name and the storage account key to allow access to your file share:

Map network drive in Linux
To connect to this file share from a Linux computer, run this command:
$ sudo mount -t cifs //ppolstorage.file.core.windows.net/cloud-drive [mount point]
  -o vers=3.0,username=ppolstorage,password=[storage account access key],dir_mode=0777,file_mode=0777
Map network drive in Windows
Using Command Line
To connect to this file share from a Windows computer, run this command:
$ net use [drive letter] \\ppolstorage.file.core.windows.net\cloud-drive
  /u: [storage account access key]
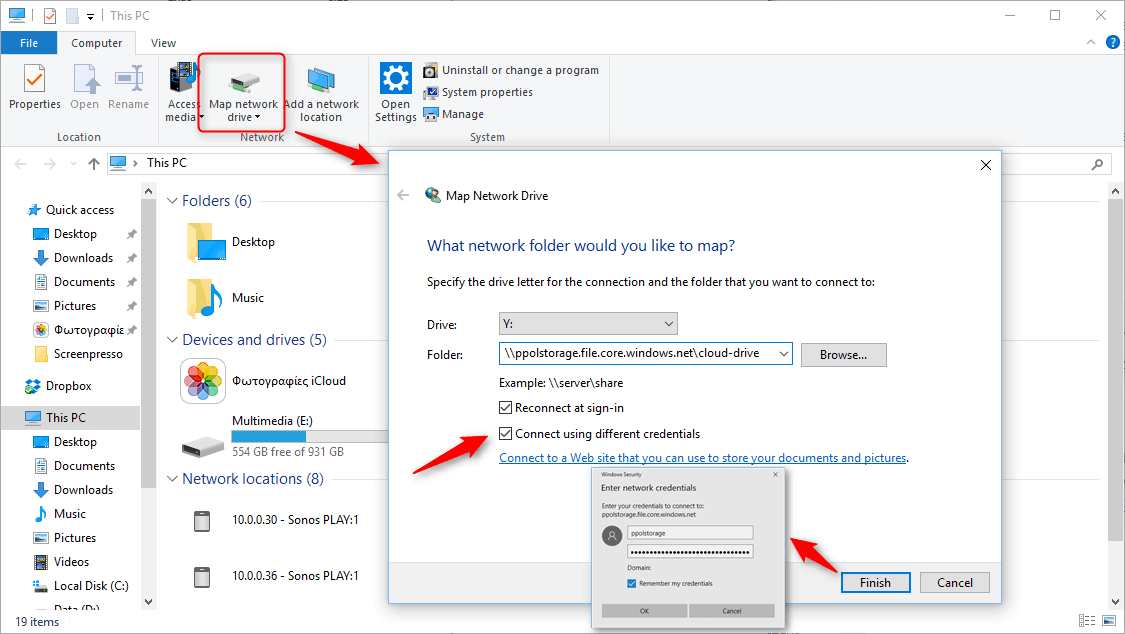
Using Windows Explorer
Open your Windows Explorer and from File click on Map network drive. Select the drive letter to use, specify the folder and be sure to check the Connect using different credentials. When you click Finish a security popup will appear where you shall specify:
- storage account name as username and
- storage account key as password
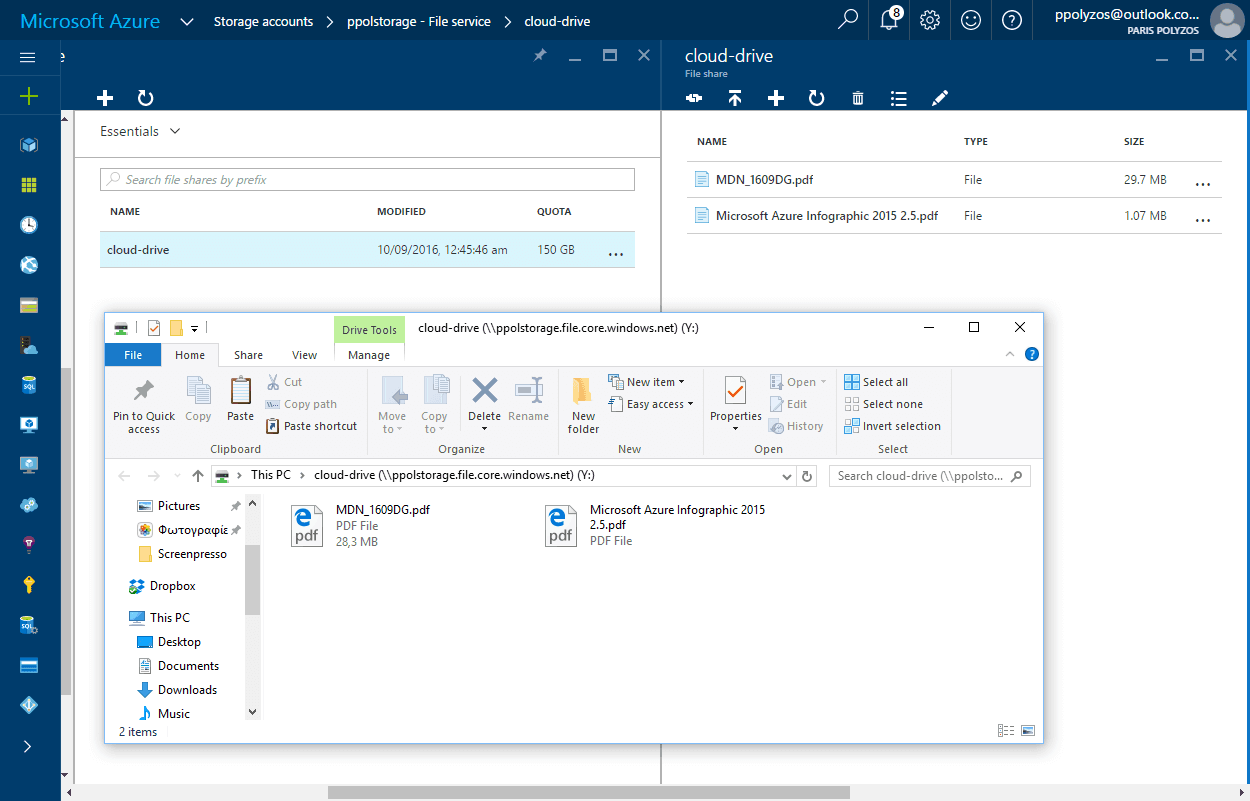
Now you can drag’n’drop files in your new network drive, which will automatically appear in Azure Portal and in all connected devices.
I have used the ‘net use’ command line version to setup the folder mapping to the Azure file storage.
Are the account details passed securely from the local machine to Azure ?
The connection between local machine and Azure is encrypted.

If you use a program like Fiddler to monitor requests and traffic from your local machine to the outside world, you can see that the details are exchanged using NTLMSSP_AUTH.
Accessing from a network where there is a domain, How do I indicate no domain or perhaps it should be local? It’s not working. Any suggestions?
Also, I have two keys — either key should work, correct?
I am not sure I quite understand the first part of your question. The credentials you are using to connect to your storage account is the Storage account name and one of the keys.
As for the second question, the answer is yes, either key should work. It is considered as best practice, to use everywhere one of the keys, ie. the Primary, and in case any security issue happens you can use the Secondary and update the other one avoiding any service interruption.
Sorry — for my first question my default domain is “company”. So, when I enter something in the box it assumes “company\username”. I need to just get username in there but it automatically adds the “company” domain.
So, the question is how to do indicate to the dialog that i just want “username”. I think \username (start with the backslash) does it but am not sure. I discovered this after posting the original comment.
The pattern is `\`, so using `\username` you ‘ll be fine in your case.
I am not sure if this is still valid. In my case I had to specify the domain explicitly, which I could take from command line instructions (AZURE\myname).
I forgot. Great post with clear explanation. Thanks for sharing
I have mapped network drive in windows successfully. But I am not able to open the shared drive from network:
For example if i type \\abc.file.core.windows.net i am getting access denied error while if i do something like : Z:\, explorer is able to open this. (Z is my mapped drive name). Can you explain me reasons for this scenario?
Secondly, i am able to create folder in this drive but when one of my applications uses this drive it is not able to create folder.
Any help would be appreciated.
Thanks.
I don’t think accessing network drive through `\\abc.file.core.windows.net` is possible. Mapped network drive allows you to authorize access and use SMB for communication.
As for the second part, it depends on the type of your application. You need to check if you have the right permissions to write files and folders in your network drive, based on the user the application is using. Have a look at your exception logs to find out more. In addition, you can try to run your app as administrator and see if this still happens.
Thanks for the reply.
For the second part, my application runs via a windows service with LocalSystem account and i have mapped the network drive using net use command from the same account with which user is logged in. Can there be a permission issue then? In logs i am getting only could not create folder error not the exact cause.
P.S : I am able to create folder manually in mapped drive and also via command line. Problem occurs only when i run my application with windows service.
Thanks
I don’t think LocalSystem account has access to write files on a network drive, as a Windows service runs under Local Service with minimum privileges on the local computer.
Have a look at this article (haven’t try it myself), it says that you can alter permissions of a certain folder using the AfterInstall event when setting up your service.
Please let me know, if this actually works.
This article needs me to make changes in my code which currently is not possible for me. After a little bit of searching i found out that we can use mapped drive in windows service by creating a symbolic link for that drive using command :mklink /D c:\docs \\mappeddrive\docs
It works for me for a mapped drive shared at any system in my domain but it’s not working for Azure File Storage.
I don’t know exactly your use case scenario, but wouldn’t it be easier if you upload your files through File Service Rest Api?
Hi there,
This will definitely suit some use cases we have but we want to know if the file share can be made read only? Essentially, we want to make the share an archive in the cloud but will never want to create new files in it.
Thanks,
Mark
There is a plan for Azure Active Directory integration to Azure File Service, for cases like yours, but at the moment this is not possible. You can have a look here and upvote.
Hi Guys,
My aim is multiple VMs will read the configuration files or web apps from same file share or location. I am trying to install Windows Services for Apache Web Server and Tomcat Application from azure file share. I installed the services, as you guys mentioned earlier, it doesn’t work with Local System account. And I changed service account to Local Admin Account and i am still getting same error message. When I run Apache or Tomcat with command prompt from file share it works fine. is there any way to run services where their actual exe files are in file share. I presumably It is much easier implementing it on Linux System.
Is it possible to connect to \\storagename.blob.core.windows.net\container? I have the key as well. I was able to get to my container using Microsoft Azure Storage Explorer but when I want to map the network drive on my machine, I keep getting unable to connect. It does look like it tries to connect to the container but comes back to enter the credentials again and again. Also, I do see a Domain selected already i.e. my company which I can’t seem to get rid of even if I try entering a different network credentials. What am I doing wrong here? Any help would be greatly appreciated.
Sid
Can you please try `\username` when you try to connect?
Do you mean on the network credentials where I enter Storage Account name and key, do you want me to tack on “\” infront of the storage account name? I tried that but getting the same thing.
When it requests for your credentials, please try `\{storage_account_name}` to avoid passing Domain\{storage_account_name} as username.
I tried that Username: \storageaccount with the key and it comes back to the same thing. I will keep trying, not sure if there is anything else I need to do.
Apparently, you can’t map to Azure Blob Storage account containers as they do not provide a SMB (Server Message Block) protocol which is a network file sharing protocol. I am going to set up a new storage account of type Storage where I can then use the file services to store all the files. I then should be able to create the network map like you have shown up here which should be pretty straightforward. Thank You!!
Sid
Indeed, mapping to Azure Blob Storage is not possible. Azure File Storage is the one that supports SMB for this kind of operation. I misunderstood that you were talking about Blob storage on your first question.
Do you have any recommendations for Azure File Storage backup?
Can you provide some more details on what you are looking for?
Sorry if that was a little vague. I’m aware LRS and GRS will ensure the safety of the data – but is there a way of making scheduled backups of the files to protect against issues like accidental deletion?
Thanks.
It depends on your needs.
If you want to backup a website hosted in azure you can use App Service Backups.
If you want to backup files hosted in your NAS, you can use Azure Cool Storage (for long-term backups, previous article), or in Azure Storage account. If you want to keep multiple versions of them you can use a tool that daily gets backup.
Storage Account, in general, is a good solution to backup files. If I only want to have a copy of my files in case of accidental deletion I would prefer LRS as the cheapest solution. The difference between LRS and GRS, is that with GRS, if there is a failure at the primary region, Azure storage will failover to the secondary region, so that your files are immediately accessible.
On the other side, there is also Azure Backup which is convenient for more demanding uses.
Hope I helped you.
I have opened outbound 445 on my Fortigate and I am trying both from the command line and Windows explorer. I am passing \username and the key. I get the error “network path not found”. What else should I be looking for?
Never mind. AT&T fiber blocks 445. It can’t be opened. Ever. Period. So… thanks for that, AT&T.
That’s a pitty. Have you tried this solution described here. Not sure if it helps but you can give it a try.
To what are you referring? Which solution? Did you intend to add a link? Otherwise, I was following the instructions in this post for mapping a network drive.
I added a link to stackoverflow in “here”. http://stackoverflow.com/questions/34651089/can-i-mount-azure-files-storage-from-my-local-workstation
I have a S2S VPN to my Azure VNet. Is there a way to go through my VPN to Azure file storage?
It might work with the right routing. Can you add a route for your Azure File share ip, pointing to your VPN gateway?
Hi Polyzos,
We are ruuning a windows 2012 r2 Vm on Azure and Although I am able to map the share as drive , when an application is trying to access the contents we are getting the following error:
Cannot access the Hot Folder directory ‘\\mystorage.file.core.windows.net\main
The service of the application runs with the same active directory credentials that we used to map the network drive.
I have also tried to create a symbolink link and although I am able to access the content using Windows Explorers , my application still can not access .
I have tried to use UNC and also the drive letter. Same Results.
So It seems that windows can Access the storage but this is not happening also to our apps.
Any ideas?
Many thanks in advance.
Many Thanks
Although I am not sure what you mean with Hot Folder I think you refer to the issue found on this link, in the section (“Application or service cannot access mounted Azure Files drive”).
In addition, Active Directory-based authentication currently is not supported by File storage.
In order to access Azure File Storage you may use Client Libraries, REST API or Powershell and AzCopy is also supported in case you need to transfer large number of files.
What I would suggest is saving your files, temporarily, in a directory where your application has access to and then create a batch job that uses AzCopy or powershell to transfer these files to Azure.
You can have a look at this example and Search for “Synchronously copy files”.
Hope I helped.
Here is the case for me….
When I tried with in Azure (My VM is on Azure and My Storage account is also on the same region) with SMB 3.0, I have been getting mount errors. But when I changed the SMB Version to 2.1, it got succeed. See Below with Examples
Eg:
Failing Command (with SMB 3.0 version) with in Azure
sudo mount -t cifs //storageaccountname.file.core.windows.net/shared /mnt/mount -o vers=3.0,username=xxxxxxx,password=xxxxxxxx,dir_mode=0777,file_mode=0777
Result:
mount error(11): Resource temporarily unavailable Refer to the mount.cifs(8) manual page (e.g. man mount.cifs)
Working Command (with SMB 2.1 version) with in Azure
sudo mount -t cifs //storageaccountname.file.core.windows.net/shared /mnt/mount -o vers=2.1,username=xxxxxxx,password=xxxxxxxx,dir_mode=0777,file_mode=0777
Result:
It got mounted successfully
Not sure why this is happening, but you could have a look at this tool to give you more insights.
Every time we reboot our computers the mapped drives disconnect and then we get a message
An error occurred while reconnecting [DRIVELETTER]: to \\[FILESTORAGE].file.core.windows.net\[CONTAINER]
Microsoft windows network: multiple connections to a server or shared resource by the same user, using more than one username, are not allowed. Disconnect all previous connection to the server or shared resource and try again.
This connection has not been restored.
We reenter the key and all is well. How do we prevent this?
One way to solve this is by persisting connections to Azure File Storage. You can follow this guide for more info.
I can get this to work everytime in Windows 10. But not on any windows 7 devices.
it seems related to SMB protocal not being installed or enabled. I have tried enabling via registry, but the SMB 1.0/CIFS file sharing never shows up under Windows features.
how can I get our windows 7 pcs\ laptops connected to Azure File shares.
In order to mount an Azure File share outside of the Azure region it is hosted in, such as on-premises or in a different Azure region, the OS must support SMB 3.0. +
According to the table found here, things are not very promising for Windows 7 devices.
I am seeing that as well.
thank you.
Hi,
I have one query.I am uploading files to azure file storage from my web application.I am able to do it successfully, while running the application on my local.But i am not upload files after deployment of my application on iis.My application is unable to create share for the root directory of azure file storage, after deployment.
Could you please help me out with the solution. I don’t want to do it by mounting its drive on to my server.
Do i need to perform some settings on IIS for azure file storage access?
Thanks in advance.
I would suggest you, instead of using Azure File Storage, to try Azure blob storage to upload and retrieve files. You can have a look at this tutorial here.
Otherwise you can have a look at this tutorial on how to add Azure File Storage to your IIS.
Hello,
Thanks for the article. Sorry for joining you so late in your blog. Which of the 4 storage types would you recommend for file/folder and VM image backups?
Thanks
It depends on how often do you need to access those backups.
Hot storage has higher storage costs than cool and archive storage, but the lowest access costs.
Cool storage tier has lower storage costs and higher access costs compared to hot storage.
Archive storage has the lowest storage cost and higher data retrieval costs compared to hot and cool storage.
Can we trigger Azure Function after user uploads file on Azure File Storage ?
Yes, you can! You can create an Azure Function that is triggered by a change (eg. upload) in Azure Blob Storage.
For a step-by-step guide, you can read this tutorial https://docs.microsoft.com/en-us/azure/azure-functions/functions-create-storage-blob-triggered-function
Hello,
Any way to know how many mapped unit are connected to the storage account?
Thanks in advance.
You can use `Azure Storage Metrics` to analyze usage. Please, visit Azure Storage metrics in Azure Monitor and using access metrics SDK you can get the info you are looking for.
Thanks, I saw that, but there is no metrics to know how many computers are conected to a single share for example. Only number of shares, quota, capacity, etc. Thank for your reply.
Sorry for asking again, your post is very useful. Is there any way to rename a File Share? Throught API, REST or Azure function? I only can find that is necessary to create a new one and delete the old, so the files will be deleted
You can do it through Azure Storage Explorer

Ok, I guess manually It’s the only solution right now. Thanks
i read all the comment but while enter the credentials it is not working
could you please advice for the same
It’s possible that you have placed some restrictions on certain IPs or you need to open a firewall port based on your needs. This link may help you https://docs.microsoft.com/en-us/azure/storage/files/storage-files-faq
Hi,
Thanks for useful info.
I have a new SQL virtual machine in Azure. Just wondering is it possible
to share folder from this vm’s c: -drive and access it from local pc?
Just like you can do with Storage account.
As Azure VMs, and VMs in general, are ephemeral I would suggest to attach a disk to your VM (https://docs.microsoft.com/en-us/azure/virtual-machines/windows/attach-managed-disk-portal) and not use the c: drive for data that you want to keep. Not entirely sure if what you ask is possible but I guess it would require a VPN so that both your local PC and VM would be at the same network and one can access the resources (disk) from the other.
Great post. Very clear explanation and it worked (after I realized that in the url not only https:// must be replaced by \\ but also at the end /sharename by \sharename; my bad 🙂 ).
Thanks a lot