In this post we are going to explore what we need in order to setup a local environment for our Azure Functions implementation, and how we can easily update our Azure Functions App through GitHub, using continuous integrations.
Let’s start with some details about Azure Functions.
What is Azure Functions?
Azure Functions is a serverless event-driven experience that extends the existing Azure App Service platform; serverless computing shall mean a cloud computing code execution model in which the cloud provider fully manages starting and stopping virtual machines as necessary to serve requests. Those requests are billed by an abstract measure of the resources required to satisfy the request, rather than per virtual machine, per hour.
The “Functions” programming model, on which Azure Functions are based, resides on three basic principles:
- Each Function should be considered as a unit of work;
- Functions start, execute their logic and finish;
- Functions have inputs and outputs.
Azure Functions is a great solution for processing data, integrating systems, building simple APIs and microservices. It is an ideal service to use when you have tasks like image, text or order processing, long-running tasks in a background thread or scheduled tasks.
It supports triggers, which are ways to start execution of your code, and bindings, which are ways to simplify coding for input and output data.
For more info please read the official documentation on Azure website.
Create Azure Functions app
Creating an Azure Functions app is very simple. Go to Azure portal, click on New and then from Compute category select Function App, and fill the form details.

Key things to note
- App Service plan provides two options, Classic and Dynamic:
In the classic service plan your functions will run on a dedicated VM, just like web apps work for Basic, Standard, or Premium SKUs. This is a good option if you have existing, under-utilized VMs that are already running other code, or if you expect to run functions continuously or almost continuously.In the dynamic service plan your function apps will be assigned to a function app instance. If needed, more instances will be added dynamically. Those instances can span across multiple computing resources, making the most out of the available Azure infrastructure. Moreover, your functions will run in parallel minimizing the total time needed to process requests. - Memory tier allows you to specify the amount of memory required to run your functions in the Function App. The selected memory size corresponds to the Working Set needed by all the functions that are part of your function app.
Setup Local Environment
Although Azure Functions provide a very powerful environment in the Azure portal that allows you to easily start playing around with your functions, setting up a local environment to work will help you better understand what is going on behind all this magic.
Let’s start by installing some tools that will help you get started.
Yeoman and Azure Functions generator
Yeoman is an alternative way to start with Azure functions as a scaffolding tool that allows you to kickstart new projects through a generator system.
To install it type in your command prompt:
> npm install -g yo
> npm install -g generator-azurefunctions
Then generate your new Azure Functions project:
yo azurefunctions
AzureFunctions CLI
Azure Function CLI provides a command line interface to initialize, create and run Azure functions locally.
To install it type in your command prompt:
> npm i -g azurefunctions
Note: `-g` is used to install this package globally.
Create new function app
Create a new folder for your app; let’s call it `funcappdemo` and initialize it:
> mkdir funcappdemo
> cd funcappdemo
> func init
When you type func init you see that a new git repository is initialized and three files are generated:
- .gitignore, which is used by Git to determine which files and directories to ignore, before you make a commit
- .secrets, that allows you to store securely secrets like passwords, connections strings, etc. for your app
- host.json, a metadata file that contains the global configuration options affecting all functions. The Script runtime will map these settings into their corresponding WebJobs SDK JobHostConfiguration settings when initializing the host.
Create an HttpTrigger function using yeoman
In your command prompt type:
yo azurefunctions
a geeky ui will come up helping you decide, out of all available templates and languages, which is the one you interested in:
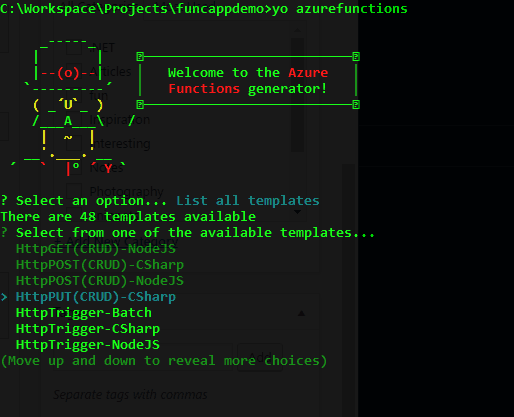
To keep things simple select HttpTrigger-CSharp function, give a name like `hello` and press enter.
A new folder, named `hello`, will be created with two important files `function.json` and run.csx.
The `function.json` file contains a configuration specific to a function, including its bindings. The runtime reads this file to determine which events to trigger off, or which data to include when calling the function, and where to send data passed along from the function itself.
{
    "disabled": false,
    "bindings": [
        {
            "authLevel": "function",
            "name": "req",
            "type": "httpTrigger",
            "direction": "in"
        },
        {
            "name": "res",
            "type": "http",
            "direction": "out"
        }
    ]
}
- `disabled` property if set to true will prevent your function from running in the runtime
- `bindings` allows you to configure both triggers and bindings. In this case the function we just created will be triggered by an HTTP request called `req` and the output will also be an HTTP request under name `res`. Whether the binding is for receiving data into the function or sending data from the function is indicated by the `direction` property
The run.csx contains the code for your function. You include any assembly references and namespaces you need up top and instead of wrapping everything in a namespace and class, you can just define your Run method.
using System.Net;

public static async Task<HttpResponseMessage> Run(HttpRequestMessage req, TraceWriter log)
{
    log.Info($"C# HTTP trigger function processed a request. RequestUri={req.RequestUri}");

    // parse query parameter
    string name = req.GetQueryNameValuePairs()
        .FirstOrDefault(q => string.Compare(q.Key, "name", true) == 0)
        .Value;

    // Get request body
    dynamic data = await req.Content.ReadAsAsync<object>();

    // Set name to query string or body data
    name = name ?? data?.name;

    return name == null
        ? req.CreateResponse(HttpStatusCode.BadRequest, "Please pass a name on the query string or in the request body")
        : req.CreateResponse(HttpStatusCode.OK, "Hello " + name);
}
The logic of this function is very simple. If you call it with a `name` parameter, the response will be a string saying “Hello + {name}”.
Test locally
To test it locally, you need to launch a server locally. To do so type in your command prompt:
func web -p 9090 -n
The -p is used to set the port you want your server to use and the -n is for the server to not use SSL.
C:\Workspace\Projects\funcappdemo>func web -p 9090 -n
Listening on http://localhost:9090
Hit CTRL-C to exit...
Debugger listening on [::]:31784

Found the following functions:
Host.Functions.hello
Job host started

Executing: 'Functions.hello' - Reason: 'This function was programmatically called via the host APIs.'
C# HTTP trigger function processed a request. RequestUri=http://localhost:9090/api/hello?name=paris
Executed: 'Functions.hello' (Succeeded)
Now you can call you function using the url: `http://localhost:9090/api/hello?name=paris`
Note: Every function usually has its own folder. The folder name is also the name of the function to call. So the structure for url is: `http://{server_endpoint}/api/{folder_name}?{parameters}`
Local Server Info
The server you have recently launched provides an endpoint url with details like scriptPath, logPath, processId and more.
If you type: `http://localhost:9090/admin/host/status` you will get the following JSON response:
{
  "version": "1.0.0.0",
  "webHostSettings": {
    "isSelfHost": true,
    "scriptPath": "C:\\Workspace\\Projects\\funcappdemo",
    "logPath": "C:\\Users\\ppoly\\AppData\\Local\\Temp\\LogFiles\\Application\\Functions",
    "secretsPath": "C:\\Workspace\\Projects\\funcappdemo\\secrets\\functions\\secrets",
    "nodeDebugPort": 31761
  },
  "processId": 9336
}
Functions App continuous deployment through GitHub
In this step we will configure your function app to watch a GitHub repository and, whenever a new commit happens, your function app should refresh its content based on the new changes. Go to https://github.com/new and create a new repository.
Commit your code and sync it with your GitHub repository:
git init
git add *
git commit -m "AzureFunctions Demo"
git remote add origin https://github.com/ppolyzos/funcappdemo.git
git push -u origin master
Note: Azure provides also a lot of other options to setup continuous integration like Bitbucket, Dropbox, OneDrive, Local Git Repository, Visual Studio Team Services. In order to keep things simple, you may use GitHub as it is really easy to start with.
Now that your code is on GitHub, you may connect it with Azure Functions app.
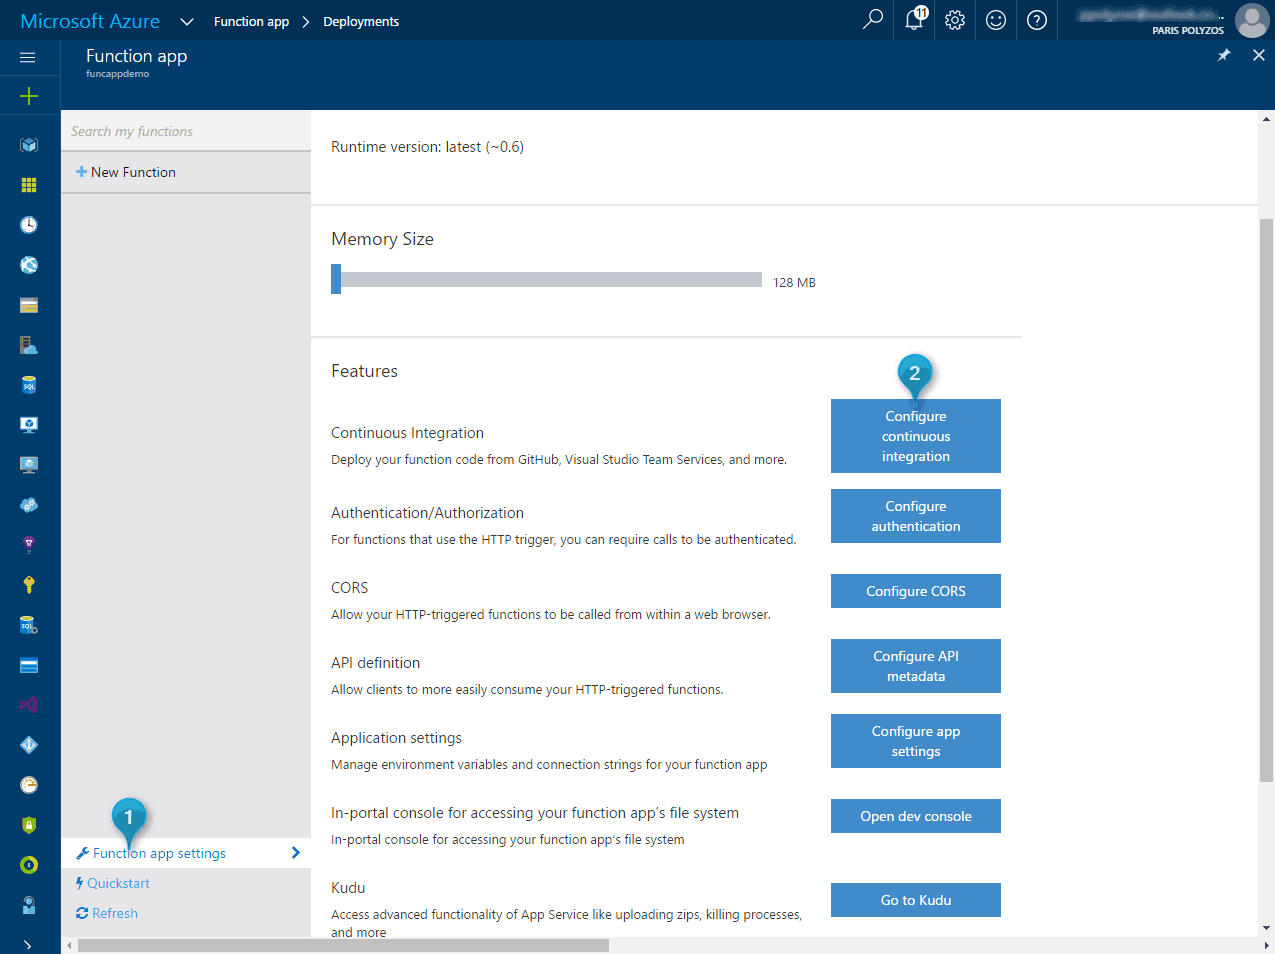
From Azure Portal click on Function app settings and then click on Configure Continuous integration button.
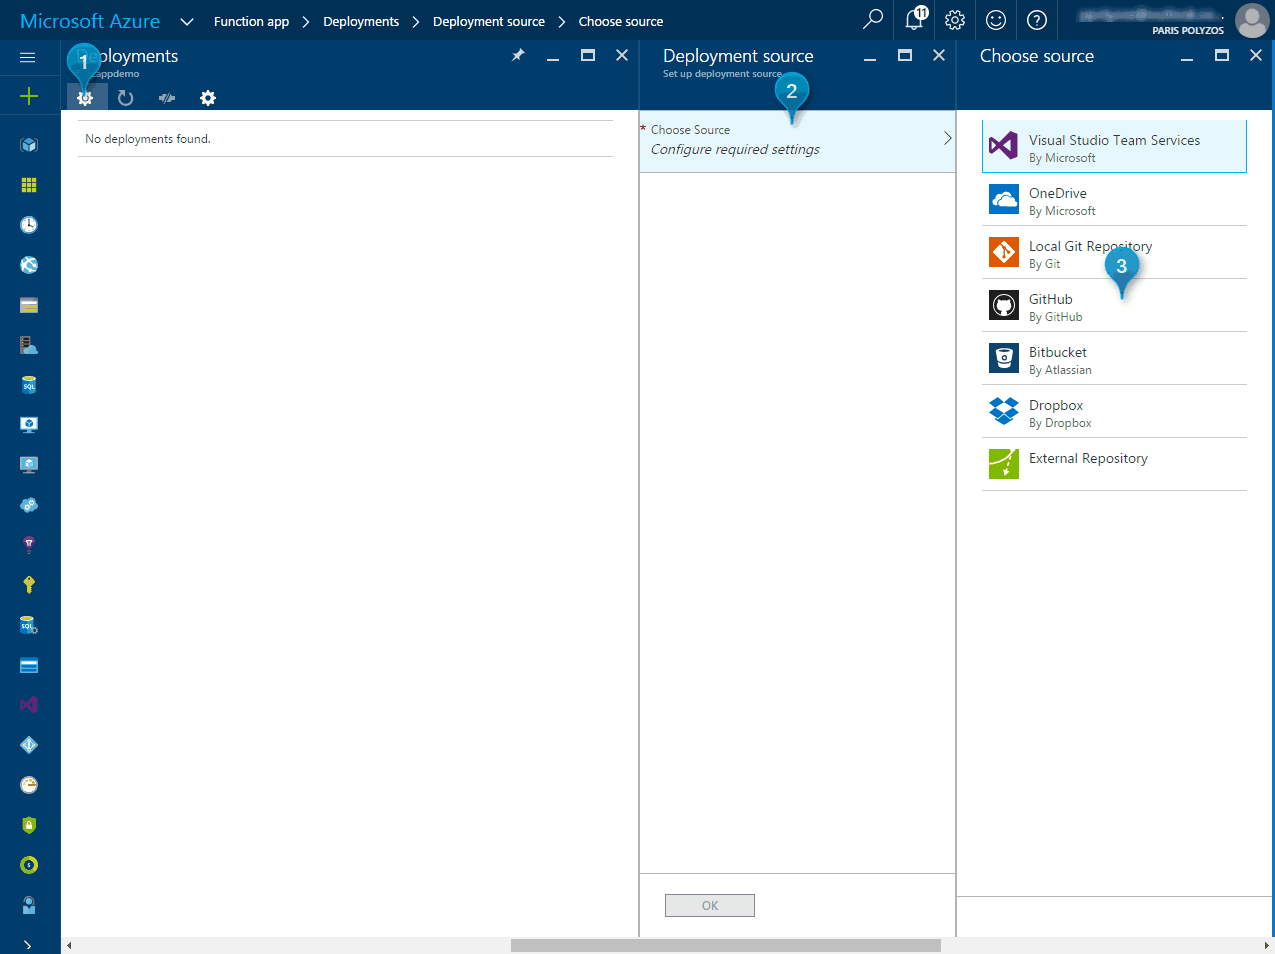
On the next blade, click on Setup icon at the top, and from the available Sources select GitHub.
Authorize Azure to access your GitHub repository, select project and master as branch and click OK. Subsequently, your code will be fetched and will be deployed to your Functions app if no error occurs.
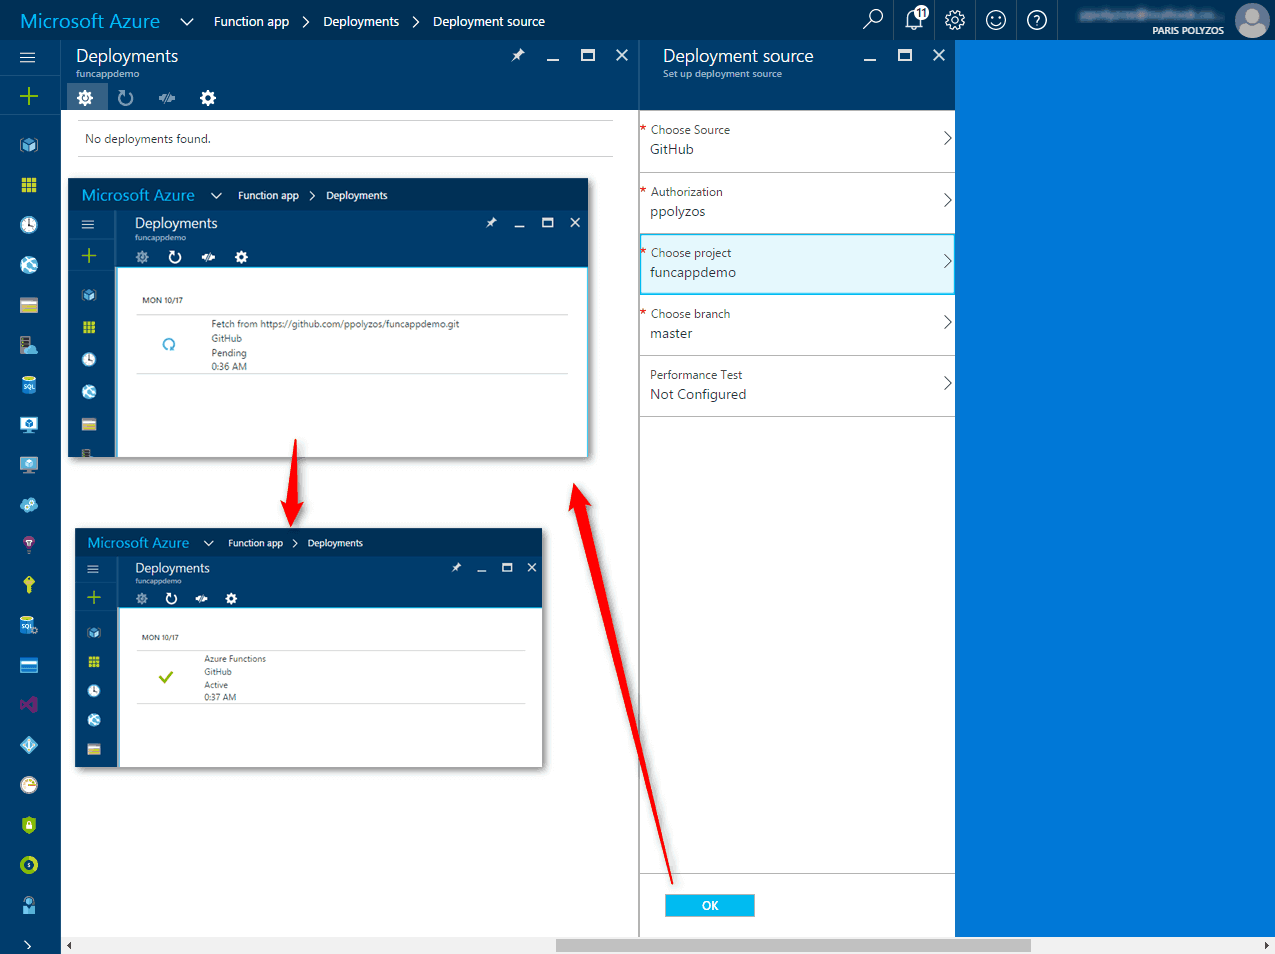
Finally, if you click the Refresh icon at the bottom right, your function will appear on the sidebar and you will be able to view the code, in read-only mode, as well as logs from the inside of the Azure portal.
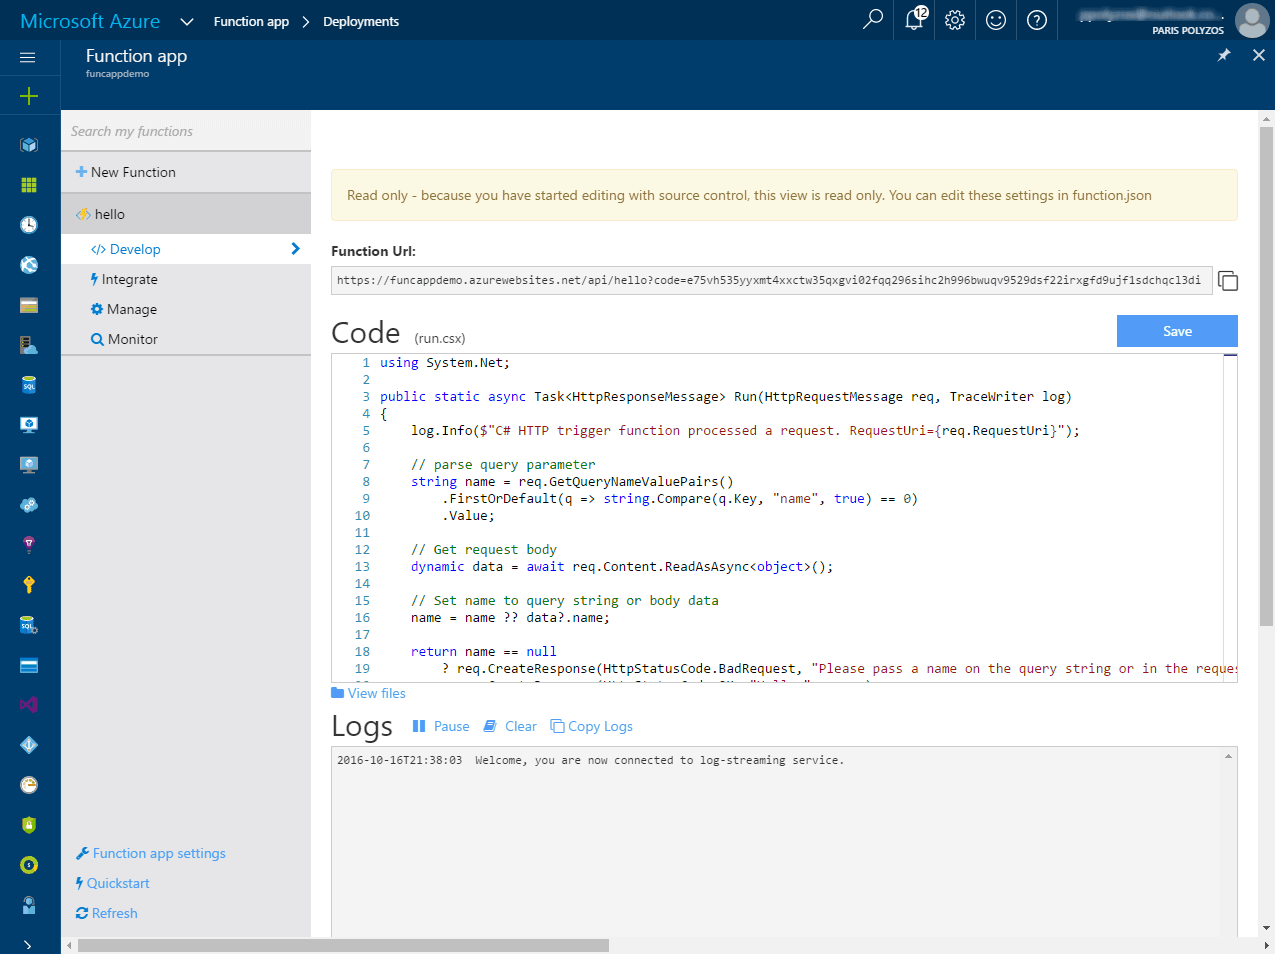
Your function will have a new url, with a code parameter for security reasons, but you will be able to call it just like you did locally.